實驗 09:發佈並訂閱事件方格事件
Microsoft Azure 使用者介面
基於 Microsoft 雲端工具的動態性質,您可能會遇到在本訓練內容開發後變更的 Azure UI。 因此,實驗指示可能無法正確對應實驗步驟。
當社群提醒 Microsoft 需要做修改時,我們會更新此訓練課程。 然而,雲端更新經常發生,所以您可能會在此訓練內容更新前遇到 UI 的變更。 如果發生這種情況,請適應變更,然後視需要在實驗中調整。
指示
在您開始使用 Intune 之前
登入實驗室環境
使用下列認證登入您的 Windows 11 虛擬機器 (VM):
- 使用者名稱:
Admin - 密碼:
Pa55w.rd
注意:您的講師會提供連線至虛擬實驗室環境的指示。
檢閱已安裝的應用程式
尋找 Windows 11 桌面上的工作列。 工作列包含此次實驗中會用到的應用程式圖示,包括:
- Microsoft Edge
- Microsoft Visual Studio Code
實驗情境
在本實驗中,您將從容器中裝載的概念證明 Web 應用程式開始,該應用程式將用於訂閱您的事件方格。 此應用程式可讓您提交事件,並接收事件成功的確認訊息。
架構圖
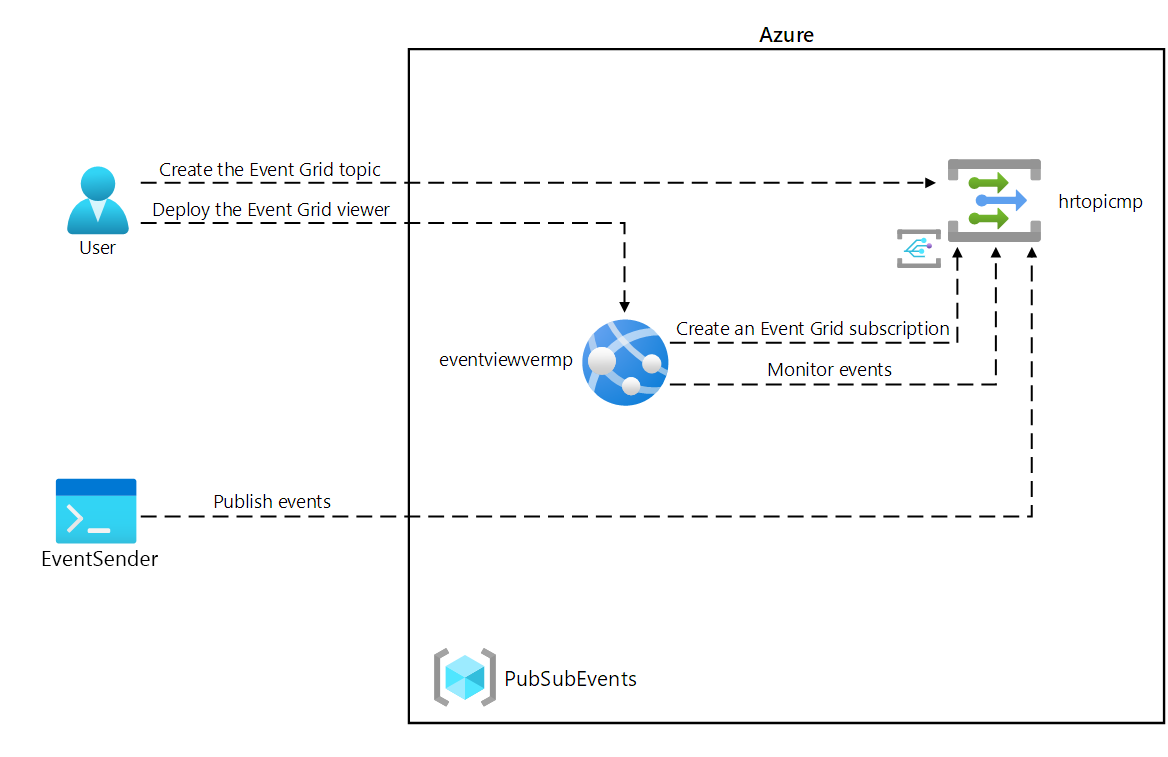
練習 1:建立 Azure 資源
工作 1:開啟 Azure 入口網站
-
在工作列上,選取 Microsoft Edge 圖示。
-
在開啟的瀏覽器視窗中,瀏覽至 Azure 入口網站 (
https://portal.azure.com),然後登入您在此實驗要用的帳戶。注意:如果這是您第一次登入 Azure 入口網站,系統會提供入口網站的導覽。 選取 [開始使用] 跳過導覽,並開始使用入口網站。
工作 2:開啟 Azure Cloud Shell
-
在 Azure 入口網站中,選取 [Cloud Shell]** 圖示
 ,開啟 Cloud Shell。 如果 Cloud Shell 預設為 PowerShell 工作階段,請選取 [Cloud Shell]** 選單中的 [切換至 Bash]**,然後選取 [確認]**。
注意:Cloud Shell 圖示以大於符號 (>) 和底線字元 (_) 表示。
如果這是您第一次啟動 Cloud Shell ,您將會看到 開始使用 提示。 選取 [不需要記憶體帳戶],然後選取 [ 套用]。
-
在 Azure 入口網站的 Cloud Shell 命令提示字元中,執行下列命令,取得 Azure 命令列介面 (Azure CLI) 工具的版本:
az --version
工作 3:檢閱 Microsoft EventGrid 提供者註冊
-
在 [Cloud Shell] 窗格中,執行下列命令,檢查資源提供者 “Microsoft.EventGrid” 是否已經註冊:
az provider show --namespace Microsoft.EventGrid --query "registrationState" -
請注意,Microsoft.EventGrid 提供者已經註冊。
-
關閉 [Cloud Shell] 窗格。
工作 4:建立自訂事件方格主題
-
在 Azure 入口網站的 [瀏覽] 窗格上,選取 [建立資源]。
-
在 [建立資源] 窗格上的 [搜尋服務和市集] 文字輸入框中,輸入事件方格主題,然後選取 [輸入]。
-
在 [市集] 搜尋結果窗格中,選取 [事件方格主題] 結果,然後選取 [建立]。
-
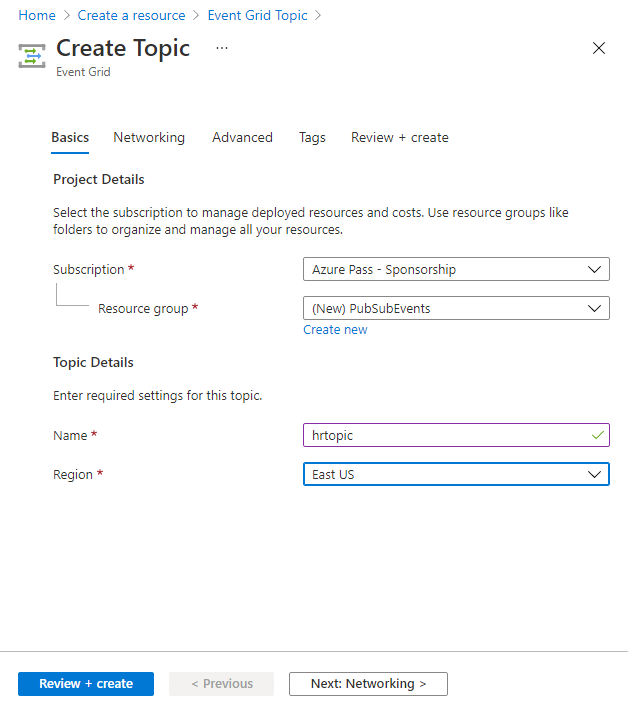
在 [建立主題] 窗格的 [基本] 索引標籤上,執行下列動作,然後選取 [進階] 索引標籤:
設定 動作 [訂閱] 下拉式清單 保留預設值 [資源群組] 下拉式清單 選取 [新建],輸入 PubSubEvents,然後選取 [確定] [名稱] 文字輸入框 輸入 hrtopic[您的名稱] [區域] 下拉式清單 選取 [美國東部] 下列螢幕擷取畫面顯示 [基本] 索引標籤上的設定。
-
在 [進階]** 索引標籤上,從 [事件結構描述]** 下拉式清單中,確定已選取 [事件方格結構描述]** 項目,然後選取 [檢閱 + 建立]**。
-
在 [檢閱 + 建立] 索引標籤上,檢閱在先前步驟中選取的選項。
-
選取 [建立] 使用指定的設定建立事件方格主題。
注意:等候 Azure 完成建立主題,再繼續進行實驗。 建立主題後,您會收到通知。
工作 5:將 Azure 事件方格檢視器部署至 Web 應用程式
-
在 Azure 入口網站的 [瀏覽] 窗格上,選取 [建立資源]。
-
在 [建立資源] 窗格的 [搜尋服務和市集] 文字輸入框中,輸入 Web 應用程式,然後選取 [輸入]。
-
在 [市集] 搜尋結果窗格中,選取 [Web 應用程式] 結果,然後選取 [建立]。
-
在 [建立 Web 應用程式] 刀鋒視窗的 [基本]** 索引卷標上,執行下列動作,然後選取 **[容器] 索引標籤:
設定 動作 [訂閱] 下拉式清單 保留預設值 [資源群組] 下拉式清單 選取清單中的 [PubSubEvents] [名稱] 文字輸入框 輸入 eventviewer[您的名稱] 保護唯一的預設主機名 停用 [發佈] 區段 選取 [容器]** [作業系統] 區段 選取 [Linux] [區域] 下拉式清單 選取 [美國東部] [Linux 方案 (美國東部)] 區段 選取 [新建],在 [名稱] 文字輸入框中,輸入 EventPlan,然後選取 [確定] [定價方案] 區段 保留預設值 下列螢幕擷取畫面顯示 [建立 Web 應用程式] 窗格上的設定。
![顯示 [建立 Web 應用程式] 窗格上設定的螢幕擷取畫面](/AZ-204-DevelopingSolutionsforMicrosoftAzure.zh-tw/Instructions/Labs/media/l09_create_web_app.png)
-
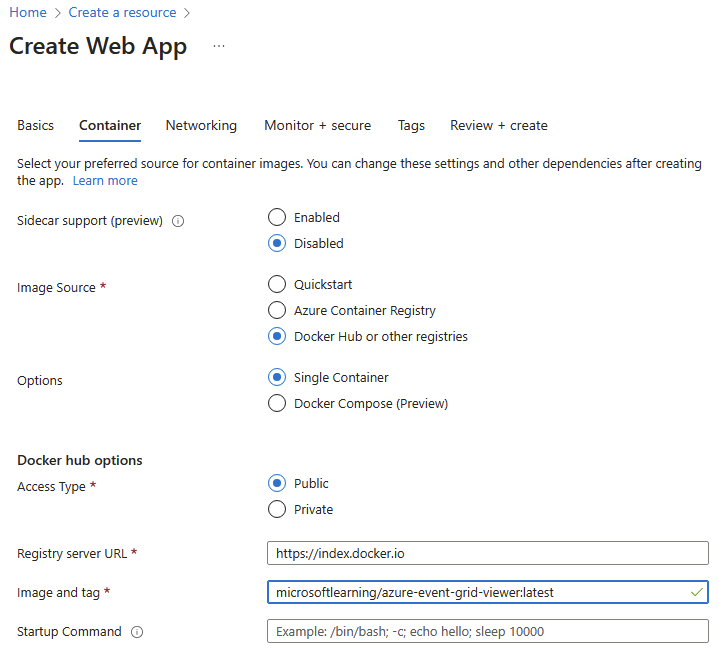
在 [ 容器] 索引標籤上,執行下列動作,然後選取 [ 檢閱 + 建立]:
設定 動作 映像來源 選取 [其他容器登錄] 存取類型 選取 [公用] 登錄伺服器 URL https://index.docker.io映像與標籤 輸入 microsoftlearning/azure-event-grid-viewer:latest 下列螢幕擷取畫面顯示 Docker 索引標籤上的設定。
-
在 [檢閱 + 建立] 索引標籤上,檢閱在先前步驟中選取的選項。
-
選取 [建立] 使用指定的設定,建立 Web 應用程式。
注意:等候 Azure 完成建立 Web 應用程式,再繼續進行實驗。 應用程式建立完成時,您會收到通知。
檢閱
在此練習中所建立的事件方格主題和 Web 應用程式,將會在實驗的其餘部分中使用。
練習 2:建立事件方格訂閱
工作 1:存取事件方格檢視器 Web 應用程式
-
在 Azure 入口網站的 [瀏覽] 窗格上,選取 [資源群組]。
-
在 [資源群組] 窗格上,選取 [PubSubEvents] 資源群組。
-
在 [PubSubEvents] 刀鋒視窗上,選取 eventviewer [yourname] Web 應用程式,您會看到 [概觀] 區段。
-
在 [概觀] 區段中,記錄 [基本資訊] 窗格底下的 [預設網域] 值。 您會在稍後的實驗中用到此值。
-
當您仍在 [概觀] 區段中時,按一下 [瀏覽] 按鈕。
-
觀察目前執行的 Azure 事件方格檢視器 Web 應用程式。 讓此 Web 應用程式在實驗的其餘部分繼續執行。
注意:此 Web 應用程式會在事件傳送至其端點時即時更新。 您會使用此應用程式來監視實驗全程中發生的事件。
-
返回目前開啟並顯示 Azure 入口網站的瀏覽器視窗。
工作 2:建立新訂閱
-
在 Azure 入口網站的 [瀏覽] 窗格上,選取 [資源群組]。
-
在 [資源群組] 窗格中,選取之前在此實驗中建立的 [PubSubEvents] 資源群組。
-
在 [PubSubEvents] 窗格中,選取之前在此實驗中建立的 [hrtopic[您的名稱]] 事件方格主題。
-
在 [事件方格主題] 窗格上,選取 [+ 事件訂閱]。
-
在 [建立事件訂閱] 窗格上,執行下列動作,然後選取 [建立]:
設定 動作 [名稱] 文字輸入框 輸入 basicsub [事件結構描述] 下拉式清單 選取 [事件方格結構描述] [端點類型] 下拉式清單 選取 [Webhook] 端點 選取 [設定端點]**。 在 [訂閱者端點] 文字輸入框中,輸入之前記錄的 **Web 應用程式 URL 值,請確定此值使用 https:// 前置詞、加上尾碼 /api/updates,然後選取 [確認選取項目]。 例如,如果 Web 應用程式 URL 值為 http://eventviewerstudent.azurewebsites.net/,您的訂閱者端點即為https://eventviewerstudent.azurewebsites.net/api/updates。下列螢幕擷取畫面顯示 [建立事件訂閱] 窗格上的設定。
![顯示 [建立事件訂閱] 窗格上設定的螢幕擷取畫面](/AZ-204-DevelopingSolutionsforMicrosoftAzure.zh-tw/Instructions/Labs/media/l09_create_event_subscription.png)
注意:等候 Azure 完成建立訂閱,再繼續進行實驗。 建立訂閱後,您會收到通知。
工作 3:觀察訂閱驗證事件
-
返回顯示 Azure 事件方格檢視器 Web 應用程式的瀏覽器視窗。
-
檢閱訂閱建立程序中建立的 Microsoft.EventGrid.SubscriptionValidationEvent 事件。
-
選取事件並檢閱事件的 JSON 內容。
-
返回目前開啟 Azure 入口網站的瀏覽器視窗。
工作 4:記錄訂閱認證
-
在 Azure 入口網站的 [瀏覽] 窗格上,選取 [資源群組]。
-
在 [資源群組] 窗格中,選取之前在此實驗中建立的 [PubSubEvents] 資源群組。
-
在 [PubSubEvents] 窗格中,選取之前在此實驗中建立的 [hrtopic[您的名稱]] 事件方格主題。
-
在 [事件方格主題] 窗格上,記錄 [主題端點] 欄位的值。 您會在稍後的實驗中用到此值。
-
在 [設定] 類別中,選取 [存取金鑰] 連結。
-
在 [存取金鑰] 區段中,記錄 [金鑰 1] 文字輸入框的值。 您會在稍後的實驗中用到此值。
檢閱
在此練習中,您已建立新訂閱、驗證該訂閱的註冊,並記錄發佈新事件至主題的必要認證。
練習 3:從 .NET 發佈事件方格事件
工作 1:建立 .NET 專案
-
在 [開始] 畫面上選取 [Visual Studio Code] 圖格。
-
在 [檔案]** 功能表上,選取 [開啟資料夾]**。
-
在開啟的 [檔案總管] 視窗中,瀏覽至 Allfiles (F):\Allfiles\Labs\09\Starter\EventPublisher,然後選取 [選取資料夾]。
-
在 [Visual Studio Code] 視窗中,從頂端功能表列移至 [終端機] 功能表,然後選取 [新增終端機]。
-
執行下列命令,在目前資料夾中建立名為 EventPublisher 的新 .NET 專案:
dotnet new console --framework net8.0 --name EventPublisher --output .注意:dotnet new 命令會在與專案同名的資料夾中,建立新的console專案。
-
執行下列命令,從 NuGet 匯入 4.11.0 版的 Azure.Messaging.EventGrid:
dotnet add package Azure.Messaging.EventGrid --version 4.11.0注意:dotnet add package 命令會從 NuGet 新增 Microsoft.Azure.EventGrid 封裝。 如需詳細資訊,請移至 Azure.Messaging.EventGrid。
-
執行下列命令組建 .NET Web 應用程式:
dotnet build -
選取 [終止終端] 或資源回收筒圖示,關閉目前開啟的終端和任何相關的程序。
工作 2:修改 Program 類別並連線事件方格
-
在 [Visual Studio Code] ** 視窗的 [Explorer] 窗格中,開啟 **Program.cs 檔案。
-
在 Program.cs 檔案的 [程式碼編輯器] 索引標籤上,刪除現有檔案中所有的程式碼。
-
新增下列程式碼:
using Azure; using Azure.Messaging.EventGrid; using System; using System.Threading.Tasks; public class Program { private const string topicEndpoint = "<topic-endpoint>"; /* Update the topicEndpoint string constant by setting its value to the Topic Endpoint of the Event Grid topic that you recorded previously in this lab. */ private const string topicKey = "<topic-key>"; /* Update the topicKey string constant by setting its value to the Key of the Event Grid topic that you recorded previously in this lab. */ public static async Task Main(string[] args) { //Add Main code here } } -
在第 7 行中,將
<topic-endpoint>預留位置取代為您稍早在此實驗室中記錄的事件方格主題端點的值。 -
在第 10 行中,將
<topic-key>預留位置取代為您稍早在此實驗室中記錄的事件方格主題存取金鑰的值。
工作 3:發佈新事件
-
以下列程式碼取代 Program.cs 檔案的 Main 方法:
public static async Task Main(string[] args) { /* To create a new variable named "endpoint" of type "Uri", using the "topicEndpoint" string constant as a constructor parameter */ Uri endpoint = new Uri(topicEndpoint); /* To create a new variable named "credential" of type "AzureKeyCredential", use the "topicKey" string constant as a constructor parameter. */ AzureKeyCredential credential = new AzureKeyCredential(topicKey); /* To create a new variable named "client" of type "EventGridPublisherClient", using the "endpoint" and "credential" variables as constructor parameters */ EventGridPublisherClient client = new EventGridPublisherClient(endpoint, credential); /* To create a new variable named "firstEvent" of type "EventGridEvent", and populate that variable with sample data */ EventGridEvent firstEvent = new EventGridEvent( subject: $"New Employee: Alba Sutton", eventType: "Employees.Registration.New", dataVersion: "1.0", data: new { FullName = "Alba Sutton", Address = "4567 Pine Avenue, Edison, WA 97202" } ); /* To create a new variable named "secondEvent" of type "EventGridEvent", and populate that variable with sample data */ EventGridEvent secondEvent = new EventGridEvent( subject: $"New Employee: Alexandre Doyon", eventType: "Employees.Registration.New", dataVersion: "1.0", data: new { FullName = "Alexandre Doyon", Address = "456 College Street, Bow, WA 98107" } ); /* To asynchronously invoke the "EventGridPublisherClient.SendEventAsync" method using the "firstEvent" variable as a parameter */ await client.SendEventAsync(firstEvent); Console.WriteLine("First event published"); /* To asynchronously invoke the "EventGridPublisherClient.SendEventAsync" method using the "secondEvent" variable as a parameter */ await client.SendEventAsync(secondEvent); Console.WriteLine("Second event published"); }注意:若要深入了解 AzureKeyCredential
注意:若要深入了解事件方格,請按下列連結:
-
儲存 Program.cs 檔案。
-
在 [Visual Studio Code] 視窗的 [功能表列] 上選取 [終端],然後選取 [新增終端]。
-
執行下列命令並執行 .NET Web 應用程式:
dotnet run注意:如果有任何建置錯誤,請檢閱位於 Allfiles (F):\Allfiles\Labs\09\Solution\EventPublisher 資料夾中的 Program.cs。
-
觀察目前執行的主控台應用程式成功輸出的訊息。
-
選取 [終止終端] 或資源回收筒圖示,關閉目前開啟的終端和任何相關的程序。
工作 4:觀察已發佈事件
-
返回 Azure 事件方格檢視器 Web 應用程式的瀏覽器視窗。
-
檢閱主控台應用程式建立的 Employees.Registration.New 事件。
-
選取任何事件並檢閱事件的 JSON 內容。
-
返回 Azure 入口網站。
檢閱
在此練習中,您已使用 .NET 主控台應用程式,發佈新事件至事件方格主題。