實驗 03:使用適用於 .NET 的 Azure 儲存體 SDK,擷取 Azure 儲存體資源和中繼資料
Microsoft Azure 使用者介面
基於 Microsoft 雲端工具的動態性質,您可能會遇到在本訓練內容開發後的 Azure 使用者介面 (UI) 變更。 因此,實驗指示可能無法正確對應實驗步驟。
當社群提醒 Microsoft 需要做修改時,我們會更新此訓練課程。 然而,雲端更新經常發生,所以您可能會在此訓練內容更新前遇到 UI 的變更。 如果發生這種情況,請適應變更,然後視需要在實驗中調整。
指示
在您開始使用 Intune 之前
登入實驗室環境
使用下列認證登入您的 Windows 11 虛擬機器 (VM):
- 使用者名稱:
Admin - 密碼:
Pa55w.rd
注意:您的講師會提供連線至虛擬實驗室環境的指示。
檢閱已安裝的應用程式
尋找 Windows 11 桌面上的工作列。 工作列包含此次實驗中會用到的應用程式圖示,包括:
- Microsoft Edge
- 檔案總管
實驗情境
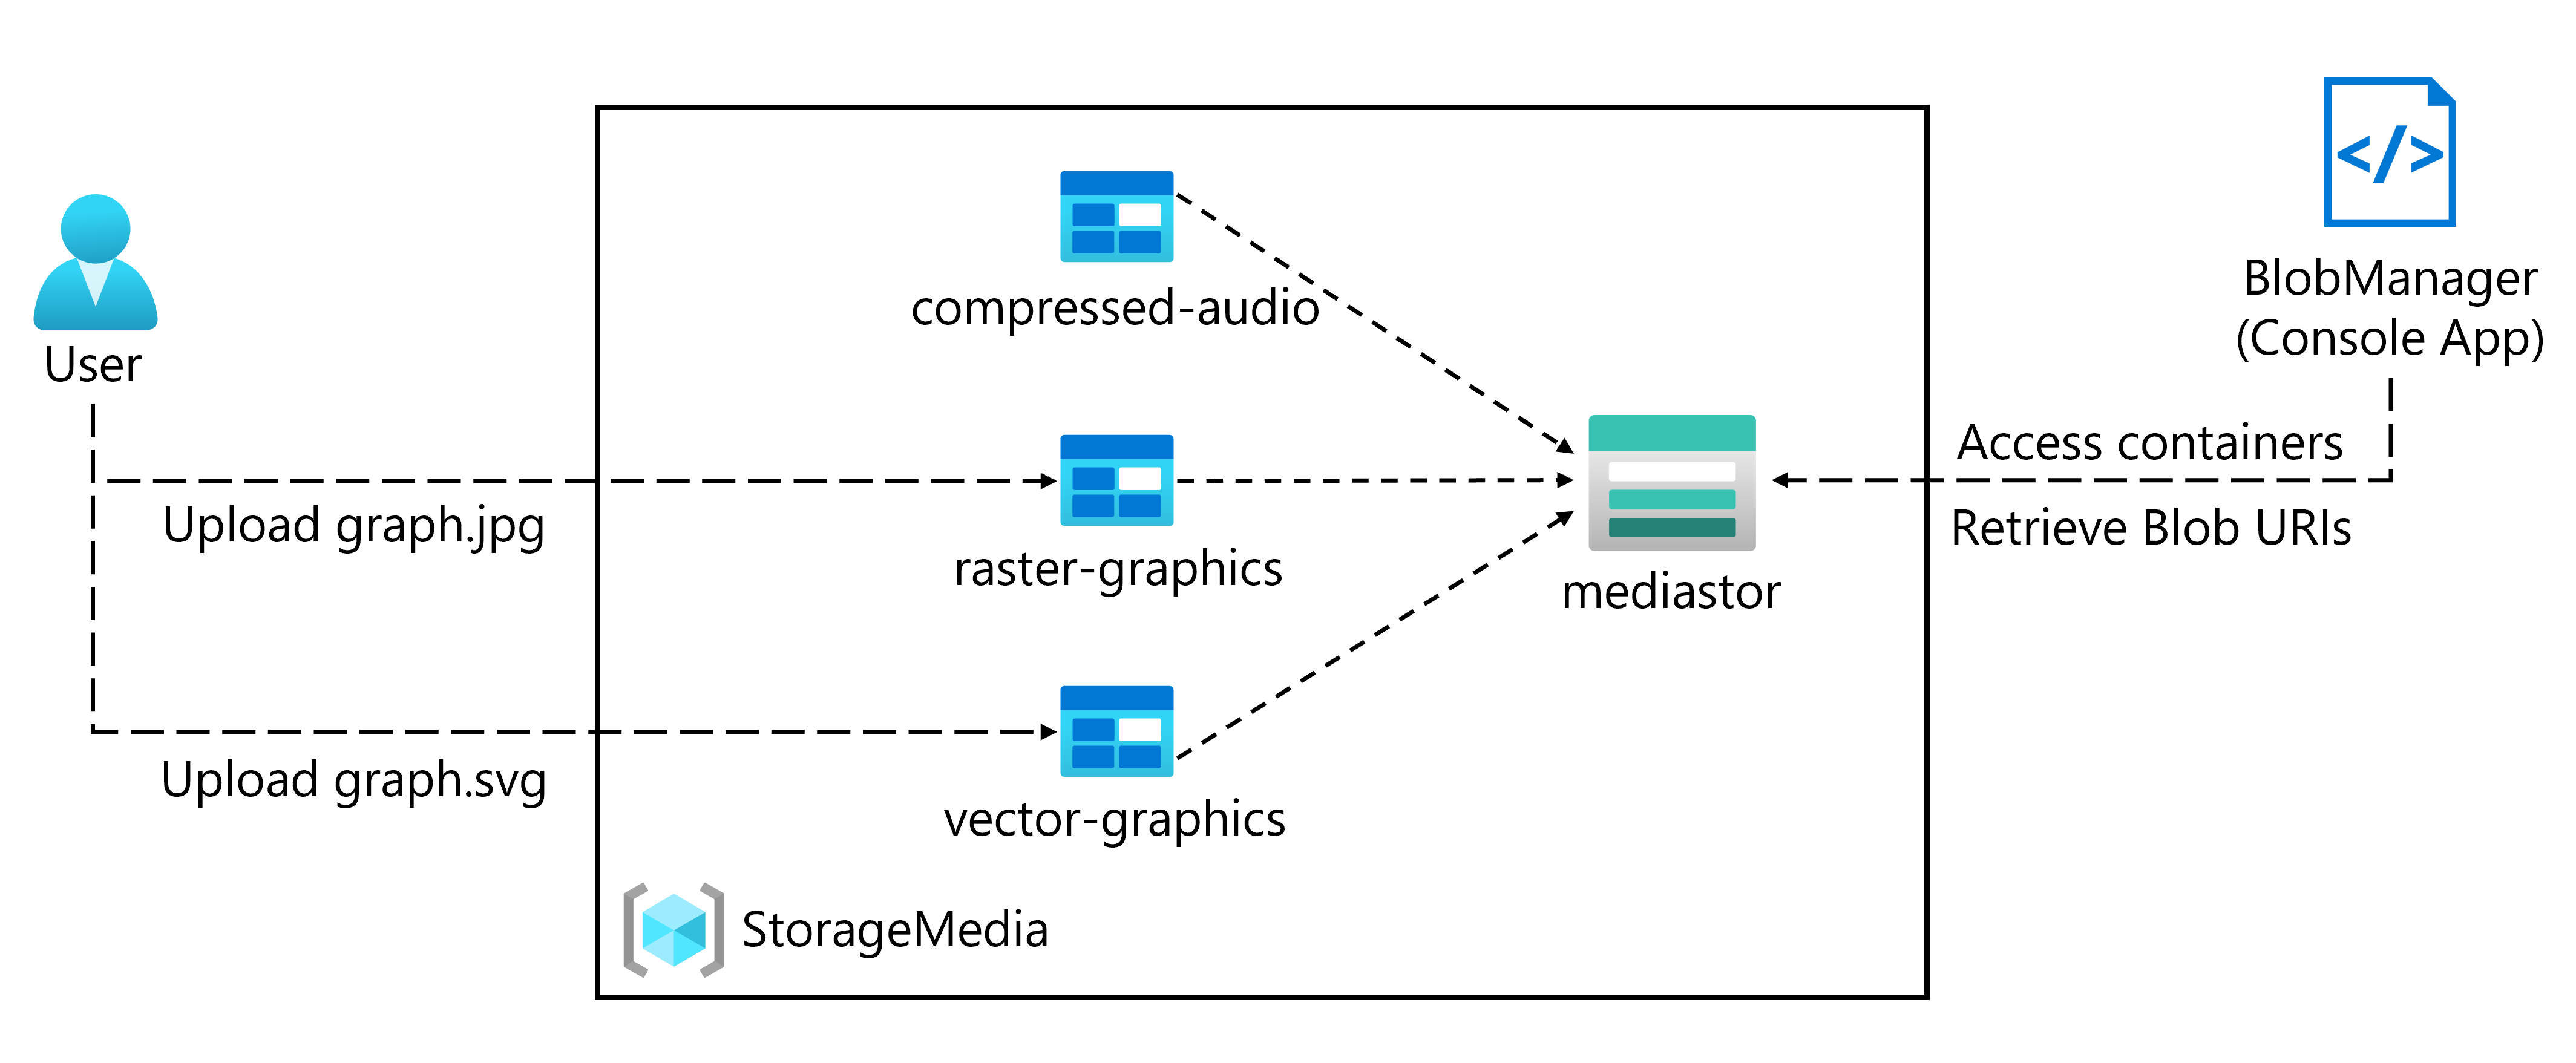
在本實驗中,您將了解如何使用 Azure 儲存體 SDK 來存取 C# 應用程式內的 Azure 儲存體容器。 您也將了解如何存取中繼資料並公開 URI 資訊,以存取儲存體帳戶中容器的內容。
在這個 影片連結 上按一下滑鼠右鍵,然後選取 [在新索引標籤/新視窗中開啟連結],以觀看這段影片。
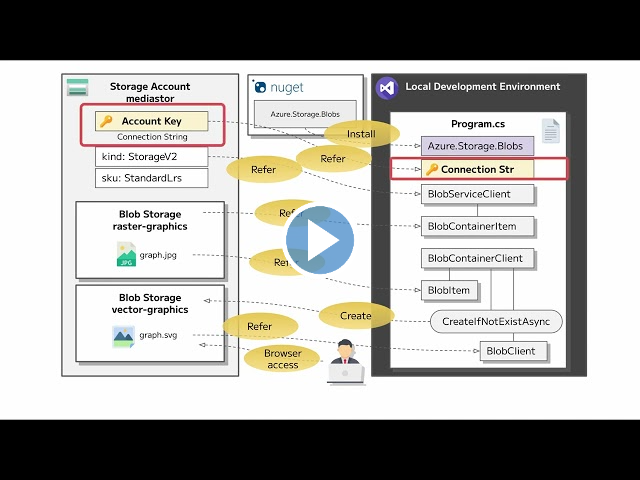
架構圖
練習 1:建立 Azure 資源
工作 1:開啟 Azure 入口網站
-
在工作列上,選取 Microsoft Edge 圖示。
-
在瀏覽器視窗中,瀏覽至 Azure 入口網站 (
https://portal.azure.com),然後登入您在此實驗要用的帳戶。注意:如果這是您第一次登入 Azure 入口網站,系統會提供入口網站的導覽。 選取 [開始使用] 跳過導覽,並開始使用入口網站。
工作 2:建立儲存體帳戶
-
在 Azure 入口網站中,使用 [搜尋資源、服務和文件] 文字輸入框,搜尋儲存體帳戶,然後在結果清單中選取 [儲存體帳戶]。
-
在 [儲存體帳戶] ** 刀鋒視窗上,選取 [+ 建立]。
-
在 [建立儲存體帳戶]** 刀鋒視窗的 [基本]** 索引標籤上,執行下列動作,然後選取 [下一步:進階]
設定 動作 [訂閱] 下拉式清單 保留預設值 [資源群組] 區段 選取 [新建],輸入 StorageMedia,然後選取 [確定] [儲存體帳戶名稱] 文字輸入框 輸入 mediastor [您的名稱] [區域] 下拉式清單 選取 (美國) 美國東部 主要服務 無變更 [效能] 區段 選取 [標準] 選項 [備援] 下拉式清單 選取 [本地備援儲存體 (LRS)] 下列螢幕擷取畫面顯示 [建立儲存體帳戶] 窗格上的設定。
![[建立儲存體帳戶] 窗格](/AZ-204-DevelopingSolutionsforMicrosoftAzure.zh-tw/Instructions/Labs/media/l03_create_a_storage_account.png)
-
在 [進階]** 索引標籤上,確定已檢查 [允許在個別容器上啟用匿名存取]。 如果未啟用設定,請核取設定,然後選取 [檢閱]**。
-
在 [檢閱] 索引標籤上,檢閱您在先前步驟中選取的選項。
-
選取 [建立],使用您指定的設定來建立儲存體帳戶。
注意:等候建立工作完成,再繼續進行實驗。
-
選取 [前往資源] 。
-
在 [儲存體帳戶] ** 刀鋒視窗的 [設定] ** 區段中,選取 [端點] ** 連結。
-
在 [端點] 區段中,複製 [Blob 服務] 文字輸入框的值至剪貼簿。
注意:您會在稍後的實驗中用到此端點。
-
開啟記事本,然後在記事本貼上複製的 Blob 服務值。
-
在 [儲存體帳戶] 窗格的 [安全性 + 網路] 區段中,選取 [存取金鑰]。
-
複製儲存體帳戶名稱值至剪貼簿,然後貼上記事本。
-
在 [存取金鑰]** 刀鋒視窗上,為任意一個 [金鑰]** 文字輸入框選取 [顯示]**。 使用哪一種並不重要,它們是可互換的。
-
檢閱任意一個金鑰,然後將任意一個 [金鑰]** 方塊的值複製至剪貼簿,然後將其貼至記事本中。
注意:您會在稍後的實驗中用到所有的這些值。
檢閱
在此練習中,您建立了將用於實驗其餘部分的新儲存體帳戶。
練習 2:上傳 Blob 至容器
工作 1:建立儲存體帳戶容器
-
在 [儲存體帳戶] 窗格的 [資料儲存體] 區段中,選取 [容器] 連結。
-
在 [容器] 區段中選取 [+ 容器]。
-
在 [新增容器] 快顯視窗中執行下列動作,然後選取 [建立]:
設定 動作 [名稱] 文字輸入框 輸入 raster-graphics [公用存取層級] 下拉式清單 選取 [私人] (無匿名存取) -
在 [容器] 區段中選取 [+ 容器]。
-
在 [新增容器] 快顯視窗中,執行下列動作,然後選取 [建立]:
設定 動作 [名稱] 文字輸入框 輸入 compressed-audio [公用存取層級] 下拉式清單 選取 [私人] (無匿名存取) -
在 [容器] 區段中,觀察更新的容器清單。
下列螢幕擷取畫面顯示 [建立儲存體帳戶] 窗格上的設定。
![[建立儲存體帳戶] 窗格](/AZ-204-DevelopingSolutionsforMicrosoftAzure.zh-tw/Instructions/Labs/media/l03_containers.png)
工作 2:上傳儲存體帳戶 blob
-
在 [容器] 區段中,選取最近建立的點陣圖形容器。
-
在 [容器] 窗格上,選取 [上傳]。
-
在 [上傳 blob] 視窗中,執行下列動作,然後選取 [上傳]:
| 設定 | 動作 |
|---|---|
| [檔案] 區段 | 選取 [瀏覽檔案] 或使用拖放功能 |
| [檔案總管] 視窗 | 瀏覽至 Allfiles (F):\Allfiles\Labs\03\Starter\Images,選取 graph.jpg 檔案,然後選取 [開啟] |
| [如果檔案已存在即覆寫檔案] 核取方塊 | 請務必選取此核取方塊 |
注意:等候 blob 上傳後,再繼續實驗。
檢閱
在此練習中,您在儲存體帳戶中建立了預留位置容器,然後使用 blob 填入其中一個容器。
練習 3:使用 .NET SDK 存取容器
工作 1:建立 .NET 專案
-
在 [開始] 畫面上選取 [Visual Studio Code] 圖格。
-
在 [檔案] 功能表上,選取 [開啟資料夾],瀏覽至 Allfiles (F):\Allfiles\Labs\03\Starter\BlobManager,然後選取 [選取資料夾]。
-
在 [Visual Studio Code] 視窗的 [功能表列] 上選取 [終端],然後選取 [新增終端]。
-
在終端中,執行下列命令,在目前的資料夾中建立名為 BlobManager 的新 .NET 專案:
dotnet new console --framework net8.0 --name BlobManager --output .注意:dotnet new 命令會在與專案同名的資料夾中,建立新的主控台專案。
-
在終端中,執行下列命令,從 NuGet 匯入 12.18.0 版的 Azure.Storage.Blobs:
dotnet add package Azure.Storage.Blobs --version 12.18.0注意:dotnet add package 命令會從 NuGet 新增 Azure.Storage.Blobs 封裝。 如需詳細資訊,請參閱 Azure.Storage.Blobs。
-
在終端中,執行下列命令,組建 .NET Web 應用程式:
dotnet build -
選取 [終止終端] 或資源回收筒圖示,關閉目前開啟的終端和任何相關的程序。
工作 2:修改 Program 類別以存取儲存體
-
在 [Visual Studio Code] ** 視窗的 [Explorer] 窗格中,開啟 **Program.cs 檔案。
-
在 Program.cs 檔案的 [程式碼編輯器] 索引標籤上,刪除現有檔案中所有的程式碼。
-
新增下列程式碼:
using Azure.Storage; using Azure.Storage.Blobs; using Azure.Storage.Blobs.Models; using System; using System.Threading.Tasks; public class Program { //Update the blobServiceEndpoint value that you recorded previously in this lab. private const string blobServiceEndpoint = "<primary-blob-service-endpoint>"; //Update the storageAccountName value that you recorded previously in this lab. private const string storageAccountName = "<storage-account-name>"; //Update the storageAccountKey value that you recorded previously in this lab. private const string storageAccountKey = "<key>"; //The following code to create a new asynchronous Main method public static async Task Main(string[] args) { } } -
更新 blobServiceEndpoint 字串常數的值,將其設為您之前在此實驗中記錄的儲存體帳戶的主要 Blob 服務端點。
-
更新 storageAccountName 字串常數的值,將其設為您之前在此實驗中記錄的儲存體帳戶的儲存體帳戶名稱。
-
更新 storageAccountKey 字串常數的值,將其設為您之前在此實驗中記錄的儲存體帳戶金鑰。
工作 3:連線 Azure 儲存體 blob 服務端點
-
在 Main 方法中,新增下列程式碼:
public static async Task Main(string[] args) { //The following line of code to create a new instance of the StorageSharedKeyCredential class by using the storageAccountName and storageAccountKey constants as constructor parameters StorageSharedKeyCredential accountCredentials = new StorageSharedKeyCredential(storageAccountName, storageAccountKey); //The following line of code to create a new instance of the BlobServiceClient class by using the blobServiceEndpoint constant and the accountCredentials variable as constructor parameters BlobServiceClient serviceClient = new BlobServiceClient(new Uri(blobServiceEndpoint), accountCredentials); //The following line of code to invoke the GetAccountInfoAsync method of the BlobServiceClient class to retrieve account metadata from the service AccountInfo info = await serviceClient.GetAccountInfoAsync(); //Render a welcome message await Console.Out.WriteLineAsync($"Connected to Azure Storage Account"); //Render the storage account's name await Console.Out.WriteLineAsync($"Account name:\t{storageAccountName}"); //Render the type of storage account await Console.Out.WriteLineAsync($"Account kind:\t{info?.AccountKind}"); //Render the currently selected stock keeping unit (SKU) for the storage account await Console.Out.WriteLineAsync($"Account sku:\t{info?.SkuName}"); } -
儲存 Program.cs 檔案。
-
在 [Visual Studio Code] 視窗的 [功能表列] 上選取 [終端],然後選取 [新增終端]。
-
在終端中,執行下列命令並執行 .NET Web 應用程式:
dotnet run注意:如果有任何建置錯誤,請檢閱 Allfiles (F):\Allfiles\Labs\03\Solution\BlobManager 資料夾中的 Program.cs 檔案。
-
觀察目前執行的主控台應用程式輸出。 輸出包含從服務擷取的儲存體帳戶中繼資料。
-
選取 [終止終端] 或資源回收筒圖示,關閉目前開啟的終端和任何相關的程序。
工作 4:列舉現有的容器
-
在 Program 類別中,輸入下列程式碼,建立名為 EnumerateContainersAsync的新private static方法,其為非同步並包含單一 BlobServiceClient 參數類型:
private static async Task EnumerateContainersAsync(BlobServiceClient client) { /*Create an asynchronous foreach loop that iterates over the results of an invocation of the GetBlobContainersAsync method of the BlobServiceClient class. */ await foreach (BlobContainerItem container in client.GetBlobContainersAsync()) { //Print the name of each container await Console.Out.WriteLineAsync($"Container:\t{container.Name}"); } } -
在 Main 方法的結尾,輸入下列程式碼,叫用 EnumerateContainersAsync 方法,並傳入 serviceClient 變數作為參數:
await EnumerateContainersAsync(serviceClient); - 觀察 Program.cs 檔案,現在應該包含:
using Azure.Storage; using Azure.Storage.Blobs; using Azure.Storage.Blobs.Models; using System; using System.Threading.Tasks; public class Program { private const string blobServiceEndpoint = "your blobServiceEndpoint"; private const string storageAccountName = "your storageAccountName"; private const string storageAccountKey = "your storageAccountKey"; public static async Task Main(string[] args) { StorageSharedKeyCredential accountCredentials = new StorageSharedKeyCredential(storageAccountName, storageAccountKey); BlobServiceClient serviceClient = new BlobServiceClient(new Uri(blobServiceEndpoint), accountCredentials); AccountInfo info = await serviceClient.GetAccountInfoAsync(); await Console.Out.WriteLineAsync($"Connected to Azure Storage Account"); await Console.Out.WriteLineAsync($"Account name:\t{storageAccountName}"); await Console.Out.WriteLineAsync($"Account kind:\t{info?.AccountKind}"); await Console.Out.WriteLineAsync($"Account sku:\t{info?.SkuName}"); /* To invoke the EnumerateContainersAsync method, passing in the serviceClient variable as a parameter */ await EnumerateContainersAsync(serviceClient); } private static async Task EnumerateContainersAsync(BlobServiceClient client) { await foreach (BlobContainerItem container in client.GetBlobContainersAsync()) { await Console.Out.WriteLineAsync($"Container:\t{container.Name}"); } } } -
儲存 Program.cs 檔案。
-
在 [Visual Studio Code] 視窗的 [功能表列] 上選取 [終端],然後選取 [新增終端]。
-
在終端中,執行下列命令並執行 .NET Web 應用程式:
dotnet run注意:如果有任何建置錯誤,請檢閱 Allfiles (F):\Allfiles\Labs\03\Solution\BlobManager 資料夾中的 Program.cs 檔案。
-
觀察目前執行的主控台應用程式輸出。 更新的輸出包含帳戶中每個現有容器的清單。
- 選取 [終止終端] 或資源回收筒圖示,關閉目前開啟的終端和任何相關的程序。
檢閱
在此練習中,您使用了 Azure 儲存體 SDK 存取現有的容器。
練習 4:使用 .NET SDK 擷取 blob 統一資源識別項 (URI)
工作 1:使用 SDK 列舉現有容器中的 blob
-
在 Program 類別中,輸入下列程式碼,建立名為 EnumerateBlobsAsync的新private static方法,其為非同步並包含兩種參數類型,分別為 BlobServiceClient 和string:
private static async Task EnumerateBlobsAsync(BlobServiceClient client, string containerName) { /* Get a new instance of the BlobContainerClient class by using the GetBlobContainerClient method of the BlobServiceClient class, passing in the containerName parameter */ BlobContainerClient container = client.GetBlobContainerClient(containerName); /* Render the name of the container that will be enumerated */ await Console.Out.WriteLineAsync($"Searching:\t{container.Name}"); /* Create an asynchronous foreach loop that iterates over the results of an invocation of the GetBlobsAsync method of the BlobContainerClient class */ await foreach (BlobItem blob in container.GetBlobsAsync()) { //Print the name of each blob await Console.Out.WriteLineAsync($"Existing Blob:\t{blob.Name}"); } } -
在 Main 方法的結尾,輸入下列程式碼,建立包含點陣圖形值且名為 existingContainerName 的變數:
string existingContainerName = "raster-graphics"; -
在 Main 方法的結尾,輸入下列程式碼,叫用 EnumerateBlobsAsync 方法,並傳入 serviceClient 和 existingContainerName 變數作為參數:
await EnumerateBlobsAsync(serviceClient, existingContainerName); - 觀察 Program.cs 檔案,現在應該包含:
using Azure.Storage; using Azure.Storage.Blobs; using Azure.Storage.Blobs.Models; using System; using System.Threading.Tasks; public class Program { private const string blobServiceEndpoint = "your blobServiceEndpoint"; private const string storageAccountName = "your storageAccountName"; private const string storageAccountKey = "your storageAccountKey"; public static async Task Main(string[] args) { StorageSharedKeyCredential accountCredentials = new StorageSharedKeyCredential(storageAccountName, storageAccountKey); BlobServiceClient serviceClient = new BlobServiceClient(new Uri(blobServiceEndpoint), accountCredentials); AccountInfo info = await serviceClient.GetAccountInfoAsync(); await Console.Out.WriteLineAsync($"Connected to Azure Storage Account"); await Console.Out.WriteLineAsync($"Account name:\t{storageAccountName}"); await Console.Out.WriteLineAsync($"Account kind:\t{info?.AccountKind}"); await Console.Out.WriteLineAsync($"Account sku:\t{info?.SkuName}"); await EnumerateContainersAsync(serviceClient); string existingContainerName = "raster-graphics"; await EnumerateBlobsAsync(serviceClient, existingContainerName); } private static async Task EnumerateContainersAsync(BlobServiceClient client) { await foreach (BlobContainerItem container in client.GetBlobContainersAsync()) { await Console.Out.WriteLineAsync($"Container:\t{container.Name}"); } } private static async Task EnumerateBlobsAsync(BlobServiceClient client, string containerName) { BlobContainerClient container = client.GetBlobContainerClient(containerName); await Console.Out.WriteLineAsync($"Searching:\t{container.Name}"); await foreach (BlobItem blob in container.GetBlobsAsync()) { await Console.Out.WriteLineAsync($"Existing Blob:\t{blob.Name}"); } } } -
儲存 Program.cs 檔案。
-
在 [Visual Studio Code] 視窗的 [功能表列] 上選取 [終端],然後選取 [新增終端]。
-
在終端中,執行下列命令並執行 .NET Web 應用程式:
dotnet run注意:如果有任何建置錯誤,請檢閱 Allfiles (F):\Allfiles\Labs\03\Solution\BlobManager 資料夾中的 Program.cs 檔案。
-
檢閱目前執行的主控台應用程式輸出。 更新的輸出會包含現有容器和 blob 的中繼資料。
- 選取 [終止終端] 或資源回收筒圖示,關閉目前開啟的終端和任何相關的程序。
工作 2:使用 SDK 建立新容器
-
在 Program 類別中,輸入下列程式碼,建立名為 GetContainerAsync 的新private static方法,其為非同步並包含兩種參數類型,分別為 BlobServiceClient 和string:
private static async Task<BlobContainerClient> GetContainerAsync(BlobServiceClient client, string containerName) { /* Get a new instance of the BlobContainerClient class by using the GetBlobContainerClient method of the BlobServiceClient class, passing in the containerName parameter */ BlobContainerClient container = client.GetBlobContainerClient(containerName); /* Invoke the CreateIfNotExistsAsync method of the BlobContainerClient class */ await container.CreateIfNotExistsAsync(PublicAccessType.Blob); /* Render the name of the container that was potentially created */ await Console.Out.WriteLineAsync($"New Container:\t{container.Name}"); /* Return the container as the result of the GetContainerAsync */ return container; } -
在 Main 方法的結尾,輸入下列程式碼,建立名為 newContainerName 的變數,且值為vector-graphics:
string newContainerName = "vector-graphics"; -
在 Main 方法的結尾,輸入下列程式碼,叫用 GetContainerAsync 方法,傳遞作為參數的 serviceClient 和 newContainerName 變數,並在名為 containerClient 的 BlobContainerClient 類型變數中儲存結果:
BlobContainerClient containerClient = await GetContainerAsync(serviceClient, newContainerName); - 檢閱 Program.cs 檔案,現在應該包含:
using Azure.Storage; using Azure.Storage.Blobs; using Azure.Storage.Blobs.Models; using System; using System.Threading.Tasks; public class Program { private const string blobServiceEndpoint = "your blobServiceEndpoint"; private const string storageAccountName = "your storageAccountName"; private const string storageAccountKey = "your storageAccountKey"; public static async Task Main(string[] args) { StorageSharedKeyCredential accountCredentials = new StorageSharedKeyCredential(storageAccountName, storageAccountKey); BlobServiceClient serviceClient = new BlobServiceClient(new Uri(blobServiceEndpoint), accountCredentials); AccountInfo info = await serviceClient.GetAccountInfoAsync(); await Console.Out.WriteLineAsync($"Connected to Azure Storage Account"); await Console.Out.WriteLineAsync($"Account name:\t{storageAccountName}"); await Console.Out.WriteLineAsync($"Account kind:\t{info?.AccountKind}"); await Console.Out.WriteLineAsync($"Account sku:\t{info?.SkuName}"); await EnumerateContainersAsync(serviceClient); string existingContainerName = "raster-graphics"; await EnumerateBlobsAsync(serviceClient, existingContainerName); string newContainerName = "vector-graphics"; BlobContainerClient containerClient = await GetContainerAsync(serviceClient, newContainerName); } private static async Task EnumerateContainersAsync(BlobServiceClient client) { await foreach (BlobContainerItem container in client.GetBlobContainersAsync()) { await Console.Out.WriteLineAsync($"Container:\t{container.Name}"); } } private static async Task EnumerateBlobsAsync(BlobServiceClient client, string containerName) { BlobContainerClient container = client.GetBlobContainerClient(containerName); await Console.Out.WriteLineAsync($"Searching:\t{container.Name}"); await foreach (BlobItem blob in container.GetBlobsAsync()) { await Console.Out.WriteLineAsync($"Existing Blob:\t{blob.Name}"); } } private static async Task<BlobContainerClient> GetContainerAsync(BlobServiceClient client, string containerName) { BlobContainerClient container = client.GetBlobContainerClient(containerName); await container.CreateIfNotExistsAsync(PublicAccessType.Blob); await Console.Out.WriteLineAsync($"New Container:\t{container.Name}"); return container; } } -
儲存 Program.cs 檔案。
-
在 [Visual Studio Code] 視窗的 [功能表列] 上選取 [終端],然後選取 [新增終端]。
-
在終端中,執行下列命令並執行 .NET Web 應用程式:
dotnet run注意:如果有任何建置錯誤,請檢閱 Allfiles (F):\Allfiles\Labs\03\Solution\BlobManager 資料夾中的 Program.cs 檔案。
-
觀察目前執行的主控台應用程式輸出。 更新的輸出會包含現有容器和 blob 的中繼資料。
- 選取 [終止終端] 或資源回收筒圖示,關閉目前開啟的終端和任何相關的程序。
工作 3:使用入口網站上傳新 blob
-
在 Azure 入口網站的 [瀏覽] 窗格上,選取 [資源群組] 連結。
-
在 [資源群組] 窗格上,選取之前在此實驗中建立的 [StorageMedia] 資源群組。
-
在 [StorageMedia] 窗格上,選取之前在此實驗中建立的 [mediastor[您的名稱]] 儲存體帳戶。
-
在 [儲存體帳戶] 窗格的 [資料儲存體] 區段中,選取 [容器] 連結。
-
在 [容器] 區段中,選取新建立的 [vector-graphics] 容器。 您可能需要重新整理頁面,才能觀察到新的容器。
-
在 [容器] 窗格上,選取 [上傳]。
-
在 [上傳 blob] 視窗中,執行下列動作,然後選取 [上傳]:
設定 動作 [檔案] 區段 選取 [瀏覽檔案] 或使用拖放功能 [檔案總管] 視窗 Allfiles (F):\Allfiles\Labs\03\Starter\Images,選取 graph.svg 檔案,然後選取 [開啟] [如果檔案已存在即覆寫檔案] 核取方塊 請務必選取此核取方塊 注意:等候 blob 上傳後,再繼續實驗。
工作 4:使用 SDK 存取 blob URI
-
切換至 [Visual Studio Code] 視窗。
-
在 Program 類別中,輸入下列程式碼,建立名為 GetBlobAsync 的新private static方法,其為非同步並包含兩種參數類型,分別為 BlobContainerClient 和string:
private static async Task<BlobClient> GetBlobAsync(BlobContainerClient client, string blobName) { BlobClient blob = client.GetBlobClient(blobName); bool exists = await blob.ExistsAsync(); if (!exists) { await Console.Out.WriteLineAsync($"Blob {blob.Name} not found!"); } else await Console.Out.WriteLineAsync($"Blob Found, URI:\t{blob.Uri}"); return blob; } -
在 Main 方法的結尾,輸入下列程式碼,建立名為 uploadedBlobName 的變數,且其值為 graph.svg:
string uploadedBlobName = "graph.svg"; -
在 Main 方法的結尾,輸入下列程式碼,叫用 GetBlobAsync 方法,傳入 containerClient 和 uploadedBlobName 變數作為參數,並在名為 blobClient 的 BlobClient 類型變數中儲存結果:
BlobClient blobClient = await GetBlobAsync(containerClient, uploadedBlobName); -
在 Main 方法的結尾,輸入下列程式碼,轉譯 blobClient 變數的 Uri 屬性:
await Console.Out.WriteLineAsync($"Blob Url:\t{blobClient.Uri}"); - 觀察 Program.cs 檔案,現在應該包含:
using Azure.Storage; using Azure.Storage.Blobs; using Azure.Storage.Blobs.Models; using System; using System.Threading.Tasks; public class Program { private const string blobServiceEndpoint = "your blobServiceEndpoint"; private const string storageAccountName = "your storageAccountName"; private const string storageAccountKey = "your storageAccountKey"; public static async Task Main(string[] args) { StorageSharedKeyCredential accountCredentials = new StorageSharedKeyCredential(storageAccountName, storageAccountKey); BlobServiceClient serviceClient = new BlobServiceClient(new Uri(blobServiceEndpoint), accountCredentials); AccountInfo info = await serviceClient.GetAccountInfoAsync(); await Console.Out.WriteLineAsync($"Connected to Azure Storage Account"); await Console.Out.WriteLineAsync($"Account name:\t{storageAccountName}"); await Console.Out.WriteLineAsync($"Account kind:\t{info?.AccountKind}"); await Console.Out.WriteLineAsync($"Account sku:\t{info?.SkuName}"); await EnumerateContainersAsync(serviceClient); string existingContainerName = "raster-graphics"; await EnumerateBlobsAsync(serviceClient, existingContainerName); string newContainerName = "vector-graphics"; BlobContainerClient containerClient = await GetContainerAsync(serviceClient, newContainerName); string uploadedBlobName = "graph.svg"; BlobClient blobClient = await GetBlobAsync(containerClient, uploadedBlobName); await Console.Out.WriteLineAsync($"Blob Url:\t{blobClient.Uri}"); } private static async Task EnumerateContainersAsync(BlobServiceClient client) { await foreach (BlobContainerItem container in client.GetBlobContainersAsync()) { await Console.Out.WriteLineAsync($"Container:\t{container.Name}"); } } private static async Task EnumerateBlobsAsync(BlobServiceClient client, string containerName) { BlobContainerClient container = client.GetBlobContainerClient(containerName); await Console.Out.WriteLineAsync($"Searching:\t{container.Name}"); await foreach (BlobItem blob in container.GetBlobsAsync()) { await Console.Out.WriteLineAsync($"Existing Blob:\t{blob.Name}"); } } private static async Task<BlobContainerClient> GetContainerAsync(BlobServiceClient client, string containerName) { BlobContainerClient container = client.GetBlobContainerClient(containerName); await container.CreateIfNotExistsAsync(PublicAccessType.Blob); await Console.Out.WriteLineAsync($"New Container:\t{container.Name}"); return container; } private static async Task<BlobClient> GetBlobAsync(BlobContainerClient client, string blobName) { BlobClient blob = client.GetBlobClient(blobName); bool exists = await blob.ExistsAsync(); if (!exists) { await Console.Out.WriteLineAsync($"Blob {blob.Name} not found!"); } else await Console.Out.WriteLineAsync($"Blob Found, URI:\t{blob.Uri}"); return blob; } } -
儲存 Program.cs 檔案。
-
在 [Visual Studio Code] 視窗的 [功能表列] 上選取 [終端],然後選取 [新增終端]。
-
在終端中,執行下列命令並執行 .NET Web 應用程式:
dotnet run注意:如果有任何建置錯誤,請檢閱 Allfiles (F):\Allfiles\Labs\03\Solution\BlobManager 資料夾中的 Program.cs 檔案。
-
觀察目前執行的主控台應用程式輸出。 更新的輸出會包含線上存取 blob 的最終 URL。 記錄此 URL 的值,以便稍後在實驗中使用。
注意:URL 會類似下列字串:
https://mediastor*[yourname]*.blob.core.windows.net/vector-graphics/graph.svg - 選取 [終止終端] 或資源回收筒圖示,關閉目前開啟的終端和任何相關的程序。
工作 5:使用瀏覽器測試 URI
-
在工作列上,啟動 Microsoft Edge 圖示的捷徑功能表,然後選取 [新增視窗]。
-
在新瀏覽器視窗中,參考您之前在此實驗中針對 blob 複製的 URL。
-
現在您應該會在瀏覽器視窗中看到可調整的向量圖形 (SVG) 檔案。
檢閱
在此練習中,您使用了儲存體 SDK 建立容器並管理 blob。