实验室 10:使用 Azure 服务总线队列异步处理消息
Microsoft Azure 用户接口
鉴于 Microsoft 云工具的动态特性,Azure UI 在此培训内容开发后可能会发生更改。 因此,实验说明和实验步骤可能无法正确对应。
我们发现社区进行了必要更改时,Microsoft 会更新此培训课程。 但是,云更新经常发生,因此在此培训内容更新之前,可能会发生 UI 更改。 如果发生这种情况,请适应这些更改,并根据需要在实验室中熟悉这些更改。
Instructions
开始之前
登录到实验室环境
使用以下凭据登录到 Windows 11 虚拟机 (VM):
- 用户名:
Admin - 密码:
Pa55w.rd
注意:你的讲师将提供连接到虚拟实验室环境的说明。
查看已安装的应用程序
在 Windows 11 桌面上找到任务栏。 任务栏里有本实验室中你将使用的应用程序的图标,包括:
- Microsoft Edge
- Visual Studio Code
实验室场景
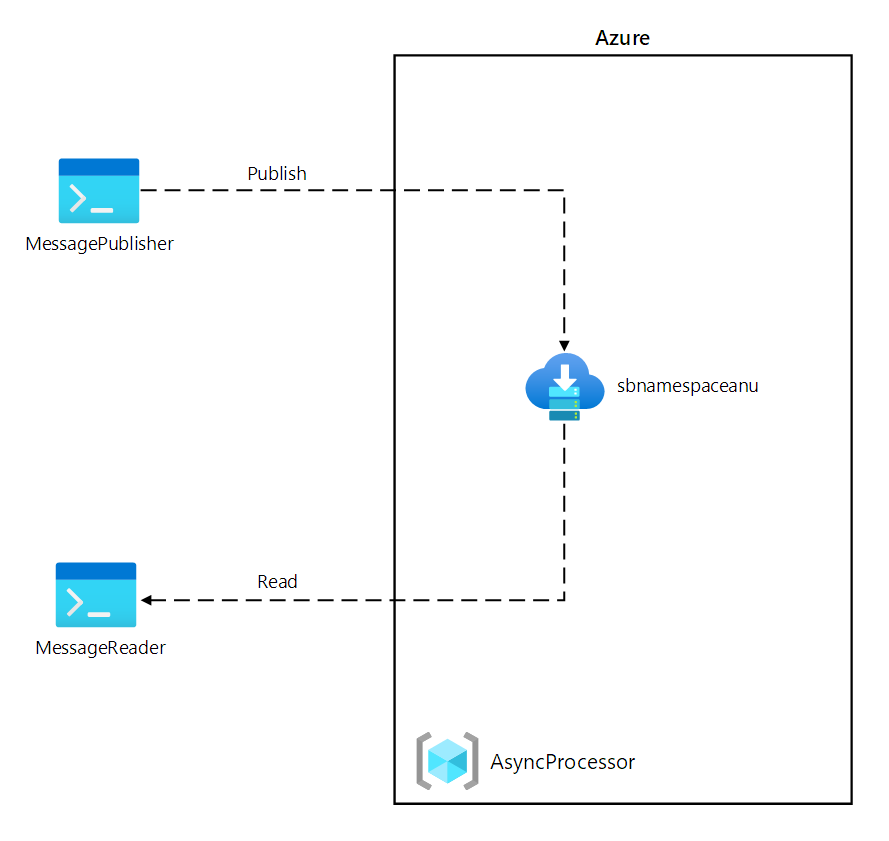
在本实验室中,你将使用 Azure 服务总线队列为此方案创建一个概念证明。 为了演示系统如何工作,你将创建一个 .NET 项目和另一个 .NET 应用程序,前者将消息发布到系统,后者从队列中读取消息。 第一个应用将模拟来自传感器的数据,而第二个应用将模拟将从队列中读取消息进行处理的系统。
体系结构关系图

练习 1:创建 Azure 资源
任务 1:打开 Azure 门户
-
在任务栏上,选择 Microsoft Edge 图标。
-
在浏览器窗口中,浏览到 Azure 门户 (
https://portal.azure.com),然后使用你将用于此实验室的帐户登录。注意:第一次登录 Azure 门户时,你会看到一个门户教程。 选择“开始使用”,以跳过导览并开始使用门户。
任务 2:创建 Azure 服务总线队列
-
在 Azure 门户中,使用“搜索资源、服务和文档”文本框搜索“服务总线”,然后在结果列表中选择“服务总线” 。
-
在“服务总线”边栏选项卡中,选择“+ 创建” 。
-
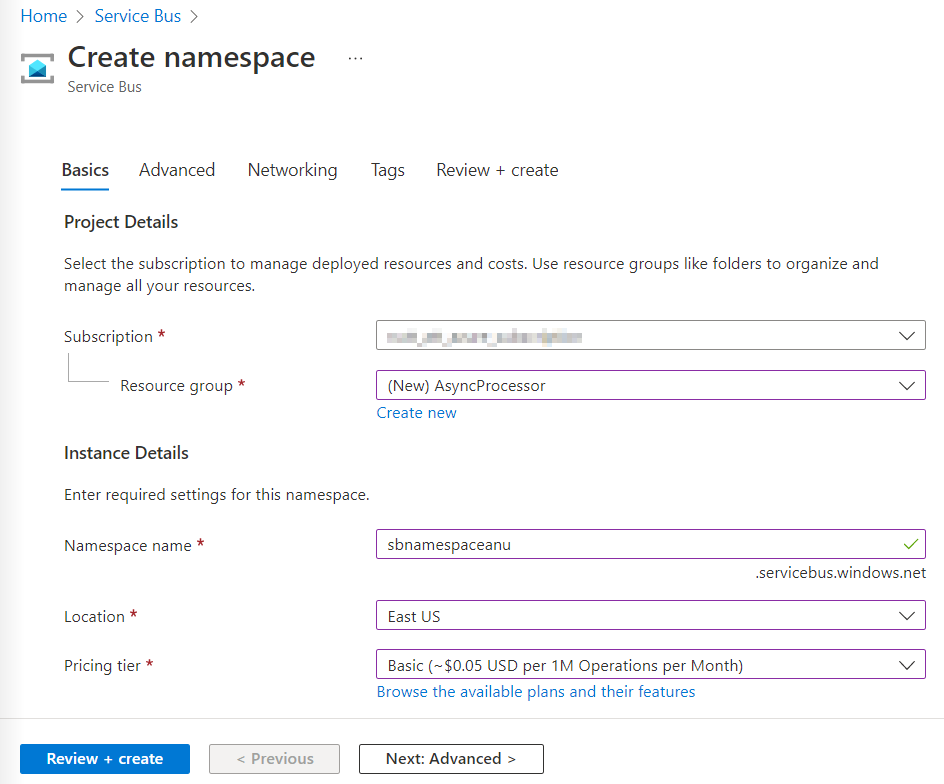
在“创建命名空间”边栏选项卡的“基本信息”选项卡上,执行以下操作,并选择“查看 + 创建” :
设置 操作 “订阅”下拉列表 保留默认值 “资源组”部分 选择“新建”,输入“AsyncProcessor”,然后选择“确定” “命名空间名称”文本框 输入“sbnamespace[yourname]” “地区”下拉列表 选择可在其中部署 Azure 服务总线的任何 Azure 区域 “定价层”下拉列表 选择“基本” 以下屏幕截图显示了“创建命名空间”边栏选项卡的“基本信息”选项卡上配置的设置 。

-
在“查看 + 创建”选项卡中,查看在上述步骤中选择的选项。
-
选择“创建”以使用指定的配置创建服务总线命名空间 。
注意:等待创建任务完成,再继续操作本实验室。
-
在“部署”边栏选项卡上,选择“转到资源”按钮,导航到新创建的“服务总线命名空间”边栏选项卡 。
-
在“服务总线命名空间”边栏选项卡的“设置”部分中,选择“共享访问策略”。 **
-
在策略列表中,选择“RootManageSharedAccessKey”。
-
在 SAS 策略上 :在“RootManageSharedAccessKey”窗格中,在“主连接字符串”条目旁边,选择“复制到剪贴板”按钮,并记录复制的值 。 你将在本实验室后面部分用到它。
注意:选择两个可用密钥中的哪一个都可以。 它们是可互换的。
-
在“服务总线命名空间”边栏选项卡上的“实体”部分中,选择“队列”,然后选择“+ 队列” ** 。
-
在“创建队列”边栏选项卡上,查看可用设置,在“名称”文本框中,输入“messagequeue”,然后选择“创建” 。
-
选择“messagequeue”以显示服务总线队列的属性 。
-
使浏览器窗口保持打开状态。 你将在本实验室后面部分再次用到它。
审阅
在此练习中,你创建了一个 Azure 服务总线命名空间和一个服务总线队列(你将在实验室的剩余部分中使用它)****。
练习 2:创建 .NET Core 项目以将消息发布到服务总线队列
任务 1:创建 .NET Core 项目
-
在实验室计算机上,启动“Visual Studio Code”。
-
在 Visual Studio Code 中的“文件”菜单上,选择“打开文件夹” 。
-
在“打开文件夹”窗口中,浏览到 Allfiles (F):\Allfiles\Labs\10\Starter\MessagePublisher,然后选择“选择文件夹” 。
-
在“Visual Studio Code”窗口中的“菜单”栏上,选择“终端”,然后选择“新建终端” 。
-
在终端提示符下,运行以下命令以在当前文件夹中创建名为 MessagePublisher 的新 .NET 项目:
dotnet new console --framework net8.0 --name MessagePublisher --output .注意:dotnet new 命令将在与项目同名的文件夹中创建一个新的“控制台”项目 。
-
运行以下命令,从 NuGet 导入 7.17.3 版本的 Azure.Messaging.ServiceBus 包**:
dotnet add package Azure.Messaging.ServiceBus --version 7.17.3注意:dotnet add package 命令将从 NuGet 添加 Azure.Messaging.ServiceBus 包 。 有关详细信息,请转到 Azure.Messaging.ServiceBus。
-
在终端提示符下,运行以下命令以生成 .NET Core 控制台应用程序:
dotnet build -
选择“终止终端”(“回收站”图标)以关闭终端窗格和任何关联的进程 。
任务 2:向 Azure 服务总线队列发布消息
-
在“Visual Studio Code”窗口的“资源管理器”窗格中,打开 Program.cs 文件。 **
-
在 Program.cs 文件的“代码编辑器”选项卡上,删除现有文件中的所有代码。 **
-
添加以下代码:
using System; using System.Threading.Tasks; using Azure.Messaging.ServiceBus; namespace MessagePublisher { public class Program { /* The `<serviceBus-connection-string>` placeholder represents the connection string to the target Azure Service Bus namespace */ private const string serviceBusConnectionString = "<serviceBus-connection-string>"; /* To create a string constant named "queueName" with a value of "messagequeue", matching the name of the Service Bus queue.*/ private const string queueName = "messagequeue"; /* Stores the number of messages to be sent to the target queue */ private const int numOfMessages = 3; /* To create a Service Bus client that will own the connection to the target queue */ static ServiceBusClient client = default!; /* To create a Service Bus sender that will be used to publish messages to the target queue */ static ServiceBusSender sender = default!; public static async Task Main(string[] args) { /* To initialize "client" of type "ServiceBusClient" that will provide connectivity to the Service Bus namespace and "sender" that will be responsible for sending messages */ client = new ServiceBusClient(serviceBusConnectionString); sender = client.CreateSender(queueName); /* To create a "ServiceBusMessageBatch" object that will allow you to combine multiple messages into a batch by using the "TryAddMessage" method */ using ServiceBusMessageBatch messageBatch = await sender.CreateMessageBatchAsync(); /* To add messages to a batch and throw an exception if a message size exceeds the limits supported by the batch */ for (int i = 1; i <= numOfMessages; i++) { if (!messageBatch.TryAddMessage(new ServiceBusMessage($"Message {i}"))) { throw new Exception($"The message {i} is too large to fit in the batch."); } } try { /* To create a try block, with "sender" asynchronously publishing messages in the batch to the target queue */ await sender.SendMessagesAsync(messageBatch); Console.WriteLine($"A batch of {numOfMessages} messages has been published to the queue."); } finally { /* To create a finally block that asynchronously disposes of the "sender" and "client" objects, releasing any network and unmanaged resources */ await sender.DisposeAsync(); await client.DisposeAsync(); } } } }注意:通过将 serviceBusConnectionString 字符串常量的值设置为服务总线命名空间的主要连接字符串来更新该常量,然后验证 queueName 常量是否设置为 messagequeue,因而与在本练习前面创建的服务总线队列的名称相匹配
注意:服务总线客户端可以安全地缓存,还可用作应用程序生存期的单一实例。 这被视为定期发布和读取消息时的最佳做法之一。
-
保存 Program.cs 文件。 **
-
在终端提示符下,运行以下命令以启动 .NET Core 控制台应用:
dotnet run注意:如果遇到任何错误,请查看 Allfiles (F):\Allfiles\Labs\10\Solution\MessagePublisher 文件夹中的 Program.cs 文件 。
-
验证在终端提示符下显示的控制台消息是否指出已将三条消息批处理发布到队列。
-
选择“终止终端”(“回收站”图标)以关闭终端窗格和任何关联的进程 。
-
切换到 Microsoft Edge 浏览器,在 Azure 门户中显示服务总线队列 messagequeue。
-
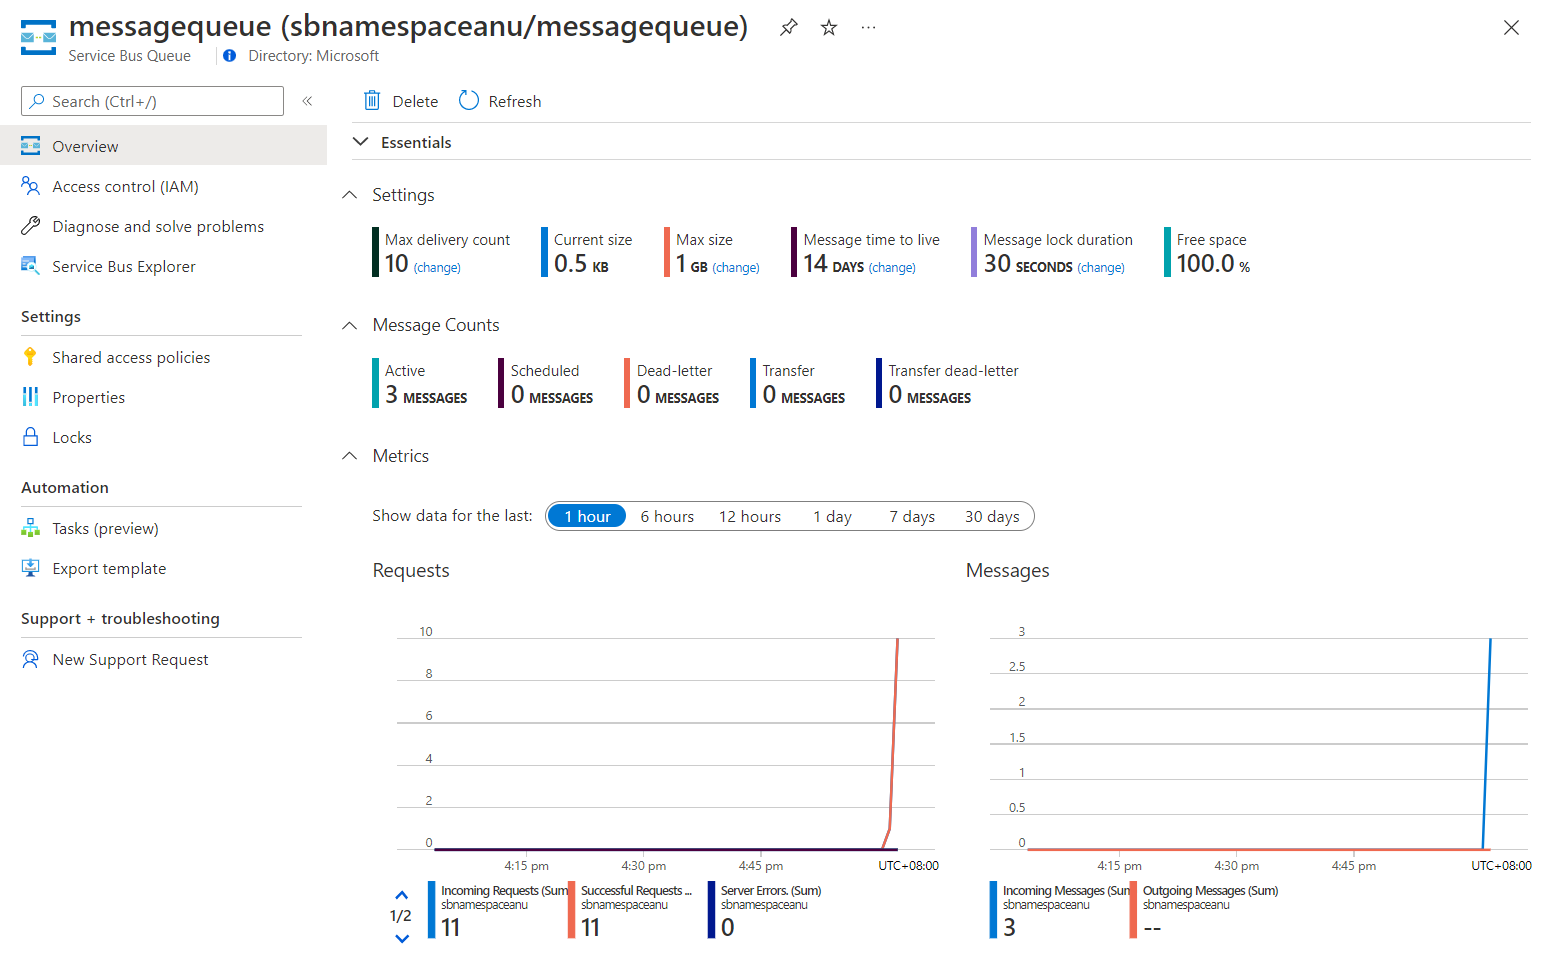
查看“Essentials”窗格,并注意该队列包含三个活动消息。
以下屏幕截图显示服务总线队列指标和消息计数。

-
选择“Service Bus Explorer”**。
-
选择“速览模式”选项卡标题,在“队列”选项卡上,选择 “从头开始速览”按钮****。
-
验证队列是否包含三条消息。
-
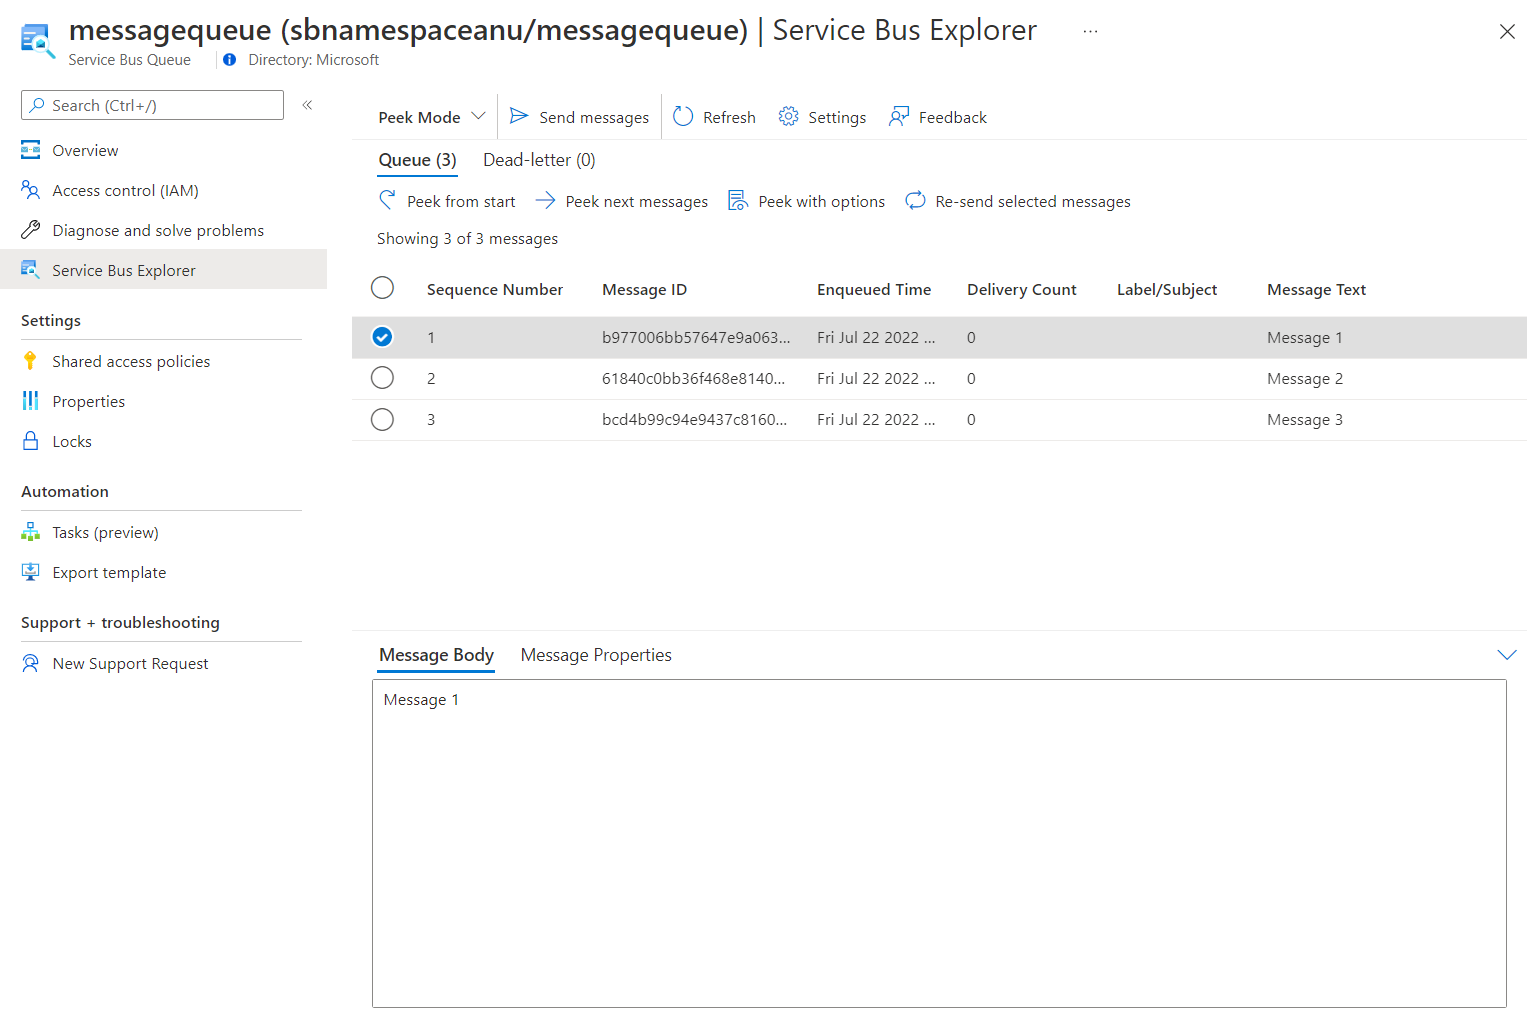
选择第一条消息,并在“消息”窗格中查看其内容。
以下屏幕截图显示第一条消息的内容。

-
关闭“消息”窗格。
审阅
在此练习中,你已配置了将消息发布到 Azure 服务总线队列的 .NET 项目。
练习 3:创建 .NET Core 项目以读取服务总线队列的消息
任务 1:创建 .NET 项目
-
在实验室计算机上,启动“Visual Studio Code”。
-
在 Visual Studio Code 中的“文件”菜单上,选择“打开文件夹” 。
-
在“打开文件夹”窗口中,浏览到 Allfiles (F):\Allfiles\Labs\10\Starter\MessageReader,然后选择“选择文件夹” 。
-
在“Visual Studio Code”窗口中的“菜单”栏上,选择“终端”,然后选择“新建终端” 。
-
在终端提示符下,运行以下命令以在当前文件夹中创建名为 MessageReader 的新 .NET 项目:
dotnet new console --framework net8.0 --name MessageReader --output . -
运行以下命令,从 NuGet 导入 7.17.3 版本的 Azure.Messaging.ServiceBus 包**:
dotnet add package Azure.Messaging.ServiceBus --version 7.17.3 -
在终端提示符下,运行以下命令以生成 .NET Core 控制台应用程序:
dotnet build -
选择“终止终端”(“回收站”图标)以关闭终端窗格和任何关联的进程 。
任务 2:从 Azure 服务总线队列读取消息
-
在“Visual Studio Code”窗口的“资源管理器”窗格中,打开 Program.cs 文件。 **
-
在 Program.cs 文件的“代码编辑器”选项卡上,删除现有文件中的所有代码。 **
-
添加以下代码:
 using System;
 using System.Threading.Tasks;
 using Azure.Messaging.ServiceBus;
 namespace MessageReader
 {
     class Program
     {
         /* The `<serviceBus-connection-string>` placeholder represents
            the connection string to the target Azure Service Bus namespace */
         static string serviceBusConnectionString = "<serviceBus-connection-string>";

         /* To create a string constant named "queueName" with a value
            of "messagequeue", matching the name of the Service Bus queue.*/
         static string queueName = "messagequeue";
         static ServiceBusClient client= default!;

         /* Create a ServiceBusProcessor that will be used to process messages from the queue */
         static ServiceBusProcessor processor = default!;


         static async Task MessageHandler(ProcessMessageEventArgs args)
         {
             /* To create a static async "MessageHandler" task that displays
                the body of messages in the queue as they are being processed
                and deletes them after the processing completes */

             string body = args.Message.Body.ToString();
             Console.WriteLine($"Received: {body}");
             await args.CompleteMessageAsync(args.Message);
         }
         static Task ErrorHandler(ProcessErrorEventArgs args)
         {
             /* To create a static async "ErrorHandler" task that manages
                any exceptions encountered during message processing */
             Console.WriteLine(args.Exception.ToString());
             return Task.CompletedTask;
         }

         static async Task Main()
         {
             /* To initialize "client" of type "ServiceBusClient" that will provide
                connectivity to the Service Bus namespace and "processor" that will
                be responsible for processing of messages */
             client = new ServiceBusClient(serviceBusConnectionString);
             processor = client.CreateProcessor(queueName, new ServiceBusProcessorOptions());
             try
             {
                 /* To create a try block, which first implements a message and error
                     processing handler, initiates message processing, and stops
                     processing following a user input */
                 processor.ProcessMessageAsync += MessageHandler;
                 processor.ProcessErrorAsync += ErrorHandler;

                 await processor.StartProcessingAsync();
                 Console.WriteLine("Wait for a minute and then press any key to end the processing");
                 Console.ReadKey();

                 Console.WriteLine("\nStopping the receiver...");
                 await processor.StopProcessingAsync();
                 Console.WriteLine("Stopped receiving messages");
             }
             finally
             {
                /* To create a finally block that asynchronously disposes of the "processor"
                    and "client" objects, releasing any network and unmanaged resources */
                 await processor.DisposeAsync();
                 await client.DisposeAsync();
             }
         }
     }
 }
注意:将 serviceBusConnectionString 字符串常量的值设置为你之前在本实验室中记录的服务总线命名空间的主要连接字符串来更新该常量。
-
保存 Program.cs 文件。 **
-
在终端提示符下,运行以下命令以启动 .NET Core 控制台应用:
dotnet run注意:如果遇到任何错误,请查看 Allfiles (F):\Allfiles\Labs\10\Solution\MessageReader 文件夹中的 Program.cs 文件 。
-
验证在终端提示符下显示的控制台消息是否指出队列中的三条消息均已收到。
-
在终端提示符下,按任意键即可停止接收程序并终止应用执行操作。
-
选择“终止终端”(“回收站”图标)以关闭终端窗格和任何关联的进程 。
-
切换回 Microsoft Edge 浏览器,在 Azure 门户中显示服务总线队列 messagequeue。
-
在“服务总线资源管理器(预览)”边栏选项卡上,选择“从头开始速览”,并注意队列中的活动消息数已更改为“0” 。
审阅
在本练习中,你已使用 .NET 库读取和删除 Azure 服务总线队列中的消息。