랩 10: Azure Service Bus 큐를 사용하여 비동기적으로 메시지 처리
Microsoft Azure 사용자 인터페이스
Microsoft 클라우드 도구의 동적 특성을 고려할 때 이 교육 콘텐츠를 개발한 후 발생하는 Azure UI 변경이 발생할 수 있습니다. 따라서 랩 지침 및 랩 단계가 올바르게 정렬되지 않을 수 있습니다.
Microsoft는 커뮤니티에서 변경해야 할 사항이 있음을 알려줄 때 이 학습 과정을 업데이트합니다. 그러나 클라우드 업데이트가 자주 이루어지기 때문에 이 학습 콘텐츠가 업데이트되기 전에 UI가 변경될 수 있습니다. 이 경우 변경 사항에 적응하고 필요에 따라 랩에서 작업합니다.
Instructions
시작하기 전에
랩 환경에 로그인
다음 자격 증명을 사용하여 Windows 11 VM(가상 머신)에 로그인합니다.
- 사용자 이름:
Admin - 암호:
Pa55w.rd
참고: 강사가 가상 랩 환경 연결에 대한 지침을 제공합니다.
설치된 애플리케이션 검토
Windows 11 데스크톱에서 작업 표시줄을 찾습니다. 작업 표시줄에는 다음을 포함하여 이 랩에서 사용할 애플리케이션에 대한 아이콘이 포함되어 있습니다.
- Microsoft Edge
- Visual Studio Code
랩 시나리오
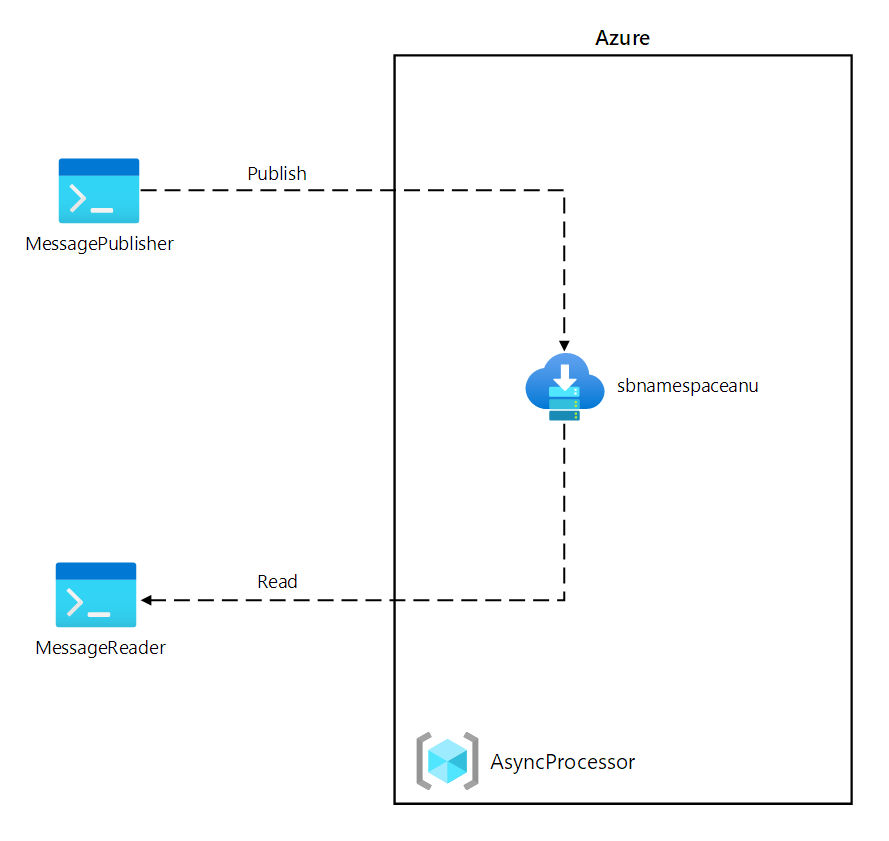
이 랩에서는 Azure Service Bus 큐를 사용하여 이 시나리오에 대한 개념 증명을 만듭니다. 시스템이 작동하는 방법을 보여 주려면 시스템에 메시지를 게시하는 .NET 프로젝트와 큐에서 메시지를 읽을 두 번째 .NET 애플리케이션을 만듭니다. 첫 번째 앱은 센서에서 생성되는 데이터를 시뮬레이션하고, 두 번째 앱은 처리를 위해 큐에서 메시지를 읽는 시스템을 시뮬레이션합니다.
아키텍처 다이어그램
연습 1: Azure 리소스 만들기
작업 1: Azure Portal 열기
-
작업 표시줄에서 Microsoft Edge 아이콘을 선택합니다.
-
브라우저 창에서 Azure Portal(
https://portal.azure.com)로 이동하고 이 랩에 사용할 계정으로 로그인합니다.참고: Azure Portal에 처음 로그인하는 경우 포털 둘러보기가 제공됩니다. 둘러보기를 건너뛰고 포털 사용을 시작하려면 시작하기를 선택합니다.
작업 2: Azure Service Bus 큐 만들기
-
Azure Portal에서 리소스, 서비스 및 문서 검색 텍스트 상자를 사용하여 Service Bus를 검색한 다음, 결과 목록에서 Service Bus를 선택합니다.
-
Service Bus 창에서 + 만들기를 선택합니다.
-
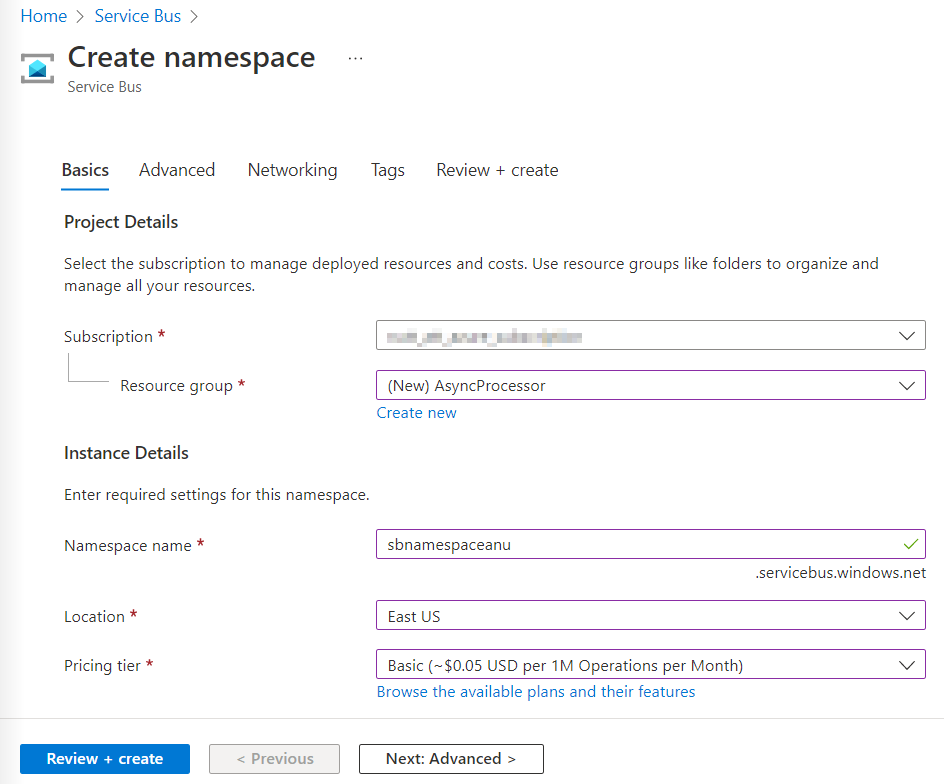
네임스페이스 만들기 창의 기본 사항 탭에서 다음 작업을 수행하고 검토 + 만들기를 선택합니다.
설정 작업 구독 드롭다운 목록 기본값을 유지합니다. 리소스 그룹 섹션 새로 만들기를 선택하고 AsyncProcessor를 입력한 다음 확인을 선택합니다. 네임스페이스 이름 텍스트 상자 sbnamespace [사용자 이름] 을 입력합니다. 지역 드롭다운 목록 Azure Service Bus를 배포할 수 있는 Azure 지역을 선택합니다. 가격 책정 계층 드롭다운 목록 기본을 선택합니다. 다음 스크린샷은 네임스페이스 만들기 창의 기본 사항 탭에 구성된 설정을 보여 줍니다.
-
검토 + 만들기 탭에서 이전 단계에서 선택한 옵션을 검토합니다.
-
만들기를 선택하여 지정한 구성으로 Service Bus 네임스페이스를 만듭니다.
참고: 이 랩을 계속 진행하기 전에 만들기 작업이 완료될 때까지 기다립니다.
-
배포 창에서 리소스로 이동 단추를 선택하여 새로 만든 Service Bus 네임스페이스의 창으로 이동합니다.
-
Service Bus 네임스페이스의 설정 섹션에서 공유 액세스 정책을 선택합니다.
-
정책 목록에서 RootManageSharedAccessKey를 선택합니다.
-
SAS 정책: RootManageSharedAccessKey 창에서 기본 연결 문자열 항목 옆에 있는 클립보드에 복사 단추를 선택하고 복사한 값을 기록합니다. 이 랩의 뒷부분에서 이것을 사용합니다.
참고: 선택한 두 개의 사용 가능한 키 중 어느 것을 선택하든 상관없습니다. 서로 교환하여 사용할 수 있습니다.
-
Service Bus 네임스페이스 블레이드의 엔터티 섹션에서 큐를 선택한 다음, + 큐를 선택합니다.
-
큐 만들기 창에서 이름 텍스트 상자의 사용 가능한 설정을 검토하고 messagequeue를 입력한 다음 만들기를 선택합니다.
-
messagequeue를 선택하여 Service Bus 큐의 속성을 표시합니다.
-
브라우저 창은 열어 둡니다. 이것을 이 랩의 뒷부분에서 다시 사용합니다.
검토
이 연습에서는 Azure Service Bus 네임스페이스와 랩의 나머지 부분에서 사용할 Service Bus 큐를 만들었습니다.
연습 2: .NET Core 프로젝트를 만들어 Service Bus 큐에 메시지 게시
작업 1: .NET Core 프로젝트 만들기
-
랩 컴퓨터에서 Visual Studio Code를 시작합니다.
-
Visual Studio Code의 파일 메뉴에서 폴더 열기를 선택합니다.
-
폴더 열기 창에서 Allfiles (F):\Allfiles\Labs\10\Starter\MessagePublisher로 이동한 다음 폴더 선택을 선택합니다.
-
Visual Studio Code 창의 메뉴 모음에서 터미널을 선택한 다음, 새 터미널을 선택합니다.
-
터미널 프롬프트에서 다음 명령을 실행하여 현재 폴더에 MessagePublisher라는 새 .NET 프로젝트를 만듭니다.
dotnet new console --framework net8.0 --name MessagePublisher --output .참고: dotnet new 명령은 새 콘솔 프로젝트를 프로젝트와 이름이 같은 폴더에 만듭니다.
-
다음 명령을 실행하여 NuGet에서 Azure.Messaging.ServiceBus 패키지의 버전 7.17.3을 가져옵니다.
dotnet add package Azure.Messaging.ServiceBus --version 7.17.3참고: dotnet add package 명령은 NuGet에서 Azure.Messaging.ServiceBus 패키지를 추가합니다. 자세한 내용은 Azure.Messaging.ServiceBus를 참조하세요.
-
터미널 프롬프트에서 다음 명령을 실행하여 .NET Core 콘솔 애플리케이션을 빌드합니다.
dotnet build -
터미널 종료(휴지통 아이콘)를 선택하여 터미널 창 및 관련된 모든 프로세스를 닫습니다.
작업 2: Azure Service Bus 큐에 메시지 게시
-
Visual Studio Code 창의 탐색기 창에서 Program.cs 파일을 엽니다.
-
Program.cs 파일의 코드 편집기 탭에서 기존 파일의 모든 코드를 삭제합니다.
-
다음 코드를 추가합니다.
using System; using System.Threading.Tasks; using Azure.Messaging.ServiceBus; namespace MessagePublisher { public class Program { /* The `<serviceBus-connection-string>` placeholder represents the connection string to the target Azure Service Bus namespace */ private const string serviceBusConnectionString = "<serviceBus-connection-string>"; /* To create a string constant named "queueName" with a value of "messagequeue", matching the name of the Service Bus queue.*/ private const string queueName = "messagequeue"; /* Stores the number of messages to be sent to the target queue */ private const int numOfMessages = 3; /* To create a Service Bus client that will own the connection to the target queue */ static ServiceBusClient client = default!; /* To create a Service Bus sender that will be used to publish messages to the target queue */ static ServiceBusSender sender = default!; public static async Task Main(string[] args) { /* To initialize "client" of type "ServiceBusClient" that will provide connectivity to the Service Bus namespace and "sender" that will be responsible for sending messages */ client = new ServiceBusClient(serviceBusConnectionString); sender = client.CreateSender(queueName); /* To create a "ServiceBusMessageBatch" object that will allow you to combine multiple messages into a batch by using the "TryAddMessage" method */ using ServiceBusMessageBatch messageBatch = await sender.CreateMessageBatchAsync(); /* To add messages to a batch and throw an exception if a message size exceeds the limits supported by the batch */ for (int i = 1; i <= numOfMessages; i++) { if (!messageBatch.TryAddMessage(new ServiceBusMessage($"Message {i}"))) { throw new Exception($"The message {i} is too large to fit in the batch."); } } try { /* To create a try block, with "sender" asynchronously publishing messages in the batch to the target queue */ await sender.SendMessagesAsync(messageBatch); Console.WriteLine($"A batch of {numOfMessages} messages has been published to the queue."); } finally { /* To create a finally block that asynchronously disposes of the "sender" and "client" objects, releasing any network and unmanaged resources */ await sender.DisposeAsync(); await client.DisposeAsync(); } } } }참고: 해당 값을 Service Bus 네임스페이스의 기본 연결 문자열로 설정하여 serviceBusConnectionString 문자열 상수를 업데이트하고 queueName 상수가 이 연습의 앞부분에서 만든 Service Bus 큐의 이름과 일치하도록 messagequeue로 설정되었는지 확인합니다.
참고: Service Bus 클라이언트는 애플리케이션의 수명 동안 싱글톤으로 캐시하고 사용할 수 있습니다. 이는 정기적으로 메시지를 게시하고 읽을 때 모범 사례 중 하나로 간주됩니다.
-
Program.cs 파일을 저장합니다.
-
터미널 프롬프트에서 다음 명령을 실행하여 .NET Core 콘솔 앱을 시작합니다.
dotnet run참고: 오류가 발생하면 Allfiles (F):\Allfiles\Labs\10\Solution\MessagePublisher 폴더에서 Program.cs 파일을 검토합니다.
-
터미널 프롬프트에 표시되는 콘솔 메시지에 3개의 메시지 일괄 처리가 큐에 게시되었는지 확인합니다.
-
터미널 종료(휴지통 아이콘)를 선택하여 터미널 창 및 관련된 모든 프로세스를 닫습니다.
-
Azure Portal에서 Service Bus 큐 messagequeue를 표시하는 Microsoft Edge 브라우저로 전환합니다.
-
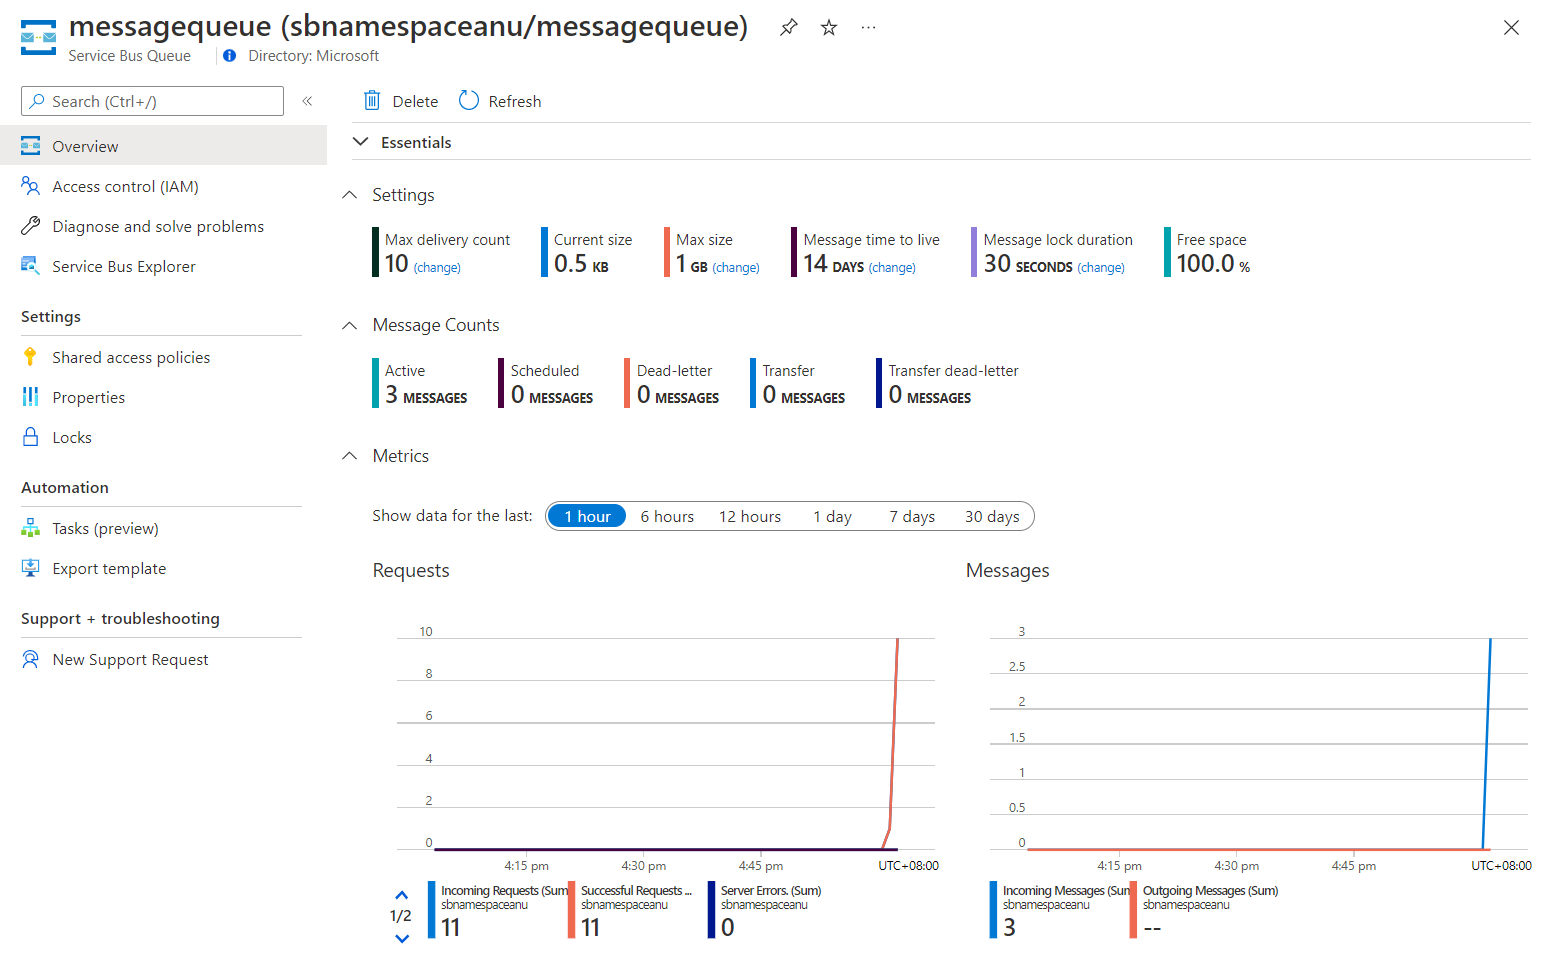
Essentials 창을 검토하고 큐에 세 개의 활성 메시지가 포함되어 있음을 확인합니다.
다음 스크린샷은 Service Bus 큐 메트릭 및 메시지 수를 표시합니다.
-
Service Bus Explorer를 선택합니다.
-
피킹 모드 탭 헤더를 선택한 상태에서 큐 탭에서 시작에서 피킹 단추를 선택합니다.
-
큐에 세 개의 메시지가 포함되어 있는지 확인합니다.
-
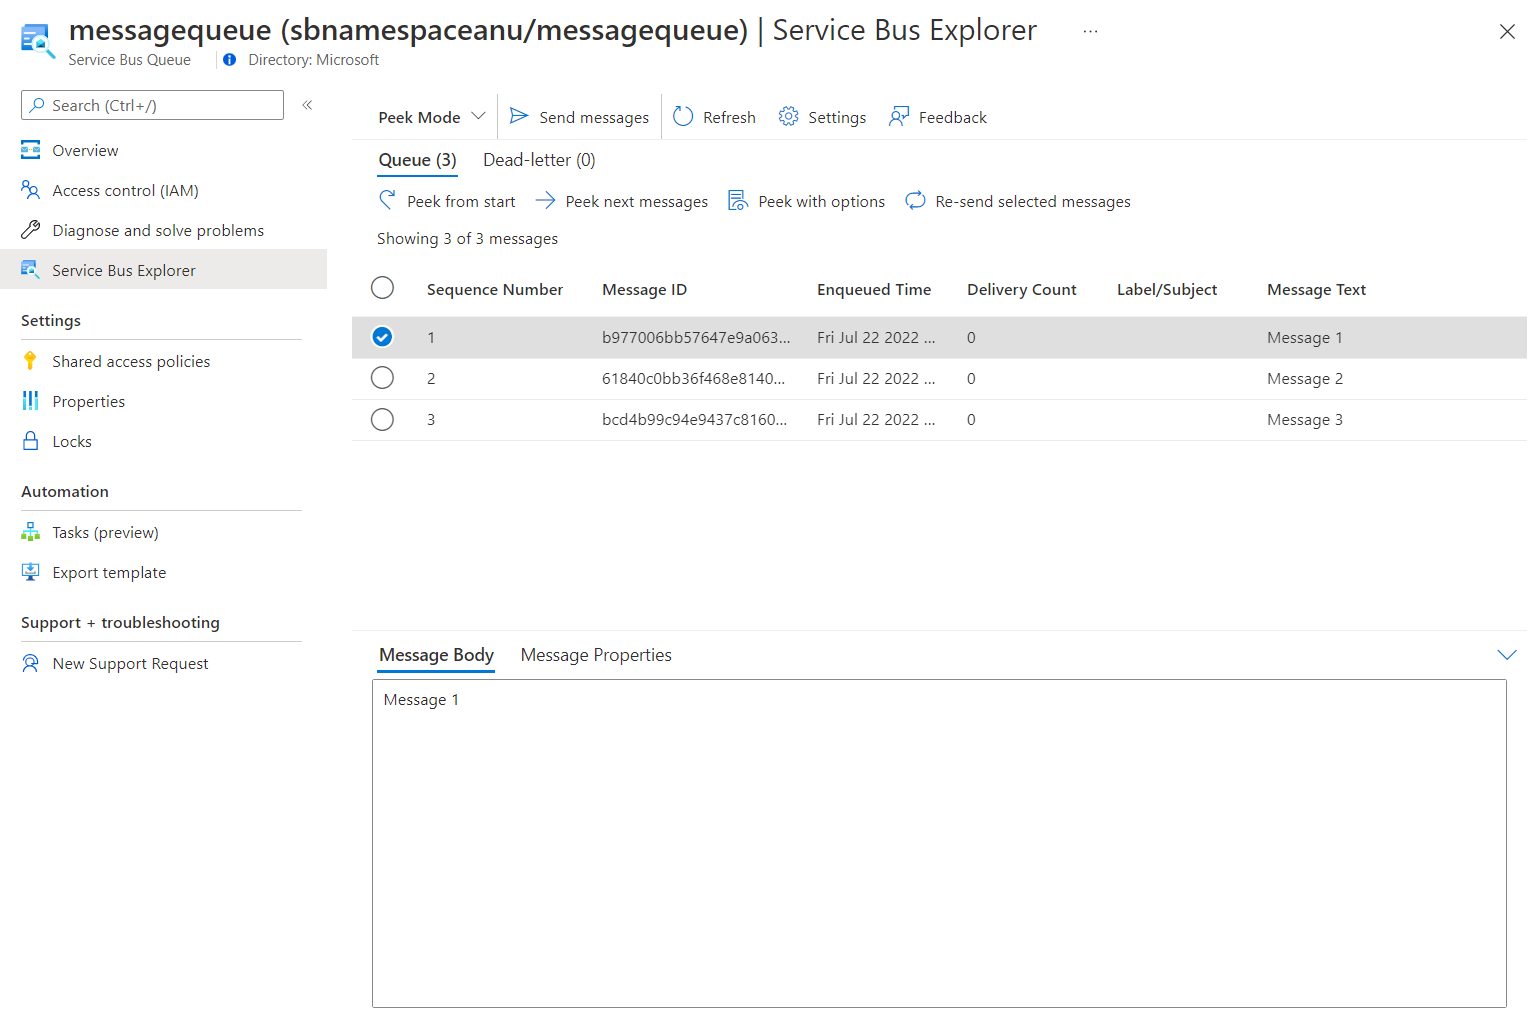
첫 번째 메시지를 선택하고 메시지 창에서 해당 내용을 검토합니다.
다음 스크린샷은 첫 번째 메시지의 내용을 표시합니다.
-
메시지 창을 닫습니다.
검토
이 연습에서는 Azure Service Bus 큐에 메시지를 게시하는 .NET 프로젝트를 구성했습니다.
연습 3: .NET Core 프로젝트를 만들어 Service Bus 큐에서 메시지 읽기
작업 1: .NET 프로젝트 만들기
-
랩 컴퓨터에서 Visual Studio Code를 시작합니다.
-
Visual Studio Code의 파일 메뉴에서 폴더 열기를 선택합니다.
-
폴더 열기 창에서 Allfiles (F):\Allfiles\Labs\10\Starter\MessageReader로 이동한 다음 폴더 선택을 선택합니다.
-
Visual Studio Code 창의 메뉴 모음에서 터미널을 선택한 다음, 새 터미널을 선택합니다.
-
터미널 프롬프트에서 다음 명령을 실행하여 현재 폴더에 MessageReader라는 새 .NET 프로젝트를 만듭니다.
dotnet new console --framework net8.0 --name MessageReader --output . -
다음 명령을 실행하여 NuGet에서 Azure.Messaging.ServiceBus 패키지의 버전 7.17.3을 가져옵니다.
dotnet add package Azure.Messaging.ServiceBus --version 7.17.3 -
터미널 프롬프트에서 다음 명령을 실행하여 .NET Core 콘솔 애플리케이션을 빌드합니다.
dotnet build -
터미널 종료(휴지통 아이콘)를 선택하여 터미널 창 및 관련된 모든 프로세스를 닫습니다.
작업 2: Azure Service Bus 큐에서 메시지 읽기
-
Visual Studio Code 창의 탐색기 창에서 Program.cs 파일을 엽니다.
-
Program.cs 파일의 코드 편집기 탭에서 기존 파일의 모든 코드를 삭제합니다.
-
다음 코드를 추가합니다.
using System; using System.Threading.Tasks; using Azure.Messaging.ServiceBus; namespace MessageReader { class Program { /* The `<serviceBus-connection-string>` placeholder represents the connection string to the target Azure Service Bus namespace */ static string serviceBusConnectionString = "<serviceBus-connection-string>"; /* To create a string constant named "queueName" with a value of "messagequeue", matching the name of the Service Bus queue.*/ static string queueName = "messagequeue"; static ServiceBusClient client= default!; /* Create a ServiceBusProcessor that will be used to process messages from the queue */ static ServiceBusProcessor processor = default!; static async Task MessageHandler(ProcessMessageEventArgs args) { /* To create a static async "MessageHandler" task that displays the body of messages in the queue as they are being processed and deletes them after the processing completes */ string body = args.Message.Body.ToString(); Console.WriteLine($"Received: {body}"); await args.CompleteMessageAsync(args.Message); } static Task ErrorHandler(ProcessErrorEventArgs args) { /* To create a static async "ErrorHandler" task that manages any exceptions encountered during message processing */ Console.WriteLine(args.Exception.ToString()); return Task.CompletedTask; } static async Task Main() { /* To initialize "client" of type "ServiceBusClient" that will provide connectivity to the Service Bus namespace and "processor" that will be responsible for processing of messages */ client = new ServiceBusClient(serviceBusConnectionString); processor = client.CreateProcessor(queueName, new ServiceBusProcessorOptions()); try { /* To create a try block, which first implements a message and error processing handler, initiates message processing, and stops processing following a user input */ processor.ProcessMessageAsync += MessageHandler; processor.ProcessErrorAsync += ErrorHandler; await processor.StartProcessingAsync(); Console.WriteLine("Wait for a minute and then press any key to end the processing"); Console.ReadKey(); Console.WriteLine("\nStopping the receiver..."); await processor.StopProcessingAsync(); Console.WriteLine("Stopped receiving messages"); } finally { /* To create a finally block that asynchronously disposes of the "processor" and "client" objects, releasing any network and unmanaged resources */ await processor.DisposeAsync(); await client.DisposeAsync(); } } } }참고: 이 랩의 앞부분에서 기록한 Service Bus 네임스페이스의 기본 연결 문자열로 값을 설정하여 serviceBusConnectionString 문자열 상수를 업데이트합니다.
-
Program.cs 파일을 저장합니다.
-
터미널 프롬프트에서 다음 명령을 실행하여 .NET Core 콘솔 앱을 시작합니다.
dotnet run참고: 오류가 발생하면 Allfiles (F):\Allfiles\Labs\10\Solution\MessageReader 폴더에서 Program.cs 파일을 검토합니다.
-
터미널 프롬프트에 표시되는 콘솔 메시지에 큐에 있는 세 개의 메시지가 각각 수신되었는지 확인합니다.
-
터미널 프롬프트에서 아무 키나 눌러 수신기를 중지하고 앱 실행을 종료합니다.
-
터미널 종료(휴지통 아이콘)를 선택하여 터미널 창 및 관련된 모든 프로세스를 닫습니다.
-
Azure Portal에서 Service Bus 큐 messagequeue를 표시하는 Microsoft Edge 브라우저로 다시 전환합니다.
-
Service Bus Explorer(미리 보기) 블레이드에서 시작에서 피킹을 선택하고 큐의 활성 메시지 수가 0으로 변경되었음을 확인합니다.
검토
이 연습에서는 .NET 라이브러리를 사용하여 Azure Service Bus 큐에서 메시지를 읽고 삭제했습니다.