랩 03: .NET용 Azure Storage SDK를 사용하여 Azure Storage 리소스 및 메타데이터 검색
Microsoft Azure 사용자 인터페이스
Microsoft 클라우드 도구의 동적 특성을 감안할 때 이 교육 콘텐츠를 개발한 후 발생하는 Azure UI(사용자 인터페이스) 변경 내용 나타날 수 있습니다. 따라서 랩 지침 및 랩 단계가 올바르게 정렬되지 않을 수 있습니다.
Microsoft는 커뮤니티에서 변경해야 할 사항이 있음을 알려줄 때 이 학습 과정을 업데이트합니다. 그러나 클라우드 업데이트가 자주 이루어지기 때문에 이 학습 콘텐츠가 업데이트되기 전에 UI가 변경될 수 있습니다. 이 경우 변경 사항에 적응하고 필요에 따라 랩에서 작업합니다.
Instructions
시작하기 전에
랩 환경에 로그인
다음 자격 증명을 사용하여 Windows 11 VM(가상 머신)에 로그인합니다.
- 사용자 이름:
Admin - 암호:
Pa55w.rd
참고: 강사가 가상 랩 환경 연결에 대한 지침을 제공합니다.
설치된 애플리케이션 검토
Windows 11 데스크톱에서 작업 표시줄을 찾습니다. 작업 표시줄에는 다음을 포함하여 이 랩에서 사용할 애플리케이션에 대한 아이콘이 포함되어 있습니다.
- Microsoft Edge
- 파일 탐색기
랩 시나리오
이 랩에서는 Azure Storage SDK를 사용하여 C# 애플리케이션 내에서 Azure Storage 컨테이너에 액세스하는 방법을 알아봅니다. 또한 메타데이터에 액세스하고 URI 정보를 노출하여 스토리지 계정의 컨테이너 내용에 액세스하는 방법을 알아봅니다.
이 비디오 링크 를 마우스 오른쪽 단추로 클릭하고 ‘새 탭/새 창에서 링크 열기’를 선택하여 이 비디오를 봅니다.
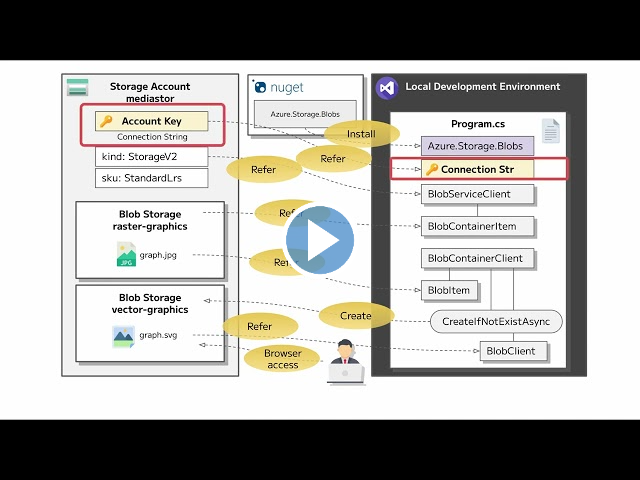
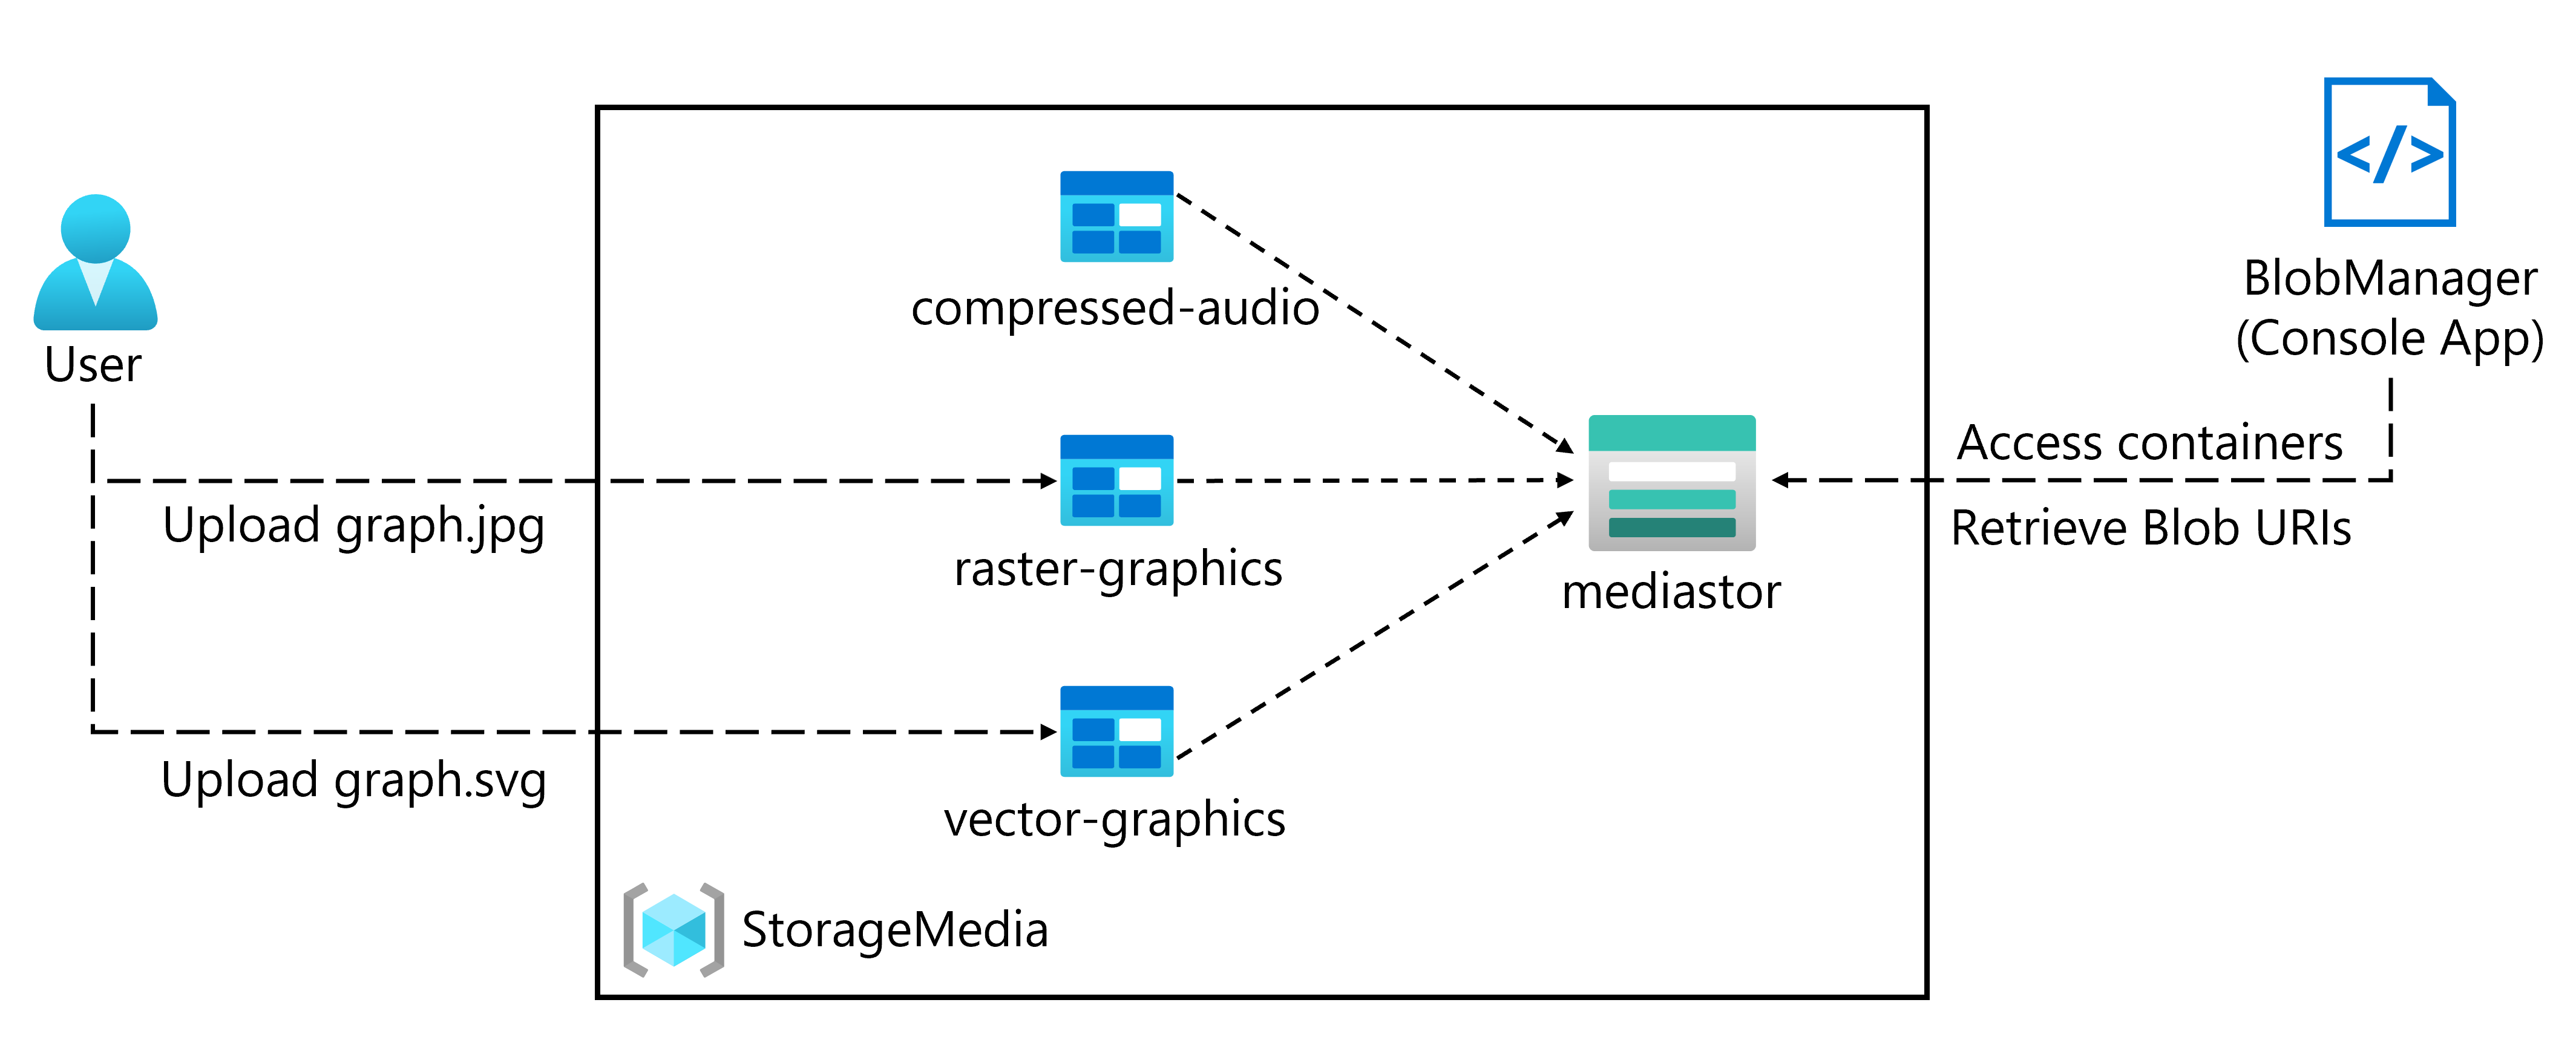
아키텍처 다이어그램
연습 1: Azure 리소스 만들기
작업 1: Azure Portal 열기
-
작업 표시줄에서 Microsoft Edge 아이콘을 선택합니다.
-
브라우저 창에서 Azure Portal(
https://portal.azure.com)로 이동한 다음, 이 랩에 사용할 계정으로 로그인합니다.참고: Azure Portal에 처음 로그인하는 경우 포털 둘러보기가 제공됩니다. 둘러보기를 건너뛰고 포털 사용을 시작하려면 시작하기를 선택합니다.
작업 2: Storage 계정 만들기
-
Azure Portal에서 리소스, 서비스, 문서 검색 텍스트 상자를 사용하여 스토리지 계정을 검색한 다음, 결과 목록에서 스토리지 계정을 선택합니다.
-
스토리지 계정 블레이드에서 + 만들기를 선택합니다.
-
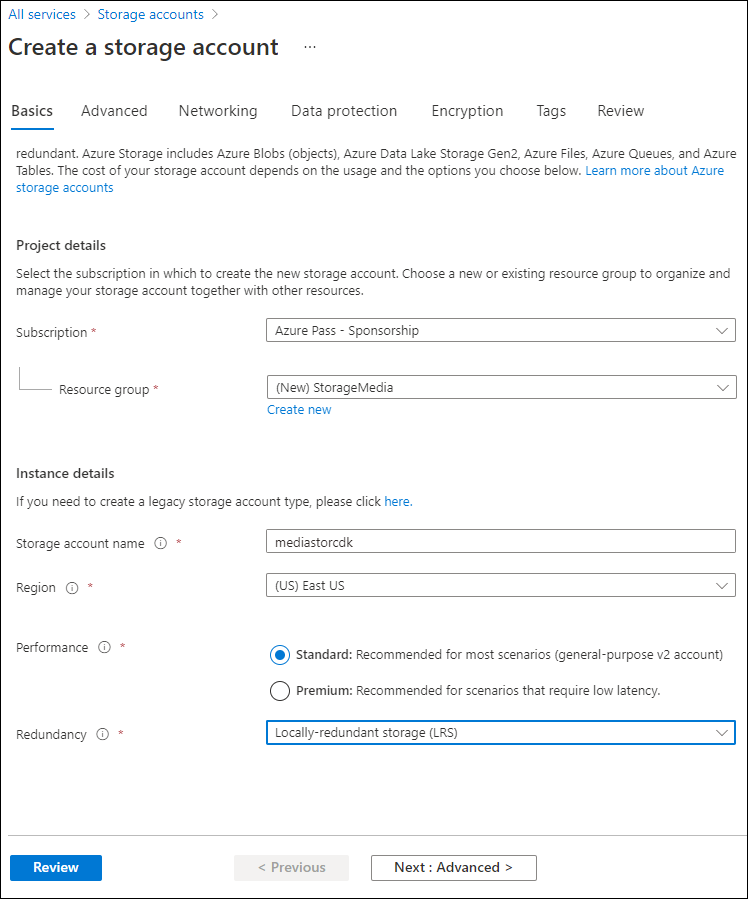
스토리지 계정 만들기 블레이드의 기본 사항 탭에서 다음 작업을 수행하고 다음: 고급:
설정 작업 구독 드롭다운 목록 기본값을 유지합니다. 리소스 그룹 섹션 새로 만들기를 선택하고, StorageMedia를 입력한 다음, 확인을 선택합니다. 스토리지 계정 이름 텍스트 상자 mediastor [사용자 이름] 을 입력합니다. 지역 드롭다운 목록 (미국) 미국 동부를 선택합니다. 주 서비스 변경 내용 없음 성능 섹션 표준 옵션을 선택합니다. 중복도 드롭다운 목록 LRS(로컬 중복 스토리지) 를 선택합니다. 다음 스크린샷은 스토리지 계정 만들기 블레이드에 구성된 설정을 표시합니다.
-
고급 탭에서 개별 컨테이너에 대한 익명 액세스 허용이 선택되어 있는지 확인합니다. 설정이 활성화되어 있지 않은지 확인한 다음 검토선택합니다.
-
검토 탭에서 이전 단계 중 선택한 옵션을 검토합니다.
-
지정된 구성을 사용하여 스토리지 계정을 만들려면 만들기를 선택합니다.
참고: 이 랩을 진행하기 전에 만들기 작업이 완료될 때까지 기다립니다.
-
리소스로 이동을 선택합니다.
-
스토리지 계정 블레이드의 설정 섹션에서 엔드포인트 링크를 선택합니다.
-
엔드포인트 섹션에서 Blob Service 텍스트 상자의 값을 클립보드에 복사합니다.
참고: 이 엔드포인트 값은 랩에서 나중에 사용합니다.
-
메모장을 연 다음, 복사한 Blob service 값을 메모장에 붙여넣습니다.
-
스토리지 계정 블레이드의 보안 + 네트워킹 섹션에서 액세스 키를 선택합니다.
-
스토리지 계정 이름 값을 클립보드에 복사한 다음, 메모장에 붙여넣습니다.
-
액세스 키 블레이드에서 키 텍스트 상자 중 하나에 표시를 선택합니다. 키는 상호 교환되어 어떤 것을 사용하든 상관 없습니다.
-
키 중 하나를 검토한 다음 키 상자의 값을 클립보드에 복사한 다음 메모장에 붙여넣습니다.
참고: 이 랩에서 나중에 이러한 모든 값을 사용합니다.
검토
이 연습에서는 랩의 나머지 부분에서 사용할 새 스토리지 계정을 만들었습니다.
연습 2: 컨테이너에 BLOB 업로드
작업 1: 스토리지 계정 컨테이너 만들기
-
스토리지 계정 블레이드에서 데이터 스토리지 섹션에 있는 컨테이너 링크를 선택합니다.
-
컨테이너 섹션에서 + 컨테이너를 선택합니다.
-
새 컨테이너 팝업 창에서 다음 작업을 수행하고 만들기를 선택합니다.
설정 작업 이름 텍스트 상자 raster-graphics를 입력합니다. 공용 액세스 수준 드롭다운 목록 프라이빗(익명 액세스 없음) 을 선택합니다. -
컨테이너 섹션에서 + 컨테이너를 선택합니다.
-
새 컨테이너 팝업 창에서 다음 작업을 수행한 다음, 만들기를 선택합니다.
설정 작업 이름 텍스트 상자 compressed-audio를 입력합니다. 공용 액세스 수준 드롭다운 목록 프라이빗(익명 액세스 없음) 을 선택합니다. -
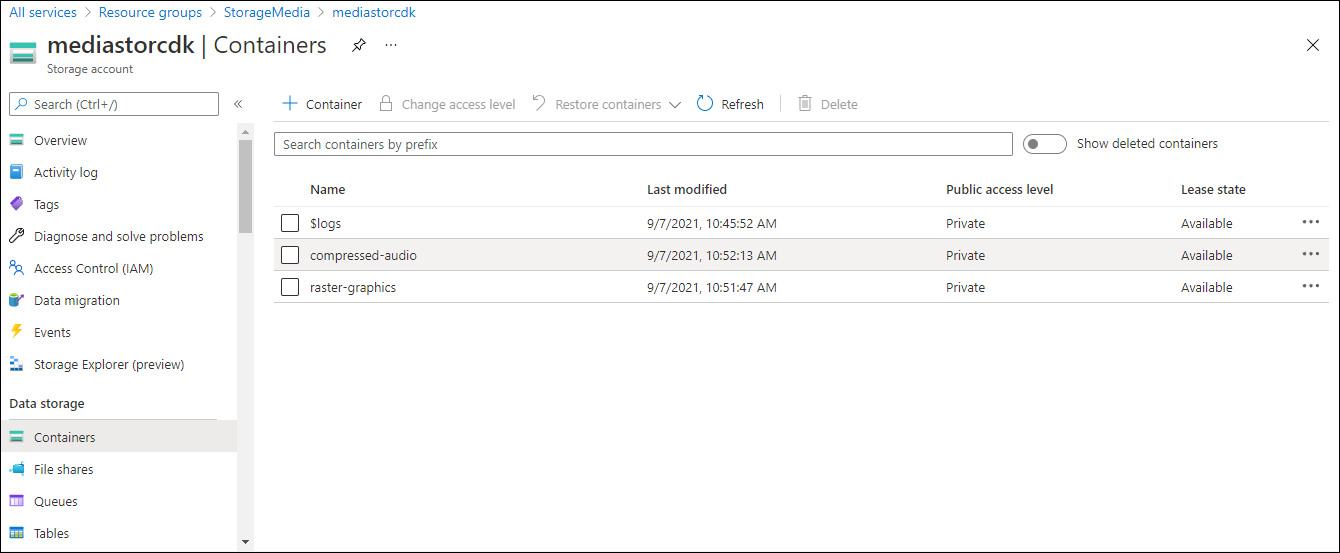
컨테이너 섹션에서 업데이트된 컨테이너 목록을 확인합니다.
다음 스크린샷은 스토리지 계정 만들기 블레이드에 구성된 설정을 표시합니다.
작업 2: 스토리지 계정 BLOB 업로드
-
컨테이너 섹션에서 최근에 만든 래스터 그래픽 컨테이너를 선택합니다.
-
컨테이너 블레이드에서 업로드를 선택합니다.
-
Blob 업로드 창에서 다음 작업을 수행한 다음, 업로드를 선택합니다.
| 설정 | 작업 |
|---|---|
| 파일 섹션 | 파일 찾아보기를 선택하거나 끌어서 놓기 기능을 사용합니다. |
| 파일 탐색기 창 | Allfiles (F):\Allfiles\Labs\03\Starter\Images로 이동하고, graph.jpg 파일을 선택한 다음, 열기를 선택합니다. |
| 파일이 이미 있는 경우 덮어쓰기 확인란 | 확인란이 선택되어 있는지 확인합니다. |
참고: 이 랩을 계속하기 전에 Blob이 업로드될 때까지 기다립니다.
검토
이 연습에서는 스토리지 계정에 자리 표시자 컨테이너를 만든 다음, 컨테이너 중 하나를 Blob으로 채웠습니다.
연습 3: .NET SDK를 사용하여 컨테이너에 액세스
작업 1: .NET 프로젝트 만들기
-
시작 화면에서 Visual Studio Code 타일을 선택합니다.
-
파일 메뉴에서 폴더 열기를 선택하고, Allfiles (F):\Allfiles\Labs\03\Starter\BlobManager로 이동한 다음, 폴더 선택을 선택합니다.
-
Visual Studio Code 창의 메뉴 모음에서 터미널을 선택한 다음, 새 터미널을 선택합니다.
-
터미널에서 다음 명령을 실행하여 현재 폴더에 BlobManager라는 새 .NET 프로젝트를 만듭니다.
dotnet new console --framework net8.0 --name BlobManager --output .참고: dotnet new 명령은 새 콘솔 프로젝트를 프로젝트와 이름이 같은 폴더에 만듭니다.
-
터미널에서 다음 명령을 실행하여 NuGet에서 Azure.Storage.Blobs 버전 12.18.0을 가져옵니다.
dotnet add package Azure.Storage.Blobs --version 12.18.0참고: dotnet 패키지 추가 명령은 NuGet에서 Azure.Storage.Blobs 패키지를 추가합니다. 자세한 내용은 Azure.Storage.Blobs를 참조하세요.
-
터미널에서 다음 명령을 실행하여 .NET 웹 애플리케이션을 빌드합니다.
dotnet build -
터미널 종료 또는 휴지통 아이콘을 선택하여 현재 열려 있는 터미널 및 관련된 모든 작업을 종료합니다.
작업 2: 프로그램 클래스를 수정하여 스토리지에 액세스
-
Visual Studio Code 창의 탐색기 창에서 Program.cs 파일을 엽니다.
-
Program.cs 파일의 코드 편집기 탭에서 기존 파일의 모든 코드를 삭제합니다.
-
다음 코드를 추가합니다.
using Azure.Storage; using Azure.Storage.Blobs; using Azure.Storage.Blobs.Models; using System; using System.Threading.Tasks; public class Program { //Update the blobServiceEndpoint value that you recorded previously in this lab. private const string blobServiceEndpoint = "<primary-blob-service-endpoint>"; //Update the storageAccountName value that you recorded previously in this lab. private const string storageAccountName = "<storage-account-name>"; //Update the storageAccountKey value that you recorded previously in this lab. private const string storageAccountKey = "<key>"; //The following code to create a new asynchronous Main method public static async Task Main(string[] args) { } } -
이전에 이 랩에서 기록한 스토리지 계정의 기본 Blob Service 엔드포인트로 값을 설정하여 blobServiceEndpoint 문자열 상수를 업데이트합니다.
-
이전에 이 랩에서 기록한 스토리지 계정의 스토리지 계정 이름으로 값을 설정하여 storageAccountName 문자열 상수를 업데이트합니다.
-
이전에 이 랩에서 기록한 스토리지 계정의 키로 값을 설정하여 storageAccountKey 문자열 상수를 업데이트합니다.
작업 3: Azure Storage Blob 서비스 엔드포인트에 연결
-
Main 메서드에서 다음 코드를 추가합니다.
public static async Task Main(string[] args) { //The following line of code to create a new instance of the StorageSharedKeyCredential class by using the storageAccountName and storageAccountKey constants as constructor parameters StorageSharedKeyCredential accountCredentials = new StorageSharedKeyCredential(storageAccountName, storageAccountKey); //The following line of code to create a new instance of the BlobServiceClient class by using the blobServiceEndpoint constant and the accountCredentials variable as constructor parameters BlobServiceClient serviceClient = new BlobServiceClient(new Uri(blobServiceEndpoint), accountCredentials); //The following line of code to invoke the GetAccountInfoAsync method of the BlobServiceClient class to retrieve account metadata from the service AccountInfo info = await serviceClient.GetAccountInfoAsync(); //Render a welcome message await Console.Out.WriteLineAsync($"Connected to Azure Storage Account"); //Render the storage account's name await Console.Out.WriteLineAsync($"Account name:\t{storageAccountName}"); //Render the type of storage account await Console.Out.WriteLineAsync($"Account kind:\t{info?.AccountKind}"); //Render the currently selected stock keeping unit (SKU) for the storage account await Console.Out.WriteLineAsync($"Account sku:\t{info?.SkuName}"); } -
Program.cs 파일을 저장합니다.
-
Visual Studio Code 창의 메뉴 모음에서 터미널을 선택한 다음, 새 터미널을 선택합니다.
-
터미널에서 다음 명령을 실행하여 .NET 웹 애플리케이션을 실행합니다.
dotnet run참고: 빌드 오류가 있는 경우 Program.cs file in the Allfiles (F):\Allfiles\Labs\03\Solution\BlobManager 폴더를 검토합니다.
-
현재 실행 중인 콘솔 애플리케이션의 출력을 살펴봅니다. 출력에는 서비스에서 검색된 스토리지 계정에 대한 메타데이터가 포함되어 있습니다.
-
터미널 종료 또는 휴지통 아이콘을 선택하여 현재 열려 있는 터미널 및 관련된 모든 작업을 종료합니다.
작업 4: 기존 컨테이너 열거
-
Program 클래스에서 다음 코드를 입력하여 비동기이고 단일 BlobServiceClient 매개 변수 유형이 있는 EnumerateContainersAsync라는 새 프라이빗 정적 메서드를 만듭니다.
private static async Task EnumerateContainersAsync(BlobServiceClient client) { /*Create an asynchronous foreach loop that iterates over the results of an invocation of the GetBlobContainersAsync method of the BlobServiceClient class. */ await foreach (BlobContainerItem container in client.GetBlobContainersAsync()) { //Print the name of each container await Console.Out.WriteLineAsync($"Container:\t{container.Name}"); } } -
Main 메서드에서 다음 코드를 입력하여 EnumerateContainersAsync 메서드를 호출하고 serviceClient 변수를 매개 변수로 전달합니다.
await EnumerateContainersAsync(serviceClient); - Program.cs 파일을 살펴봅니다. 이제 파일에 다음 코드가 포함되어 있어야 합니다.
using Azure.Storage; using Azure.Storage.Blobs; using Azure.Storage.Blobs.Models; using System; using System.Threading.Tasks; public class Program { private const string blobServiceEndpoint = "your blobServiceEndpoint"; private const string storageAccountName = "your storageAccountName"; private const string storageAccountKey = "your storageAccountKey"; public static async Task Main(string[] args) { StorageSharedKeyCredential accountCredentials = new StorageSharedKeyCredential(storageAccountName, storageAccountKey); BlobServiceClient serviceClient = new BlobServiceClient(new Uri(blobServiceEndpoint), accountCredentials); AccountInfo info = await serviceClient.GetAccountInfoAsync(); await Console.Out.WriteLineAsync($"Connected to Azure Storage Account"); await Console.Out.WriteLineAsync($"Account name:\t{storageAccountName}"); await Console.Out.WriteLineAsync($"Account kind:\t{info?.AccountKind}"); await Console.Out.WriteLineAsync($"Account sku:\t{info?.SkuName}"); /* To invoke the EnumerateContainersAsync method, passing in the serviceClient variable as a parameter */ await EnumerateContainersAsync(serviceClient); } private static async Task EnumerateContainersAsync(BlobServiceClient client) { await foreach (BlobContainerItem container in client.GetBlobContainersAsync()) { await Console.Out.WriteLineAsync($"Container:\t{container.Name}"); } } } -
Program.cs 파일을 저장합니다.
-
Visual Studio Code 창의 메뉴 모음에서 터미널을 선택한 다음, 새 터미널을 선택합니다.
-
터미널에서 다음 명령을 실행하여 .NET 웹 애플리케이션을 실행합니다.
dotnet run참고: 빌드 오류가 있는 경우 Program.cs file in the Allfiles (F):\Allfiles\Labs\03\Solution\BlobManager 폴더를 검토합니다.
-
현재 실행 중인 콘솔 애플리케이션의 출력을 살펴봅니다. 업데이트된 출력에는 계정의 모든 기존 컨테이너 목록이 포함됩니다.
- 터미널 종료 또는 휴지통 아이콘을 선택하여 현재 열려 있는 터미널 및 관련된 모든 작업을 종료합니다.
검토
이 연습에서는 Azure Storage SDK를 사용하여 기존 컨테이너에 액세스했습니다.
연습 4: .NET SDK를 사용하여 BLOB URI(Uniform Resource Identifier)를 검색합니다.
작업 1: SDK를 사용하여 기존 컨테이너의 Blob을 열거합니다.
-
Program 클래스에서 다음 코드를 입력하여 비동기이며 BlobServiceClient와 문자열이라는 두 개의 매개 변수 유형이 있는 EnumerateBlobsAsync라는 새 개인 정적 메서드를 만듭니다.
private static async Task EnumerateBlobsAsync(BlobServiceClient client, string containerName) { /* Get a new instance of the BlobContainerClient class by using the GetBlobContainerClient method of the BlobServiceClient class, passing in the containerName parameter */ BlobContainerClient container = client.GetBlobContainerClient(containerName); /* Render the name of the container that will be enumerated */ await Console.Out.WriteLineAsync($"Searching:\t{container.Name}"); /* Create an asynchronous foreach loop that iterates over the results of an invocation of the GetBlobsAsync method of the BlobContainerClient class */ await foreach (BlobItem blob in container.GetBlobsAsync()) { //Print the name of each blob await Console.Out.WriteLineAsync($"Existing Blob:\t{blob.Name}"); } } -
Main 메서드에서 메서드 끝에 다음 코드를 입력하여 래스터 그래픽 값을 가진 existingContainerName이라는 변수를 만듭니다.
string existingContainerName = "raster-graphics"; -
기본 메서드에서 다음 코드를 입력하여 EnumerateBlobsAsync메서드를 호출하여 serviceClient 및 existingContainerName변수를 매개 변수로 전달합니다.
await EnumerateBlobsAsync(serviceClient, existingContainerName); - Program.cs 파일을 살펴봅니다. 이제 파일에 다음 코드가 포함되어 있어야 합니다.
using Azure.Storage; using Azure.Storage.Blobs; using Azure.Storage.Blobs.Models; using System; using System.Threading.Tasks; public class Program { private const string blobServiceEndpoint = "your blobServiceEndpoint"; private const string storageAccountName = "your storageAccountName"; private const string storageAccountKey = "your storageAccountKey"; public static async Task Main(string[] args) { StorageSharedKeyCredential accountCredentials = new StorageSharedKeyCredential(storageAccountName, storageAccountKey); BlobServiceClient serviceClient = new BlobServiceClient(new Uri(blobServiceEndpoint), accountCredentials); AccountInfo info = await serviceClient.GetAccountInfoAsync(); await Console.Out.WriteLineAsync($"Connected to Azure Storage Account"); await Console.Out.WriteLineAsync($"Account name:\t{storageAccountName}"); await Console.Out.WriteLineAsync($"Account kind:\t{info?.AccountKind}"); await Console.Out.WriteLineAsync($"Account sku:\t{info?.SkuName}"); await EnumerateContainersAsync(serviceClient); string existingContainerName = "raster-graphics"; await EnumerateBlobsAsync(serviceClient, existingContainerName); } private static async Task EnumerateContainersAsync(BlobServiceClient client) { await foreach (BlobContainerItem container in client.GetBlobContainersAsync()) { await Console.Out.WriteLineAsync($"Container:\t{container.Name}"); } } private static async Task EnumerateBlobsAsync(BlobServiceClient client, string containerName) { BlobContainerClient container = client.GetBlobContainerClient(containerName); await Console.Out.WriteLineAsync($"Searching:\t{container.Name}"); await foreach (BlobItem blob in container.GetBlobsAsync()) { await Console.Out.WriteLineAsync($"Existing Blob:\t{blob.Name}"); } } } -
Program.cs 파일을 저장합니다.
-
Visual Studio Code 창의 메뉴 모음에서 터미널을 선택한 다음, 새 터미널을 선택합니다.
-
터미널에서 다음 명령을 실행하여 .NET 웹 애플리케이션을 실행합니다.
dotnet run참고: 빌드 오류가 있는 경우 Program.cs file in the Allfiles (F):\Allfiles\Labs\03\Solution\BlobManager 폴더를 검토합니다.
-
현재 실행 중인 콘솔 애플리케이션의 출력을 검토합니다. 업데이트된 출력에는 기존 컨테이너 및 BLOB에 대한 메타데이터가 포함됩니다.
- 터미널 종료 또는 휴지통 아이콘을 선택하여 현재 열려 있는 터미널 및 관련된 모든 작업을 종료합니다.
작업 2: SDK를 사용하여 새 컨테이너 만들기
-
Program 클래스에서 다음 코드를 입력하여 비동기인 BlobServiceClient 및 string이라는 두 개의 매개 변수 유형이 있는 GetContainerAsync라는 새 private static 메서드를 만듭니다:
private static async Task<BlobContainerClient> GetContainerAsync(BlobServiceClient client, string containerName) { /* Get a new instance of the BlobContainerClient class by using the GetBlobContainerClient method of the BlobServiceClient class, passing in the containerName parameter */ BlobContainerClient container = client.GetBlobContainerClient(containerName); /* Invoke the CreateIfNotExistsAsync method of the BlobContainerClient class */ await container.CreateIfNotExistsAsync(PublicAccessType.Blob); /* Render the name of the container that was potentially created */ await Console.Out.WriteLineAsync($"New Container:\t{container.Name}"); /* Return the container as the result of the GetContainerAsync */ return container; } -
기본 메서드에서 메서드 끝에 다음 코드를 입력하여 *벡터 그래픽 *값을 가진 newContainerName이라는 변수를 만듭니다.
string newContainerName = "vector-graphics"; -
Main 메서드의 끝에 다음 코드를 입력하여 GetContainerAsync 메서드를 호출하고, serviceClient 및 newContainerName 변수를 매개 변수로 전달하고, BlobContainerClient 형식의 containerClient라는 변수에 결과를 저장합니다.
BlobContainerClient containerClient = await GetContainerAsync(serviceClient, newContainerName); - Program.cs 파일을 검토합니다. 이제 여기에는 다음이 포함되어야 합니다.
using Azure.Storage; using Azure.Storage.Blobs; using Azure.Storage.Blobs.Models; using System; using System.Threading.Tasks; public class Program { private const string blobServiceEndpoint = "your blobServiceEndpoint"; private const string storageAccountName = "your storageAccountName"; private const string storageAccountKey = "your storageAccountKey"; public static async Task Main(string[] args) { StorageSharedKeyCredential accountCredentials = new StorageSharedKeyCredential(storageAccountName, storageAccountKey); BlobServiceClient serviceClient = new BlobServiceClient(new Uri(blobServiceEndpoint), accountCredentials); AccountInfo info = await serviceClient.GetAccountInfoAsync(); await Console.Out.WriteLineAsync($"Connected to Azure Storage Account"); await Console.Out.WriteLineAsync($"Account name:\t{storageAccountName}"); await Console.Out.WriteLineAsync($"Account kind:\t{info?.AccountKind}"); await Console.Out.WriteLineAsync($"Account sku:\t{info?.SkuName}"); await EnumerateContainersAsync(serviceClient); string existingContainerName = "raster-graphics"; await EnumerateBlobsAsync(serviceClient, existingContainerName); string newContainerName = "vector-graphics"; BlobContainerClient containerClient = await GetContainerAsync(serviceClient, newContainerName); } private static async Task EnumerateContainersAsync(BlobServiceClient client) { await foreach (BlobContainerItem container in client.GetBlobContainersAsync()) { await Console.Out.WriteLineAsync($"Container:\t{container.Name}"); } } private static async Task EnumerateBlobsAsync(BlobServiceClient client, string containerName) { BlobContainerClient container = client.GetBlobContainerClient(containerName); await Console.Out.WriteLineAsync($"Searching:\t{container.Name}"); await foreach (BlobItem blob in container.GetBlobsAsync()) { await Console.Out.WriteLineAsync($"Existing Blob:\t{blob.Name}"); } } private static async Task<BlobContainerClient> GetContainerAsync(BlobServiceClient client, string containerName) { BlobContainerClient container = client.GetBlobContainerClient(containerName); await container.CreateIfNotExistsAsync(PublicAccessType.Blob); await Console.Out.WriteLineAsync($"New Container:\t{container.Name}"); return container; } } -
Program.cs 파일을 저장합니다.
-
Visual Studio Code 창의 메뉴 모음에서 터미널을 선택한 다음, 새 터미널을 선택합니다.
-
터미널에서 다음 명령을 실행하여 .NET 웹 애플리케이션을 실행합니다.
dotnet run참고: 빌드 오류가 있는 경우 Program.cs file in the Allfiles (F):\Allfiles\Labs\03\Solution\BlobManager 폴더를 검토합니다.
-
현재 실행 중인 콘솔 애플리케이션의 출력을 살펴봅니다. 업데이트된 출력에는 기존 컨테이너 및 BLOB에 대한 메타데이터가 포함됩니다.
- 터미널 종료 또는 휴지통 아이콘을 선택하여 현재 열려 있는 터미널 및 관련된 모든 작업을 종료합니다.
작업 3: 포털을 사용하여 새 Blob 업로드하기
-
Azure Portal의 탐색 창에서 리소스 그룹 링크를 선택합니다.
-
리소스 그룹 블레이드에서 이전에 이 랩에서 만든 StorageMedia 리소스 그룹을 선택합니다.
-
StorageMedia 블레이드에서 이전에 이 랩에서 만든 mediastor [yourname] 스토리지 계정을 선택합니다.
-
스토리지 계정 블레이드에서 데이터 스토리지 섹션에 있는 컨테이너 링크를 선택합니다.
-
컨테이너 섹션에서 새로 만든 벡터 그래픽 컨테이너를 선택합니다. 새 컨테이너를 확인하려면 페이지를 새로 고쳐야 할 수 있습니다.
-
컨테이너 블레이드에서 업로드를 선택합니다.
-
Blob 업로드 창에서 다음 작업을 수행한 다음, 업로드를 선택합니다.
설정 작업 파일 섹션 파일 찾아보기를 선택하거나 끌어서 놓기 기능을 사용합니다. 파일 탐색기 창 Allfiles (F):\Allfiles\Labs\03\Starter\Images로 이동하고, graph.svg 파일을 선택한 다음, 열기를 선택합니다. 파일이 이미 있는 경우 덮어쓰기 확인란 확인란이 선택되어 있는지 확인합니다. 참고: 이 랩을 계속하기 전에 Blob이 업로드될 때까지 기다립니다.
작업 4: SDK를 사용하여 Blob URI에 액세스
-
Visual Studio Code 창으로 전환합니다.
-
Program 클래스에서 다음 코드를 입력하여 비동기이며 BlobContainerClient 및 문자열이라는 두 개의 매개 변수 유형이 있는 GetBlobAsync라는 새 개인 정적 메서드를 만듭니다.
private static async Task<BlobClient> GetBlobAsync(BlobContainerClient client, string blobName) { BlobClient blob = client.GetBlobClient(blobName); bool exists = await blob.ExistsAsync(); if (!exists) { await Console.Out.WriteLineAsync($"Blob {blob.Name} not found!"); } else await Console.Out.WriteLineAsync($"Blob Found, URI:\t{blob.Uri}"); return blob; } -
Main 메서드에서 메서드 끝에 다음 코드를 입력하여 graph.svg 값을 가진 uploadedBlobName라는 이름의 변수를 만듭니다.
string uploadedBlobName = "graph.svg"; -
Main 메서드에서 다음 코드를 입력하여 GetBlobAsync 메서드를 호출하고 containerClient 및 uploadedBlobName 변수를 매개 변수로 전달하고 BlobClient형식이라는 blobClient 변수에 결과를 저장합니다.
BlobClient blobClient = await GetBlobAsync(containerClient, uploadedBlobName); -
Main 메서드에서 blobClient변수의Uri 속성을 렌더링하는 메서드의 끝에 다음 코드를 입력합니다.
await Console.Out.WriteLineAsync($"Blob Url:\t{blobClient.Uri}"); - Program.cs 파일을 살펴봅니다. 이제 파일에 다음 코드가 포함되어 있어야 합니다.
using Azure.Storage; using Azure.Storage.Blobs; using Azure.Storage.Blobs.Models; using System; using System.Threading.Tasks; public class Program { private const string blobServiceEndpoint = "your blobServiceEndpoint"; private const string storageAccountName = "your storageAccountName"; private const string storageAccountKey = "your storageAccountKey"; public static async Task Main(string[] args) { StorageSharedKeyCredential accountCredentials = new StorageSharedKeyCredential(storageAccountName, storageAccountKey); BlobServiceClient serviceClient = new BlobServiceClient(new Uri(blobServiceEndpoint), accountCredentials); AccountInfo info = await serviceClient.GetAccountInfoAsync(); await Console.Out.WriteLineAsync($"Connected to Azure Storage Account"); await Console.Out.WriteLineAsync($"Account name:\t{storageAccountName}"); await Console.Out.WriteLineAsync($"Account kind:\t{info?.AccountKind}"); await Console.Out.WriteLineAsync($"Account sku:\t{info?.SkuName}"); await EnumerateContainersAsync(serviceClient); string existingContainerName = "raster-graphics"; await EnumerateBlobsAsync(serviceClient, existingContainerName); string newContainerName = "vector-graphics"; BlobContainerClient containerClient = await GetContainerAsync(serviceClient, newContainerName); string uploadedBlobName = "graph.svg"; BlobClient blobClient = await GetBlobAsync(containerClient, uploadedBlobName); await Console.Out.WriteLineAsync($"Blob Url:\t{blobClient.Uri}"); } private static async Task EnumerateContainersAsync(BlobServiceClient client) { await foreach (BlobContainerItem container in client.GetBlobContainersAsync()) { await Console.Out.WriteLineAsync($"Container:\t{container.Name}"); } } private static async Task EnumerateBlobsAsync(BlobServiceClient client, string containerName) { BlobContainerClient container = client.GetBlobContainerClient(containerName); await Console.Out.WriteLineAsync($"Searching:\t{container.Name}"); await foreach (BlobItem blob in container.GetBlobsAsync()) { await Console.Out.WriteLineAsync($"Existing Blob:\t{blob.Name}"); } } private static async Task<BlobContainerClient> GetContainerAsync(BlobServiceClient client, string containerName) { BlobContainerClient container = client.GetBlobContainerClient(containerName); await container.CreateIfNotExistsAsync(PublicAccessType.Blob); await Console.Out.WriteLineAsync($"New Container:\t{container.Name}"); return container; } private static async Task<BlobClient> GetBlobAsync(BlobContainerClient client, string blobName) { BlobClient blob = client.GetBlobClient(blobName); bool exists = await blob.ExistsAsync(); if (!exists) { await Console.Out.WriteLineAsync($"Blob {blob.Name} not found!"); } else await Console.Out.WriteLineAsync($"Blob Found, URI:\t{blob.Uri}"); return blob; } } -
Program.cs 파일을 저장합니다.
-
Visual Studio Code 창의 메뉴 모음에서 터미널을 선택한 다음, 새 터미널을 선택합니다.
-
터미널에서 다음 명령을 실행하여 .NET 웹 애플리케이션을 실행합니다.
dotnet run참고: 빌드 오류가 있는 경우 Program.cs file in the Allfiles (F):\Allfiles\Labs\03\Solution\BlobManager 폴더를 검토합니다.
-
현재 실행 중인 콘솔 애플리케이션의 출력을 살펴봅니다. 업데이트된 출력에는 BLOB에 온라인으로 액세스할 수 있는 최종 URL이 포함됩니다. 이 URL의 값을 기록하여 이 랩의 후반부에서 사용합니다.
참고: URL은 문자열
https://mediastor*[yourname]*.blob.core.windows.net/vector-graphics/graph.svg와 유사할 수 있습니다. - 터미널 종료 또는 휴지통 아이콘을 선택하여 현재 열려 있는 터미널 및 관련된 모든 작업을 종료합니다.
작업 5: 브라우저를 사용하여 URI 테스트
-
작업 표시줄에서 Microsoft Edge 아이콘의 바로 가기 메뉴를 활성화한 다음, 새 창을 선택합니다.
-
새 브라우저 창에서 Blob에 대해 이전에 이 랩에서 복사한 URL을 참조합니다.
-
이제 브라우저 창에서 SVG(확장성 있는 벡터 그래픽) 파일을 확인할 수 있습니다.
검토
이 연습에서는 저장소 SDK를 사용하여 컨테이너및 관리 BLOB을 만들었습니다.