ラボ 10: Azure Service Bus キューを利用してメッセージを非同期に処理する
Microsoft Azure ユーザー インターフェイス
Microsoft クラウド ツールの動的な性質を考慮すると、このトレーニング コンテンツの開発の後に発生する Azure UI の変更に気付くかもしれません。 その結果、ラボの指示とラボの手順が正しく整合しなくなる可能性があります。
Microsoft は、コミュニティから必要な変更の通知があったときに、このトレーニング コースを更新します。 ただし、クラウドの更新は頻繁に発生するため、このトレーニング コンテンツの更新の前に UI の変更に気付く可能性があります。 これが発生した場合は、その変更に適応し、ラボでは必要に応じてそれらに対応してください。
Instructions
開始する前に
ラボ環境にサインインする
次の資格情報を使用して Windows 11 仮想マシン (VM) にサインインします。
- ユーザー名:
Admin - パスワード:
Pa55w.rd
注: 仮想ラボ環境に接続するための手順は、インストラクターから提供されます。
インストールされているアプリケーションを確認する
Windows 11 デスクトップでタスク バーを探します。 タスク バーには、このラボで使用する次のようなアプリケーションのアイコンが含まれています。
- Microsoft Edge
- Visual Studio Code
課題シナリオ
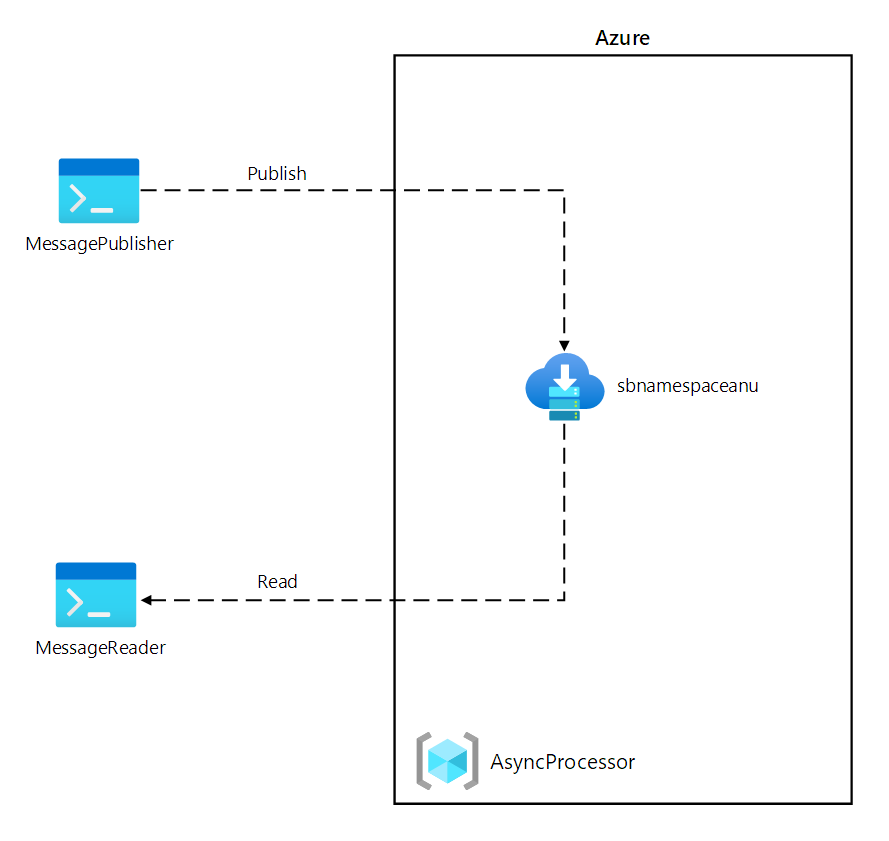
このラボでは、Azure Service Bus キューを使用して、このシナリオの概念実証を作成します。 システムがどのように機能するかを示すために、システムにメッセージを発行する .NET プロジェクトと、キューからメッセージを読み取る 2 つ目の .NET アプリケーションを作成します。 最初のアプリではセンサーからのデータをシミュレートし、2 つ目のアプリではキューからメッセージを読み取って処理するシステムをシミュレートします。
アーキテクチャの図
演習 1: Azure リソースを作成する
タスク 1: Azure portal を開く
-
タスク バーで、Microsoft Edge アイコンを選択します。
-
ブラウザー ウィンドウで、Azure portal (
https://portal.azure.com) に移動し、このラボで使用するアカウントでサインインします。注:初めて Azure portal にサインインする場合は、このポータルのツアーが表示されます。 [はじめに] を選択してツアーをスキップし、ポータルの使用を開始します。
タスク 2: Azure Service Bus キューを作成する
-
Azure portal で、 [リソース、サービス、ドキュメントの検索] テキスト ボックスを使用して、Service Bus を検索し、結果の一覧で [Service Bus] を選択します。
-
[Service Bus] ブレードで、 [+ 作成] を選択します。
-
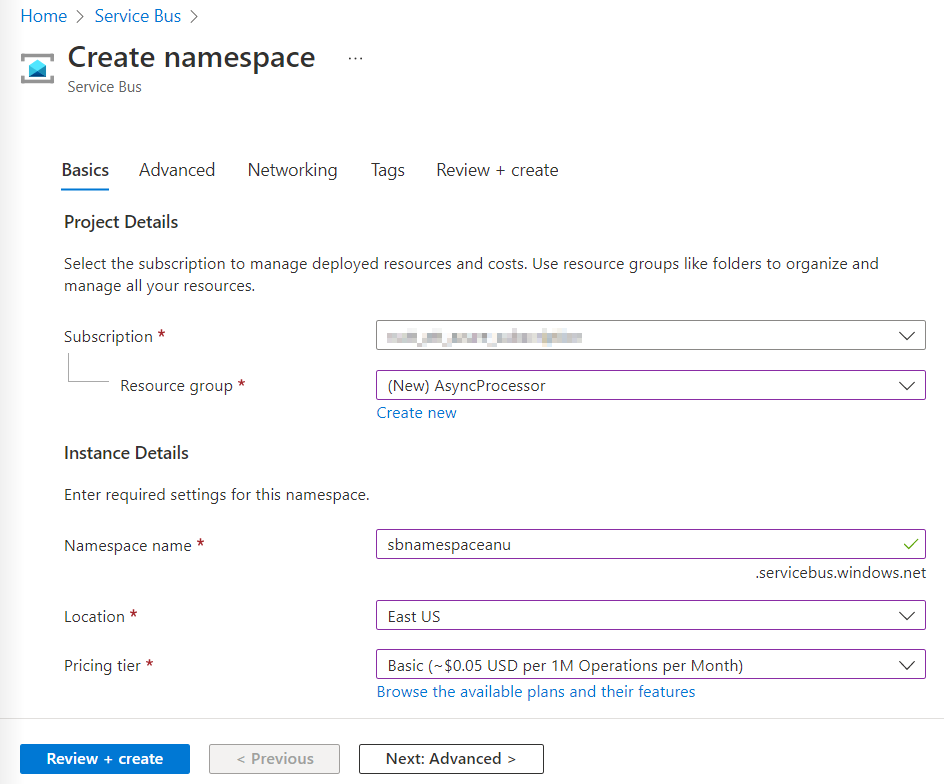
[名前空間の作成] ブレードの [基本] タブで、次のアクションを実行し、 [確認および作成] を選択します。
設定 アクション [サブスクリプション] ドロップダウン リスト 既定値のままにします [リソース グループ] セクション [新規作成] を選択し、「 「AsyncProcessor」と入力して、 [OK] を選択します。 [名前空間の名前] テキスト ボックス 「sbnamespace [ご自分の名前] 」と入力します。 [リージョン] ドロップダウン リスト Azure Service Bus をデプロイできる Azure リージョンを選択します。 [価格レベル] ドロップダウン リスト [Basic] を選択します 次のスクリーンショットには、 [名前空間の作成] ブレードの [基本] タブに構成されている設定が表示されています。
-
[確認と作成] タブで、前の手順で選択したオプションを確認します。
-
[作成] を選択し、指定した構成を使用して、Service Bus 名前空間を作成します。
注: 作成タスクが完了するのを待ってから、このラボを続行してください。
-
[デプロイ] ブレードで、 [リソースに移動] ボタンを選択して、新しく作成された [Service Bus] 名前空間のブレードに移動します。
-
[Service Bus] 名前空間ブレードの [設定] セクションで、 [共有アクセスポリシー] を選択します。
-
ポリシーの一覧で、RootManageSharedAccessKey を選択します。
-
[SAS ポリシー: RootManageSharedAccessKey] ペインで、 [プライマリ接続文字列] エントリの横にある [クリップボードにコピー] ボタンを選択し、コピーした値を記録します。 この値は、このラボで後ほど使用します。
注: 利用可能な 2 つのキーのどちらを選択してもかまいません。 これらは交換可能です。
-
[Service Bus] 名前空間ブレードの [エンティティ] セクションで、 [キュー] を選択し、 [+ キュー] を選択します。
-
[キューの作成] ウィンドウで、使用可能な設定を確認し、[名前] テキスト ボックスに「messagequeue」と入力して、[作成] を選択します。
-
[messagequeue] を選択して、 [Service Bus] キューのプロパティを表示します。
-
ブラウザー ウィンドウは開いたままにしておきます。 このウィンドウは、このラボで後ほどもう一度使用します。
確認
この演習では、Azure Service Bus 名前空間と、ラボの残りの部分で使用する Service Bus キューを作成しました。
演習 2: Service Bus キューにメッセージを発行する .NET Core プロジェクトを作成する
タスク 1: .NET Core プロジェクトを作成する
-
ラボ コンピューターから Visual Studio Code を起動します。
-
Visual Studio Code の [ファイル] メニューで、 [フォルダーを開く] を選択します。
-
[フォルダーを開く] ウィンドウで、Allfiles (F):\Allfiles\Labs\10\Starter\MessagePublisher に移動し、 [フォルダーの選択] を選択します。
-
Visual Studio Code ウィンドウのメニュー バーで、 [ターミナル] を選択し、 [新しいターミナル] を選択します。
-
ターミナル プロンプトで、次のコマンドを実行して、現在のフォルダーに MessagePublisher という名前の新しい .NET プロジェクトを作成します。
dotnet new console --framework net8.0 --name MessagePublisher --output .注: dotnet new コマンドは、プロジェクトと同じ名前のフォルダーに新しいコンソール プロジェクトを作成します。
-
次のコマンドを実行して、NuGet から Azure.Messaging.ServiceBus パッケージのバージョン 7.17.3 をインポートします。
dotnet add package Azure.Messaging.ServiceBus --version 7.17.3注: dotnet add package コマンドを実行すると、NuGet から Azure.Messaging.ServiceBus が追加されます。 詳細については、「Azure.Messaging.ServiceBus」を参照してください。
-
ターミナル プロンプトで、次のコマンドを実行して、.NET Core コンソール アプリケーションをビルドします。
dotnet build -
[ターミナルの強制終了] (ごみ箱 アイコン) を選択して、ターミナル ペインと関連プロセスを閉じます。
タスク 2: Azure Service Bus キューにメッセージを発行する
-
[Visual Studio Code] ウィンドウの [エクスプローラー] ペインで、Program.cs ファイルを開きます。
-
Program.cs ファイルのコード エディター タブで、既存のファイルのすべてのコードを削除します。
-
次のコードを追加します。
using System; using System.Threading.Tasks; using Azure.Messaging.ServiceBus; namespace MessagePublisher { public class Program { /* The `<serviceBus-connection-string>` placeholder represents the connection string to the target Azure Service Bus namespace */ private const string serviceBusConnectionString = "<serviceBus-connection-string>"; /* To create a string constant named "queueName" with a value of "messagequeue", matching the name of the Service Bus queue.*/ private const string queueName = "messagequeue"; /* Stores the number of messages to be sent to the target queue */ private const int numOfMessages = 3; /* To create a Service Bus client that will own the connection to the target queue */ static ServiceBusClient client = default!; /* To create a Service Bus sender that will be used to publish messages to the target queue */ static ServiceBusSender sender = default!; public static async Task Main(string[] args) { /* To initialize "client" of type "ServiceBusClient" that will provide connectivity to the Service Bus namespace and "sender" that will be responsible for sending messages */ client = new ServiceBusClient(serviceBusConnectionString); sender = client.CreateSender(queueName); /* To create a "ServiceBusMessageBatch" object that will allow you to combine multiple messages into a batch by using the "TryAddMessage" method */ using ServiceBusMessageBatch messageBatch = await sender.CreateMessageBatchAsync(); /* To add messages to a batch and throw an exception if a message size exceeds the limits supported by the batch */ for (int i = 1; i <= numOfMessages; i++) { if (!messageBatch.TryAddMessage(new ServiceBusMessage($"Message {i}"))) { throw new Exception($"The message {i} is too large to fit in the batch."); } } try { /* To create a try block, with "sender" asynchronously publishing messages in the batch to the target queue */ await sender.SendMessagesAsync(messageBatch); Console.WriteLine($"A batch of {numOfMessages} messages has been published to the queue."); } finally { /* To create a finally block that asynchronously disposes of the "sender" and "client" objects, releasing any network and unmanaged resources */ await sender.DisposeAsync(); await client.DisposeAsync(); } } } }注:serviceBusConnectionString 文字列定数の値を Service Bus 名前空間の [プライマリ接続文字列] に設定して更新し、この演習で先ほど作成した Service Bus キューの名前と一致する messagequeue に queueName 定数が設定されていることを確認します
注: アプリケーションの有効期間中は、Service Bus クライアントをシングルトンとしてキャッシュして使用しても安全です。 これは、メッセージを定期的に発行および読み取りする際のベストプラクティスの 1 つと見なされています。
-
Program.cs ファイルを保存します。
-
ターミナル プロンプトで、次のコマンドを実行して、.NET Core コンソール アプリを起動します。
dotnet run注: エラーが発生した場合は、Allfiles (F):\Allfiles\Labs\10\Solution\MessagePublisher フォルダーにある Program.cs ファイルを確認してください。
-
ターミナル プロンプトに表示されているコンソール メッセージに、3 つのメッセージのバッチがキューにパブリッシュされたことが記載されていることを確認します。
-
[ターミナルの強制終了] (ごみ箱 アイコン) を選択して、ターミナル ペインと関連プロセスを閉じます。
-
Azure portal の Service Bus キュー messagequeue を表示する Microsoft Edge ブラウザーに切り替えます。
-
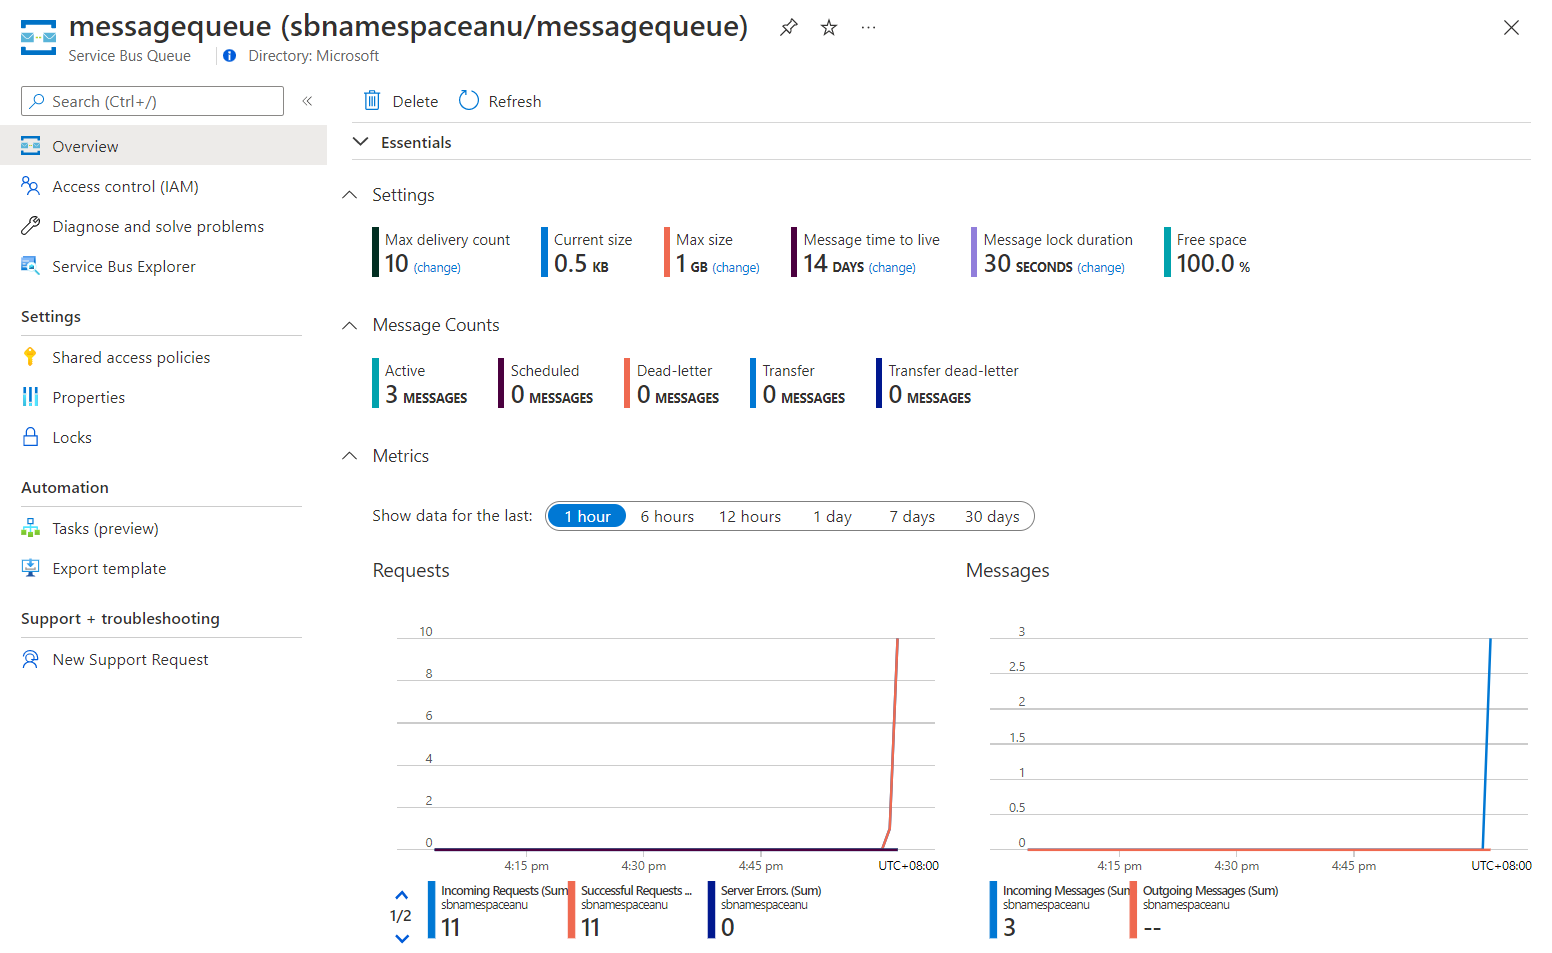
[要点] ペインを確認すると、キューにアクティブなメッセージが 3 つ含まれていることがわかります。
次のスクリーンショットには、Service Bus キュー メトリックとメッセージ数が表示されています。
-
[Service Bus Explorer] を選びます。
-
[ピーク モード] タブ ヘッダーを選び、[キュー] タブで [開始からピーク] ボタンを選びます。
-
キューに 3 つのメッセージが含まれていることを確認します。
-
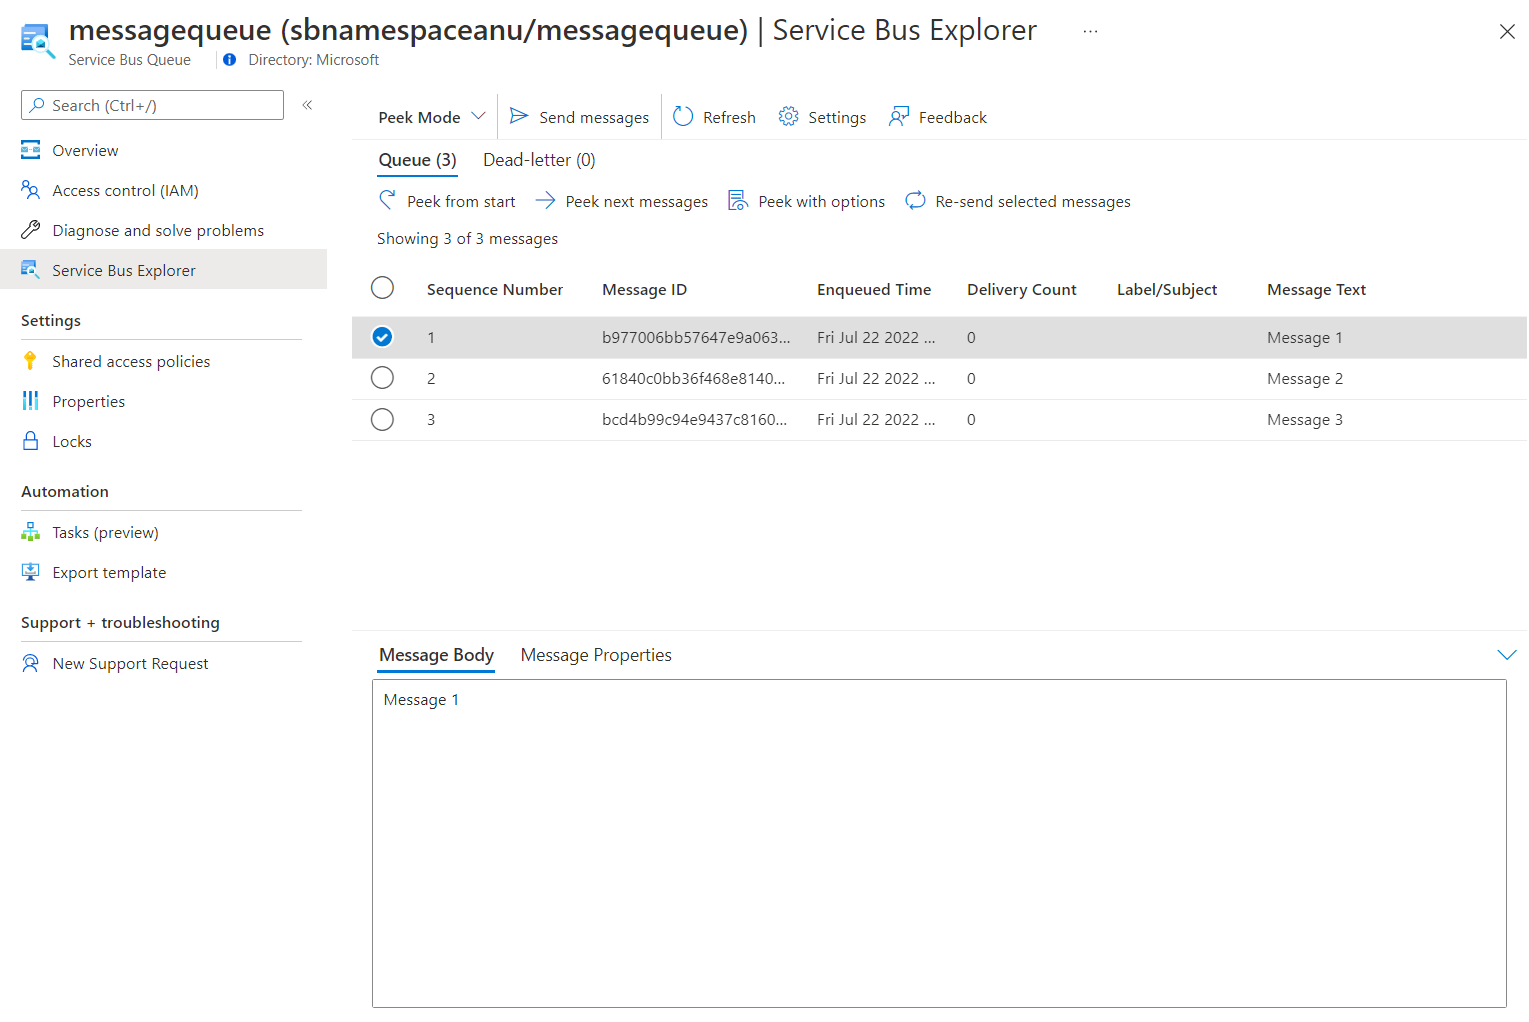
最初のメッセージを選択し、 [メッセージ] ペインで内容を確認します。
次のスクリーンショットには、最初のメッセージの内容が表示されています。
-
[メッセージ] ペインを閉じます。
確認
この演習では、Azure Service Bus キューにメッセージを発行する .NET プロジェクトを構成しました。
演習 3: Service Bus キューからメッセージを読み取る .NET Core プロジェクトを作成する
タスク 1: .NET プロジェクトを作成する
-
ラボ コンピューターから Visual Studio Code を起動します。
-
Visual Studio Code の [ファイル] メニューで、 [フォルダーを開く] を選択します。
-
[フォルダーを開く] ウィンドウで、Allfiles (F):\Allfiles\Labs\10\Starter\MessageReader に移動し、 [フォルダーの選択] を選択します。
-
Visual Studio Code ウィンドウのメニュー バーで、 [ターミナル] を選択し、 [新しいターミナル] を選択します。
-
ターミナル プロンプトで、次のコマンドを実行して、現在のフォルダーに MessageReader という名前の新しい .NET プロジェクトを作成します。
dotnet new console --framework net8.0 --name MessageReader --output . -
次のコマンドを実行して、NuGet から Azure.Messaging.ServiceBus パッケージのバージョン 7.17.3 をインポートします。
dotnet add package Azure.Messaging.ServiceBus --version 7.17.3 -
ターミナル プロンプトで、次のコマンドを実行して、.NET Core コンソール アプリケーションをビルドします。
dotnet build -
[ターミナルの強制終了] (ごみ箱 アイコン) を選択して、ターミナル ペインと関連プロセスを閉じます。
タスク 2:Azure Service Bus キューからメッセージを読み取る
-
[Visual Studio Code] ウィンドウの [エクスプローラー] ペインで、Program.cs ファイルを開きます。
-
Program.cs ファイルのコード エディター タブで、既存のファイルのすべてのコードを削除します。
-
次のコードを追加します。
using System; using System.Threading.Tasks; using Azure.Messaging.ServiceBus; namespace MessageReader { class Program { /* The `<serviceBus-connection-string>` placeholder represents the connection string to the target Azure Service Bus namespace */ static string serviceBusConnectionString = "<serviceBus-connection-string>"; /* To create a string constant named "queueName" with a value of "messagequeue", matching the name of the Service Bus queue.*/ static string queueName = "messagequeue"; static ServiceBusClient client= default!; /* Create a ServiceBusProcessor that will be used to process messages from the queue */ static ServiceBusProcessor processor = default!; static async Task MessageHandler(ProcessMessageEventArgs args) { /* To create a static async "MessageHandler" task that displays the body of messages in the queue as they are being processed and deletes them after the processing completes */ string body = args.Message.Body.ToString(); Console.WriteLine($"Received: {body}"); await args.CompleteMessageAsync(args.Message); } static Task ErrorHandler(ProcessErrorEventArgs args) { /* To create a static async "ErrorHandler" task that manages any exceptions encountered during message processing */ Console.WriteLine(args.Exception.ToString()); return Task.CompletedTask; } static async Task Main() { /* To initialize "client" of type "ServiceBusClient" that will provide connectivity to the Service Bus namespace and "processor" that will be responsible for processing of messages */ client = new ServiceBusClient(serviceBusConnectionString); processor = client.CreateProcessor(queueName, new ServiceBusProcessorOptions()); try { /* To create a try block, which first implements a message and error processing handler, initiates message processing, and stops processing following a user input */ processor.ProcessMessageAsync += MessageHandler; processor.ProcessErrorAsync += ErrorHandler; await processor.StartProcessingAsync(); Console.WriteLine("Wait for a minute and then press any key to end the processing"); Console.ReadKey(); Console.WriteLine("\nStopping the receiver..."); await processor.StopProcessingAsync(); Console.WriteLine("Stopped receiving messages"); } finally { /* To create a finally block that asynchronously disposes of the "processor" and "client" objects, releasing any network and unmanaged resources */ await processor.DisposeAsync(); await client.DisposeAsync(); } } } }注: serviceBusConnectionString 文字列定数を更新するには、その値を、このラボで先ほど記録した Service Bus 名前空間の [プライマリ接続文字列] に設定します。
-
Program.cs ファイルを保存します。
-
ターミナル プロンプトで、次のコマンドを実行して、.NET Core コンソール アプリを起動します。
dotnet run注: エラーが発生した場合は、Allfiles (F):\Allfiles\Labs\10\Solution\MessageReader フォルダーにある Program.cs ファイルを確認してください。
-
ターミナル プロンプトに表示されているコンソール メッセージに、キュー内の 3 つの各メッセージが受信されたことが記載されていることを確認します。
-
ターミナル プロンプトで、任意のキーを押してレシーバーを停止し、アプリの実行を終了します。
-
[ターミナルの強制終了] (ごみ箱 アイコン) を選択して、ターミナル ペインと関連プロセスを閉じます。
-
Azure portal の Service Bus キュー messagequeue を表示する Microsoft Edge ブラウザーに戻ります。
-
[Service Bus Explorer (プレビュー)] ブレードで [最初からクイック表示] を選択し、キュー内のアクティブなメッセージの数が 0 に変更されていることを確認します。
確認
この演習では、.NET ライブラリを使用して、Azure Service Bus キューからメッセージを読み取り、削除しました。