Lab 02 - Implement Flow of Work with GitHub
Estimated timing: 30 minutes
Scenario
Remember this module’s scenario in which you’re working for a software development company in the retail industry that is planning to migrate an online store from an old app to a new app called eShopOnWeb. Since you have decided to use Git and GitHub to facilitate application lifecycle management, this lab gives you the opportunity to start by forking an existing repo, configuring it, creating an issue, creating a branch, updating files in the branch, creating and merging a pull request, closing the issue and validating the changes.
Objectives
In this lab, you will:
- Implement and manage repos with GitHub
Note: For this and subsequent labs, use the same GitHub account you created for the purpose of the first lab.
Prerequisites
Exercise 1: Implement and manage repos with GitHub
In this exercise, you’ll fork a Git repo and manage it by using GitHub.
Important: The GitHub Copilot for pull request feature usage is completely optional. To use this feature, you must be a member of an enterprise with a Copilot Enterprise subscription. You can skip the steps that involve the GitHub Copilot for pull request feature if you don’t have access to it. If you want to know more about the GitHub Copilot for pull request feature, refer to About Copilot pull request summaries.
Note: You created a new repo in the first lab of our course. In this lab, you will start by forking an existing repo. A fork is a repository that shares code and visibility settings with an existing upstream repository. This approach is frequently used when developing updates to open-source projects or in scenarios where write access to the upstream repository is not available. For more information, refer to Working with forks.
The exercise consists of the following tasks:
- Task 1: Fork a GitHub repo
- Task 2: Configure a GitHub repo
- Task 3: Create an issue
- Task 4: Create a branch
- Task 5: Update files in the branch
- Task 6: Create and merge a pull request
- Task 7: Close the issue
- Task 8: Validate the changes
Task 1: Fork a GitHub repo
- Start a web browser and navigate to the GitHub home page.
- When prompted to authenticate, sign in by using your GitHub user account.
- Open another tab in the same browser window and navigate to the Spoon-Knife repo.
- On the Spoon-Knife repo page, select Fork.
-
On the Create a new fork page, ensure that the Owner drop-down list entry displays your GitHub user name, accept the default entry Spoon-Knife in the Repository name text box, leave the Copy the main branch only checkbox enabled, and then select Create fork.
Note: Your browser session will be automatically redirected to the newly forked repo.
Task 2: Configure a GitHub repo
- On the forked Spoon-Knife repo page, in the toolbar, select Settings.
- In the General section of the Settings tab, note that the default branch is set to *main.
- Navigate to the Features area of the General section and enable the Issues checkbox.
- In the left side navigational menu, in the Code and automation grouping, select the Pages entry.
-
In the GitHub Pages pane, in the Branch section, change the None entry in the drop-down list to main and then select Save.
Note: GitHub Pages will automatically publish the content of the repo to a site accessible via the URL
https://<your_GitHub_username>.github.io/Spoon-Knife/. -
In the GitHub Pages pane, select the Visit site button. This will automatically open another web browser tab and display the page representing the current content of the index.html file.
Note: You might need to wait a few minutes before the Visit site button and the page become available.
Note: Perform the remaining steps of this task if you completed the first lab.
- Back on the forked Spoon-Knife repo page, in the toolbar, select Projects.
- On the Welcome to the all-new projects pane, select Link a project, and, in the drop-down menu, select Link an existing project.
- In the list of the existing projects, select DevOps Core Intro Project.
Task 3: Create an issue
- On the forked Spoon-Knife page, select the Issues tab.
- On the Welcome to issues! page, select New issue.
- In the Add a title text box, enter
index.html looks rather austere. - In the Add a description text box, enter
index.html file can use a modern touch. - In the current pane, in the Assignees section, select Add assignees…, and, in the Suggestions section, select your GitHub user name.
- Select the gear icon next to the Labels entry and, in the drop-down list, select enhancement.
- Select the gear icon next to the Projects entry and, in the drop-down list, select DevOps Core Intro Project.
- Click Create to save the new issue.
- Open the new issue again.
- On the index.html looks rather austere pane, in the Projects section, set Status to In Progress.
- On the forked Spoon-Knife page, select the Projects tab.
- On the Welcome to the all-new projects page, select DevOps Core Intro Project.
- In the board view of the DevOps Core Intro Project, review the In Progress column and note that it includes the newly created issue.
Task 4: Create a branch
- Switch back to the Code tab.
- In the upper left corner of the page, select the main entry to display the Switch branches/tags drop-down list.
-
In the Find or create a branch… text box, enter
update index.htmland then select Create branch: update index.html from ‘main’ entry to create a new branch.Note: This will automatically make the newly created branch the current one, as indicated by the content of the drop-down list.
Task 5: Update files in the branch
- On the forked Spoon-Knife repo page, in the listing of files, select index.html.
- On the Spoon-Knife/index.html page, on the right side in the code editor toolbar, select the pencil icon to switch to the editor mode.
-
In the editor pane, replace the entire body element of the page (lines 12-17) with the following HTML code:
<div id="octocat"> <img src="https://octodex.github.com/images/NUX_Octodex.gif" alt="Octocat Image"> </div> <p> Ready to team up? Let's collaborate, @octocat! </p> - In the upper right corner of the editor page, select Commit changes….
-
In the Commit changes window, in the Extended description text box, enter
Modified the image and paragraph text, accept the default commit message, and select Commit changes.Note: You also have the option to create a new branch for the commit at this point.
- In the listing of repo files on the left side, select styles.css.
- On the Spoon-Knife/styles.css page, on the right side in the code editor toolbar, select the pencil icon to switch to the editor mode.
-
In the editor pane, replace the line 17 with the entire following HTML code:
color: #333; line-height: 1.5; text-align: center; } body { font-family: 'Segoe UI', Tahoma, Geneva, Verdana, sans-serif; background-color: #f8f9fa; } #octocat img { display: block; width: 100%; height: auto; } - In the upper right corner of the editor page, select Commit changes….
- In the Commit changes window, in the Extended description text box, enter
Modified CSS tags and selectors, accept the default commit message, and select Commit changes to commit changes to the update-index.html branch.
Task 6: Create and merge a pull request
- Navigate back to the forked Spoon-Knife repo page.
- Ensure that you’re currently viewing the update-index.html branch, as indicated by the label appearing in the drop-down list in the upper-left corner of the page. If that label displays main, select it first and then, in the drop-down list containing the list of branches, select update-index.html.
- On the forked Spoon-Knife repo page, select Contribute and then select Open pull request.
- On the Open a pull request page, select the entry base repository: octocat/Spoon-Knife.
-
In the Choose a Base Repository drop-down list, select the name of the forked repository you created at the beginning of this lab.
Note: The name will start with your GitHub name, followed by a forward slash, followed by Spoon-Knife. Once you select it, the entry should change to base: main.
Note: This is necessary because we want to update the main branch in the forked repo, rather than the main branch in the repo from which you created the fork.
-
In the Add a title text box, replace Update index.html with Update index.html and styles.css.
-
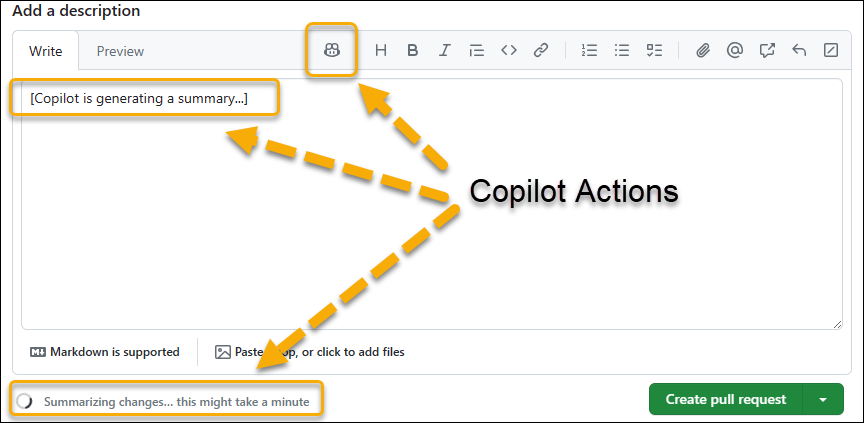
(Optional) If you have access to the GitHub Copilot for pull request feature, in the Add a description text box, click the Copilot action button, and then select Summary (Generate a summary of the changes in the pull request).
-
GitHub Copilot for pull request feature will generate a summary of the changes in the pull request.
-
Review the summary generated by the GitHub Copilot for pull request feature.
-
After the summary is generated, enter
Addressing #1in the Add a description in the first line and select Create pull request.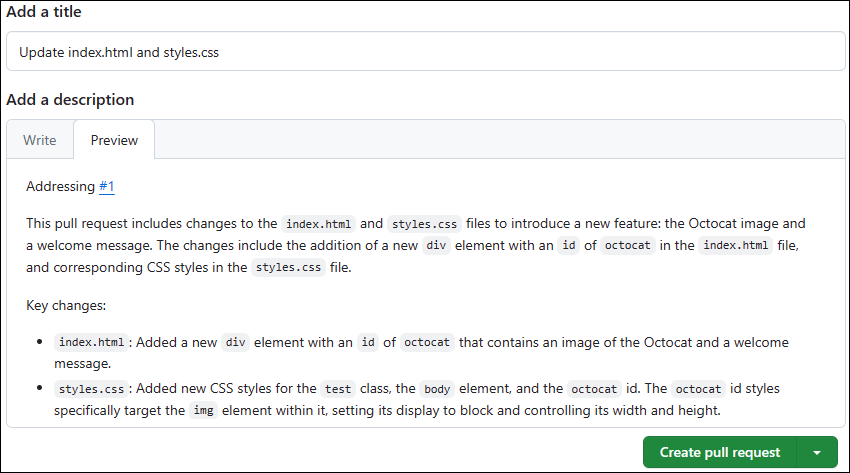
Note: If you don’t have access to the GitHub Copilot for pull request feature, you can skip this step.
Note: if you you choose to use the GitHub Copilot for pull request feature, you can skip the next step.
-
-
In the Add a description text box, enter
Addressing #1and select Create pull request.Note: By including #1, you are able to reference the first issue associated with this pull request.
- Verify that the current branch has no conflicts with the base branch, select Merge pull request, and then select Confirm merge.
- Verify that the pull request has been successfully merged and closed and select Delete branch.
Task 7: Close the issue
- In the toolbar of the GitHub page, select the Issues tab.
- Select the checkbox to the left of the first issue index.html looks rather austere, select Mark as, and in the drop-down list, select Closed.
- Navigate back to the board view of the DevOps Core Intro Project and note that the issue appears now in the Done column.
Task 8: Validate the changes
- In the web browser window, navigate back to your forked Spoon-Knife repo page, select the Settings tab and then, in the left side navigation menu, in the Code and automation grouping, select Pages to display the GitHub Pages pane.
- In the GitHub Pages pane, select Visit site to open another browser tab displaying the updated content of the index.html file.
- Verify that the page has been updated to include the visual elements referenced in the HTML and CSS files.
Note: At this point, you could potentially submit changes to the main branch in your fork back to the original repo. This would be typically the next step when developing updates and collaborating on open-source projects. However, since the original repo is not maintained, this step is not applicable here.