Project overview
In this guided project, you go through the major steps of creating, configuring, and maintaining a domain controller. You also have the opportunity to promote a domain controller.
This exercise should take approximately 45 minutes to complete.
Setup
To reduce resource access requirements (such as access to Windows Server or a Microsoft Azure subscription), this guided project uses a Windows 10 or Windows 11 machine to run a virtualized environment. You configure a Windows 10 or Windows 11 computer’s Hyper-V subsystem to support the two Windows Server 2022 Evaluation Edition virtual machines that you use in this project. You require the Professional or Enterprise edition of Windows 10 or Windows 11 to perform these tasks.
The computer that functions as the Hyper-V virtualization host should have at least 16 GB of RAM. You can also use an evaluation version of Windows Server with the Hyper-V role installed as the host for these virtual machines, or to configure a third-party virtualization platform to host both virtual machines. The exercises and tasks in this lab use Windows 11 when describing the Hyper-V host. The options presented here make it easy to locate large virtual machine files if you want to remove the configuration after you finish with the project.
The Setup section consists of three main tasks:
- Install Hyper-V
- Create Windows Server Domain Controller Virtual Machine
- Create Windows Server Domain Member Server
Install Hyper-V
In this task, you install Hyper-V and configure a NAT switch. You configure Hyper-V to use a different set of default directories to store virtual machine files and hard disks. You can use the options presented in these instructions or choose your own location.
- Sign in to the Windows 11 computer with an account that has local Administrator privileges.
- On the Windows 11 Computer click Start, select Settings and on the Settings page select System.
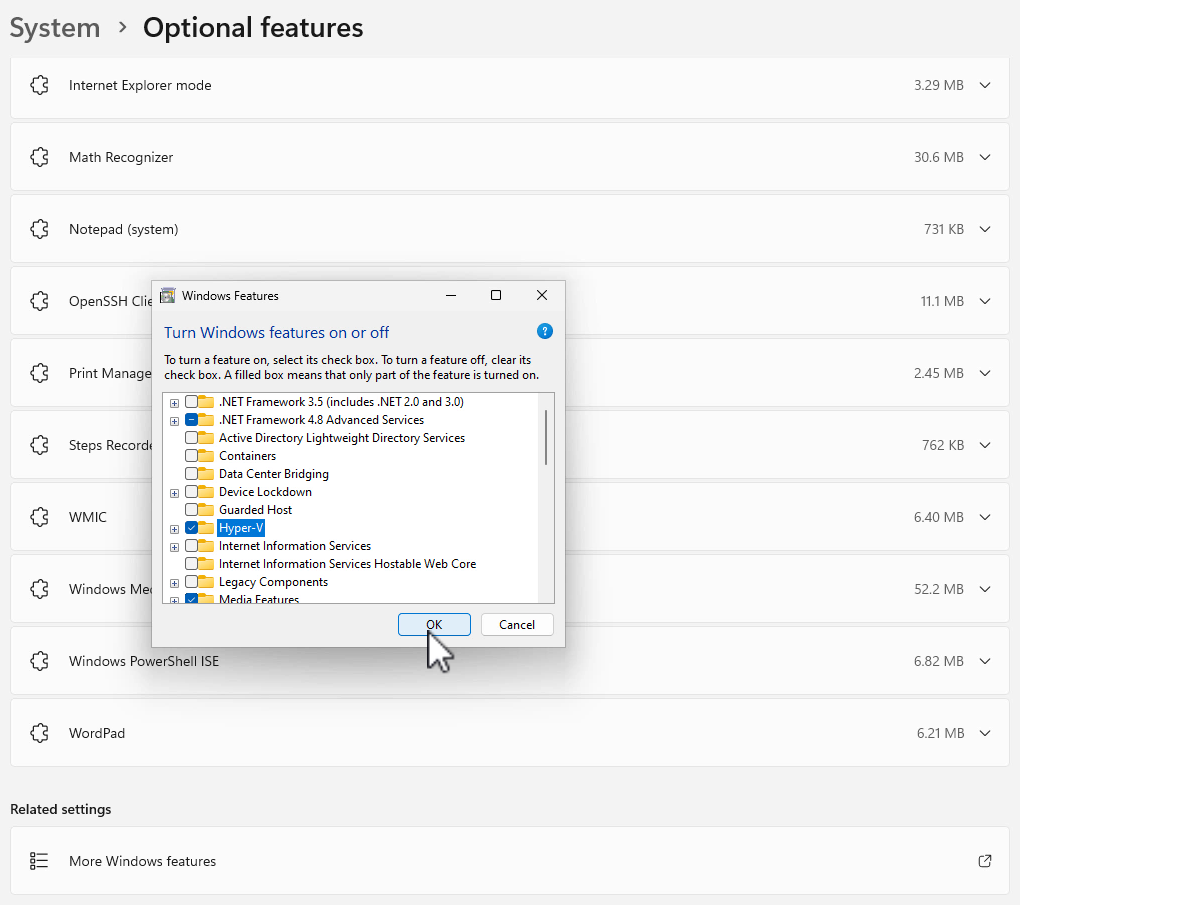
- On the System page of Settings, scroll down until you locate Optional Features. Select Optional Features.
- On the Optional Features page, scroll down until you locate More Windows Features under Related Settings.
-
On the Windows Feature page, select the checkbox next to Hyper-V and click OK as shown in the exhibit.
- When the installation completes, on the Windows Features page, click Restart Now.
- After the computer restarts, sign in again using the same account that has local Administrative privileges.
- Click Start and search for Hyper-V Manger. Pin Hyper-V Manager to the Taskbar.
- Open Hyper-V Manager, right click on the local computer, and select Hyper-V Settings.
- On the Hyper-V settings dialog box, under Server, select Virtual Machines. Set the location of the Virtual Machines folder to C:\VirtualMachines.
- Under the Hyper-V settings dialog box, under Server, select Virtual Machine Hard Disks. Set the location of the Virtual Machine Hard Disks to C:\VirtualMachines\VHDs.
- Click OK to close the Hyper-V Settings dialog box.
- Open PowerShell with administrator access and run the following commands to create a NAT network.
New-VMSwitch -SwitchName “NATSwitch” -SwitchType InternalNew-NetIPAddress -IPAddress 10.10.10.1 -PrefixLength 24 -InterfaceAlias “vEthernet (NATSwitch)”New-NetNat -Name “NATNetwork” –InternalIPInterfaceAddressPrefix “10.10.10.0/24” - Close PowerShell.
Create Windows Server Domain Controller Virtual Machine
In this task, you deploy and configure a Windows Server 2022 Domain Controller for the lab in which you perform tasks related to the Applied Skill Credential. To perform this task, ensure that you downloaded the Windows Server 2022 Evaluation Edition ISO file from https://www.microsoft.com/en-us/evalcenter/download-windows-server-2022. Place this file in the folder c:\ISOs. This evaluation ISO allows you to run a full version of Windows Server 2022 for up to 180 days.
- In Hyper-V Manager on the Actions menu select New and then select Virtual Machine.
- On the Before you Begin page of the New Virtual Machine Wizard, click Next.
- On the Specify Name and Location page of the New Virtual Machine Wizard, type the name TAILWIND-DC1 and click Next.
- On the Specify Generation page, select Generation 2 and click Next.
- On the Assign Memory page, set the startup memory to 4096 MB and leave the Use Dynamic Memory for this virtual machine option selected. Click Next.
- On the Configure Networking page, set the Connection in the drop-down menu to NATSwitch and click Next.
- On the Connect Virtual Hard Disk page, accept the defaults and click Next.
- On the Installation Options page, select the Install an operating system from a bootable image file option and then click Browse to select the Windows Server 2022 Evaluation Edition iso file (named SERVER_EVAL_x64FRE_en-us.iso). You already downloaded this file to the C:\ISOs folder. Click Next.
- On the Summary page, click Finish.
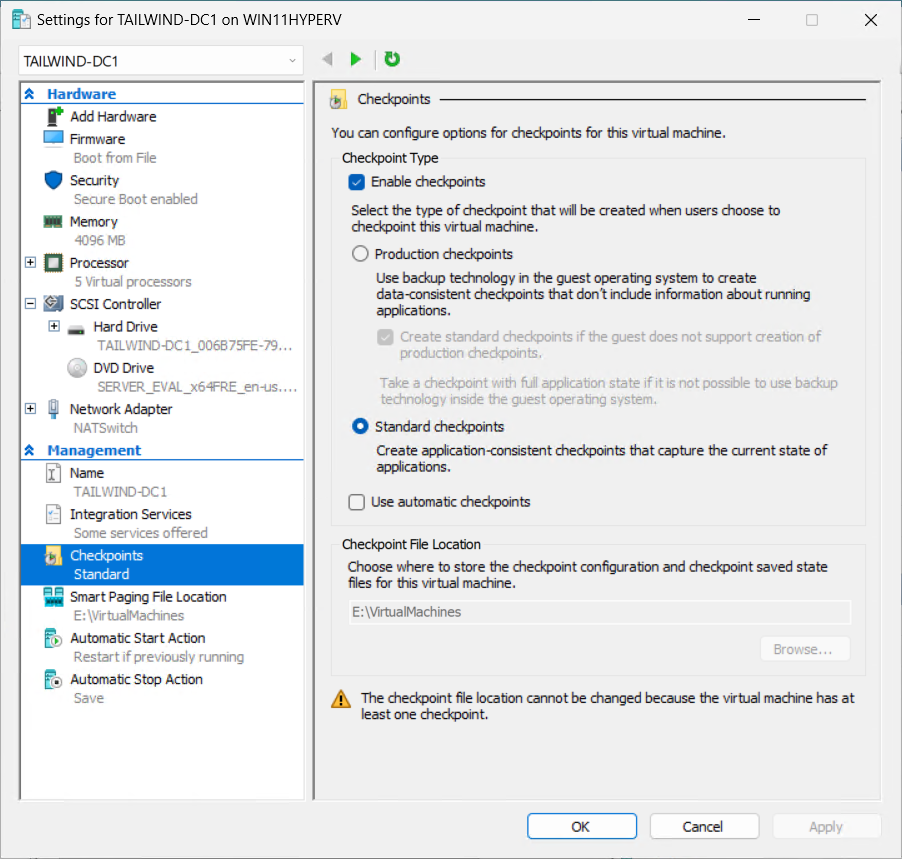
- In Hyper-V Manager, right-click TAILWIND-DC1 and select Settings.
-
On the TAILWIND-DC1 Settings page, under Management select Checkpoints and ensure that the Use automatic checkpoints option isn’t selected as is shown in the screenshot. Click OK.
- Double-click TAILWIND-DC1. This opens the Virtual Machine Connection window. Select Start. When the Press any key to boot from CD or DVD message displays, use the mouse to select inside the virtual machine window and press the Space bar. This sets the virtual machine to boot from the attached ISO file.
- On the Microsoft Server Operating System Setup page, accept the defaults and click Next.
- On the Install now page, select Install now.
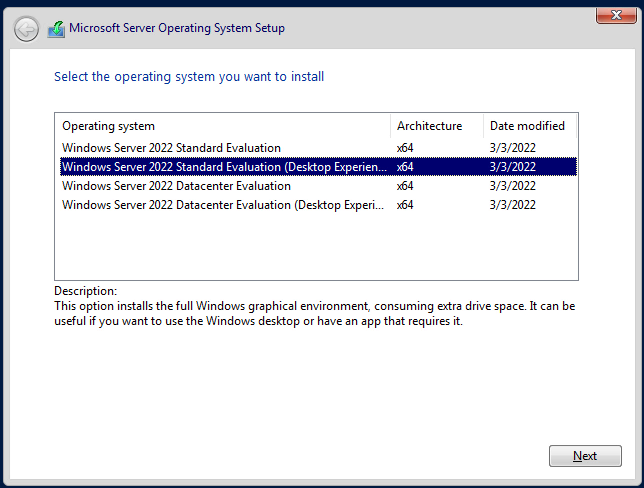
-
On the Microsoft Server Operating System Setup page, select Windows Server 2022 Standard Evaluation (Desktop Experience) as shown in the screenshot and click Next.
- On the Applicable notices and license terms page, review the license and then select the I Accept checkbox. Click Next.
- On the Which type of installation do you want? page, select Custom.
- On the Where do you want to install the operating system? page, select Drive 0 and click Next. The operating system will install. This takes several minutes depending on the speed of the computer you’re using. The virtual machine will restart.
- On the Customize settings page, you are asked to provide a password for the built-in Administrator account. Enter the password: Pa55w.rdPa55w.rd twice. The password is a demonstration password and shouldn’t be used on production systems. You can also choose your own password here. After you have entered the Administrator password twice, click Finish. You won’t be connected to the running virtual machine.
- On the virtual machine’s lock screen, enter the Administrator password Pa55w.rdPa55w.rd to sign in.
- After you sign in, right-click the network icon, represented by a globe on the task bar, and select Open Network & Internet Settings.
- On the Network Status page, select Change adapter options.
- On the Network Connections page, right-click Ethernet and select Properties.
- On the Ethernet Properties page, select the Internet Protocol Version 4 (TCP/IPv4) item and click Properties.
-
On the General tab of the Internet Protocol Version 4 (TCP/IPv4) Properties page, set the IP address configuration as follows and click OK:
-
Use the following IP address:
- IP address: 10.10.10.10
- Subnet Mask: 255.255.255.0
- Default Gateway: 10.10.10.1
-
Use the following DNS server addresses:
- Preferred DNS server: 1.1.1.1
- Alternate DNS server: 8.8.8.8
-
- Click Close. When queried about whether you want to allow the computer to be discoverable, select Yes.
- From the Start menu, open Server Manager, select Local Server and then select the Computer Name. This opens the System Properties dialog box. On the Computer Name page of the System Properties dialog box, select Change.
- On the Computer Name/Domain Changes dialog box, set the computer name to TAILWIND-DC1 and then click OK.
- In the dialog informing you that you need to restart your computer click OK.
- On the System Properties dialog box, select Close.
- In the You must restart your computer to apply these changes dialog box, click Restart Now. The computer will restart.
- When the computer has restarted, sign in as Administrator with the password you configured during installation.
- In Server Manager, select the Manage menu and then select Add Roles and Features.
- On the Before you begin page of the Add Roles and Features wizard, select Next.
- On the Select installation type page, select Role-based or feature-based installation and click Next.
- On the Select destination server page, click Select a server from the server pool, ensure TAILWIND-DC1 is selected and click Next.
- On the Select server roles page, select the Active Directory Domain Services checkbox. This opens the Add features page. Select Add Features. On the Select server roles page, click Next.
- On the Select features page, click Next.
- On the Active Directory Domain Services page, click Next.
- On the Confirm installation selections page, select Install. Depending on the speed of the computer, installation may take several minutes. When the installation completes, click Close.
-
On the Server manager menu, select the notification icon next to the flag in the top right corner shown in the screenshot.

- On the menu that opens when you select the notification icon, select Promote this server to a domain controller. This starts the Active Directory Domain Services Configuration Wizard.
- On the Deployment Configuration page, select Add a new forest and set the root domain name to tailwindtraders.internal. Click Next.
- On the Domain Controller options page, accept the default settings and provide the Directory Services Restore Mode (DSRM) password. To do this, enter the following password twice: Pa55w.rdPa55w.rd. Click Next.
- On the DNS Options page, click Next.
- On the Additional Options page, click Next.
- On the Paths page, click Next.
- On the Review Options page, click Next.
- On the Prerequisites Check page, click Install. The installation takes several minutes depending on the speed of the virtual machine. The virtual machine will restart.
- When the virtual machine restarts, sign in as tailwindtraders\administrator with the password you configured for the default administrator account (Pa55w.rdPa55w.rd)
Create Windows Server Domain Member Server
In this task, you deploy and configure a Windows Server 2022 Domain member server for the lab in which you perform tasks related to the Applied Skill Credential. This task also uses the evaluation edition iso file.
- In Hyper-V Manager on the Actions menu, select New and then select Virtual Machine.
- On the Before you Begin page of the New Virtual Machine Wizard, click Next.
- On the Specify Name and Location page of the New Virtual Machine Wizard, enter the name TAILWIND-MBR1 and click Next.
- On the Specify Generation page, select Generation 2 and click Next.
- On the Assign Memory page, set the startup memory to 4096 MB and leave the Use Dynamic Memory for this virtual machine option selected. Click Next.
- On the Configure Networking page, set the Connection in the drop-down menu to NATSwitch and click Next.
- On the Connect Virtual Hard Disk page, accept the defaults and click Next.
- On the Installation Options page, select the Install an operating system from a bootable image file option and then click Browse to select the Windows Server 2022 Evaluation Edition iso file (named SERVER_EVAL_x64FRE_en-us.iso) that you have downloaded to the C:\ISOs folder. Click Next.
- On the Summary page, click Finish.
- In Hyper-V Manager, right-click TAILWIND-MBR1 and select Settings.
- On the TAILWIND-MBR1 Settings page, under Management, select Checkpoints, ensure that the Use automatic checkpoints option isn’t selected, and click OK.
- Double click TAILWIND-MBR1. This brings up the Virtual Machine Connection window. Click Start. When the Press any key to boot from CD or DVD message appears, use the mouse to select inside the virtual machine window and press the Space bar. This sets the virtual machine to boot from the attached ISO file.
- On the Microsoft Server Operating System Setup page, accept the defaults and click Next.
- On the Install now page, click Install now.
- On the Microsoft Server Operating System Setup page, select Windows Server 2022 Standard Evaluation (Desktop Experience) and click Next.
- On the Applicable notices and license terms page, review the license and then select the I Accept checkbox. Click Next.
- On the Which type of installation do you want? page, select Custom.
- On the Where do you want to install the operating system? page, select Drive 0 and click Next. The operating system will install. This takes several minutes depending on the speed of the computer you’re using. The virtual machine will restart.
- On the Customize settings page, you are asked to provide a password for the built-in Administrator account. Enter the password: Pa55w.rdPa55w.rd twice. The password is a demonstration password and shouldn’t be used on production systems. You can also choose your own password here. After you have entered the Administrator password twice, select Finish. You won’t be connected to the running virtual machine.
- On the virtual machine’s lock screen, enter the Administrator password Pa55w.rdPa55w.rd to sign in.
- After you have signed in, right-click the network icon, represented by a globe on the task bar, and select Open Network & Internet Settings.
- On the Network Status page, select Change adapter options.
- On the Network Connections page, right-click Ethernet and select Properties.
- On the Ethernet Properties page, select the Internet Protocol Version 4 (TCP/IPv4) item and click Properties.
-
On the General tab of the Internet Protocol Version 4 (TCP/IPv4) Properties page, set the IP address configuration as follows and click OK:
-
Use the following IP address:
- IP address: 10.10.10.20
- Subnet Mask: 255.255.255.0
- Default Gateway: 10.10.10.1
-
Use the following DNS server addresses:
- Preferred DNS server: 10.10.10.10
- Alternate DNS server: 8.8.8.8
-
- Click Close. When queried about whether you want to allow the computer to be discoverable, select Yes.
- From the Start menu, open Server Manager, select Local Server and then select the Computer Name. This opens the System Properties dialog box. On the Computer Name page of the System Properties dialog box, select Change.
- On the Computer Name/Domain Changes dialog box, set the computer name to TAILWIND-MBR1 and then click OK.
- On the dialog informing you that you need to restart your computer, click OK.
- On the System Properties dialog box, click Close.
- On the You must restart your computer to apply these changes dialog box, click Restart Now. The computer will restart.
- When the computer has restarted, sign in as Administrator with the password you configured during installation.
- In the Server Manager console, select the Local Server section. In the Local Server section, select TAILWIND-MBR1 next to Computer Name. this opens the System Properties dialog box.
- On the System Properties dialog box, click Change.
- On the Computer Name/Domain Changes dialog box, select Domain under Member of, enter the domain name TAILWINDTRADERS, and click OK.
-
On the Computer Name/Domain Changes dialog box, enter the following username and password and click OK:
- Username: TAILWINDTRADERS\Administrator
- Password: Pa55w.rdPa55w.rd
- Momentarily, the Welcome to the Tailwintraders domain dialog will appear. Click OK.
- On the System Properties dialog box, click Close.
- On the dialog asking you to restart the computer, click Restart Now.