在本练习中,了解如何将代码添加到 ASP.NET Core Blazor Web 应用中,以呈现 HTTP 的结果。 该代码已添加到 .razor文件中。 在 .razor.cs 文件中执行操作的代码已完成。
目标
完成此练习后,你将能够:
- 在应用中实现 Razor 语法
- 将 C# 代码与 Razor 语法相结合
先决条件
要完成本练习,您需要在系统中安装以下设备:
- Visual Studio Code
- 最新的 .NET 8.0 SDK
- Visual Studio Code 的 C# 扩展
预计练习完成时间:30 分钟
练习场景
本练习包含两个部分:
- 向 API 发送 HTTP 请求的网络应用程序。 该应用程序在
http://localhost:5010上运行 - 响应 HTTP 请求的 API。 该 API 在
http://localhost:5050上运行

下载代码
在本节中,您将下载 Fruit 网络应用程序和 Fruit API 的代码。 您还将在本地运行 Fruit API,以便它可用于网络应用程序。
任务 1: 下载并运行 API 代码
-
右键单击以下链接并选择另存链接选项。
-
启动文件资源管理器并导航到文件保存的位置。
-
将文件解压缩到它自己的文件夹中。
-
打开 Windows 终端或命令提示符,并导航到提取 API 代码的位置。
-
在Windows 终端窗格中运行以下
dotnet命令:dotnet run -
以下是生成的输出示例。 请注意
Now listening on: http://localhost:5050输出中的一行。 它标识了 API 的主机和端口。info: Microsoft.EntityFrameworkCore.Update[30100] Saved 3 entities to in-memory store. info: Microsoft.Hosting.Lifetime[14] Now listening on: http://localhost:5050 info: Microsoft.Hosting.Lifetime[0] Application started. Press Ctrl+C to shut down. info: Microsoft.Hosting.Lifetime[0] Hosting environment: Development info: Microsoft.Hosting.Lifetime[0] Content root path: <project location>
注意: 在接下来的练习中,让 Fruit API 一直处于运行状态。
任务 2:下载并打开网络应用程序项目
-
右键单击以下链接并选择另存链接选项。
-
启动文件资源管理器并导航到文件保存的位置。
-
将文件解压缩到它自己的文件夹中。
-
启动 Visual Studio Code,在菜单栏中选择文件,然后选择打开文件夹……。
-
导航到解压项目文件的位置,然后选择 FruitWebApp-render 文件夹。
-
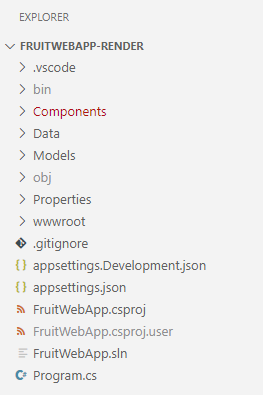
资源管理器窗格中的项目结构应与下面的截图相似。 如果资源管理器窗格不可见,请选择查看,然后在菜单栏中选择资源管理器。
注意: 请花时间查看本练习中编辑的每个文件中的代码。 这些代码都有大量注释,可以帮助你理解代码库。
执行代码以在主页上呈现数据
Fruit 网络应用程序会在主页上显示 API 示例数据。 您需要添加代码,以迭代由在代码后台文件中执行的 HTTP GET操作返回的示例数据。
任务 1:添加代码以在表格中呈现数据
-
在“资源管理器”窗格中,选择 Home.razor 文件,打开该文件进行编辑。
-
在
@* Begin render API data code block *@和@* End render API data code block *@注释之间添加以下代码。<tbody> @* The Razor explicit expression @foreach is used to iterate through the data returned to the data model from the HTTP operations. *@ @foreach (var obj in _fruitList ?? []) { <tr> @* Display the name of the fruit. *@ <td width="50%">@obj.name</td> @* The following if statment changes the true/false of instock to Yes/No. *@ @{ if (@obj.instock) { <td width="20%" class="text-md-center"> Yes </td> } else { <td width="20%" class="text-md-center"> No </td> } } <td width="30%" class="text-center"> @* The following div renders the Edit and Delete buttons that pass the Id to a function that handles the navigation and passes the Id to the page. *@ <div class="w-75 btn-group btn-group-sm" role="group" style="text-align:center"> <button class="btn btn-primary mx-2" @onclick="() => EditButton(obj.id)"> Edit </button> <button class="btn btn-danger mx-2" @onclick="() => DeleteButton(obj.id)"> Delete </button> </div> </td> </tr> } </tbody> -
保存对 Home.razor 所做的更改,并查看代码中的注释。
-
在 Visual Studio Code 顶部菜单中选择运行|开始调试,或选择 F5。 项目构建完成后,浏览器窗口应启动并运行网络应用程序
-
验证索引页面是否显示来自 API 的示例数据。
注意: 在本练习的稍后部分添加代码之前,添加到列表、编辑和删除功能将无法运行。
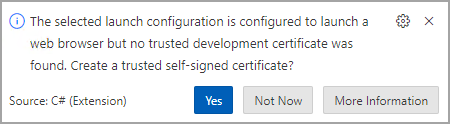
注意: 如果运行应用程序时出现下面的提示,您可以放心地忽略它。
-
要继续练习,请关闭浏览器或浏览器选项卡,并在 Visual Studio Code 中选择运行 | 停止调试 或 Shift + F5。
执行代码以处理添加到列表功能
添加、编辑和删除操作分别在项目中的单独 .razor 页面上处理。 在本部分中,添加代码,在 Add.razor 文件中创建表格,以便向列表中添加数据。
任务 1:添加代码以创建添加数据表单
-
在“资源管理器”窗格中,选择 Add.razor 文件,打开该文件进行编辑。
-
在
@* Begin render Add code block *@和@* End render Add code block *@注释之间添加以下代码。@* Data is added using a Razor form, the data model is bound to the form.*@ <EditForm OnSubmit="Submit" FormName="AddFruit" Model="_fruitList"> @* The _fruitList.id is here so the full data model is represented on the page. The database behind the API will assign the id. *@ <InputNumber hidden="true" @bind-Value="_fruitList!.id" /> <div class="border p-3 mt-4" style="width:50%"> <div class="row pb-2"> <h2 class="text-primary pl-3">Add Fruit</h2> <hr /> </div> <div class="mb-3"> <label class="h5"></label><br /> @* Empty text box for the name of the fruit to be added. *@ <InputText @bind-Value="_fruitList!.name" /> </div> <div class="mb-3"> <label class="h5"></label><br /> @* Render the true/false instock state from the record in an editable checkbox. *@ <InputCheckbox @bind-Value="_fruitList!.instock" style="width:20px; height:20px" /> <label class="h7">Check the box if it's available.</label> </div> @* Submit the addition or return to the Index page if the Add is cancelled.*@ <button @onclick="() => Submit()" class="btn btn-primary" style="width:150px;">Create</button> <a class="btn btn-secondary" style="width:150px;" href="/">Cancel</a> </div> </EditForm> -
保存对 Add.razor 的更改,并查看代码中的注释。
-
在 Visual Studio Code 顶部菜单中选择运行|开始调试,或选择 F5。 项目构建完成后,浏览器窗口应启动并运行网络应用程序
-
在页面上选择添加到列表。
-
输入要添加到列表中的水果名称,并选择复选框表示该水果可用。
-
选择创建将条目添加到列表中,然后返回主页。 验证您的条目是否已添加到列表中。
-
要继续练习,请关闭浏览器或浏览器选项卡,并在 Visual Studio Code 中选择运行|停止调试或 Shift + F5。
执行代码以处理编辑功能
在本节中,您将添加代码,在 Edit.cshtml 文件中创建表格,以便编辑列表中的数据。
任务 1:为编辑表单添加代码
-
在“资源管理器”窗格中,选择 Edit.razor 文件,打开该文件进行编辑。
-
在
@* Begin render Edit code block *@和@* End render Edit code block *@注释之间添加以下代码。@* Data is edited using a Razor form, the data model is bound to the form.*@ <EditForm OnSubmit="Submit" FormName="EditFruit" Model="_fruitList"> @* The id for the data record is hidden because it needs to be available to the code-behind processing, but it's not displayed. *@ <InputNumber hidden="true" @bind-Value="_fruitList!.id" /> <div class="border p-3 mt-4" style="width:50%"> <div class="row pb-2"> <h2 class="text-primary pl-3">Edit Fruit</h2> <hr /> </div> <div class="mb-3"> <label asp-for="FruitModels.name" class="h5"></label><br/> @* Render the name of the fruit in an editable text box. *@ <InputText @bind-Value="_fruitList!.name" /> </div> <div class="mb-3"> <label class="h5"></label><br/> @* Render the true/false instock state from the record in an editable checkbox. *@ <InputCheckbox @bind-Value="_fruitList!.instock" style="width:20px; height:20px" /> <label class="h7"><i class="bi bi-arrow-left"></i> Check the box if available.</label> </div> @* Submit the changes or return to the Index page if the Edit is cancelled.*@ <button type="submit" class="btn btn-danger " style="width:150px;">Save</button> <a class="btn btn-secondary" style="width:150px;" href="/">Cancel</a> </div> </EditForm> -
保存对 Edit.razor 的更改,并查看代码中的注释。
-
在 Visual Studio Code 顶部菜单中选择运行|开始调试,或选择 F5。 项目构建完成后,浏览器窗口应启动并运行网络应用程序
-
在列表中选择一个要更改的项目,然后在该行中选择编辑。
-
编辑水果名称并选择复选框以更改其可用状态。
-
选择更新保存更改,然后返回主页。 确认列表中显示了您的更改。
-
要继续练习,请关闭浏览器或浏览器选项卡,并在 Visual Studio Code 中选择运行|停止调试或 Shift + F5。
执行代码以处理删除功能
在本节中,您将添加代码,在 Delete.cshtml 文件中创建一个表单,以便从列表中删除数据。
任务 1: 为删除表单添加代码
-
在“资源管理器”窗格中,选择 Delete.razor 文件,打开该文件进行编辑。
-
在
@* Begin render Delete code block *@和@* End render Delete code block *@注释之间添加以下代码。@* Data is deleted using a Razor form, the data model is bound to the form.*@ <EditForm OnSubmit="Submit" FormName="DeleteFruit" Model="_fruitList"> @* The id for the data record is hidden because it needs to be available to the code-behind processing, but it's not displayed. *@ <InputNumber hidden="true" @bind-Value="_fruitList!.id" /> <div class="border p-3 mt-4" style="width:50%"> <div class="row pb-2"> <h2 class="text-primary pl-3">Delete Fruit</h2> <hr /> </div> <div class="mb-3"> <label asp-for="FruitModels.name" class="h5"></label><br/> @* Render the name of the fruit in a non-editable text box. *@ <InputText @bind-Value="_fruitList!.name" Disabled/> </div> <div class="mb-3"> <label class="h5"></label><br/> @* Render the true/false instock state from the record in a non-editable checkbox. *@ <InputCheckbox @bind-Value="_fruitList!.instock" style="width:20px; height:20px" Disabled /> <label class="h7">Check the box if available.</label> </div> @* Submit the changes or return to the Index page if the delete is cancelled.*@ <button type="submit" class="btn btn-danger " style="width:150px;">Delete</button> <a class="btn btn-secondary" style="width:150px;" href="/">Cancel</a> </div> </EditForm> -
保存对 Delete.razor 的更改,并查看代码中的注释。
-
在 Visual Studio Code 顶部菜单中选择运行|开始调试,或选择 F5。 项目构建完成后,浏览器窗口应启动并运行网络应用程序
-
在列表中选择一个要删除的项目,然后在该行中选择删除。
-
选择删除,您将返回主页。 确认已删除的项目不再显示在列表中。
准备结束练习时:
-
关闭浏览器或浏览器选项卡,在 Visual Studio Code 中选择运行 | 停止调试 或 Shift + F5。
-
在 Fruit API 运行的终端中输入 Ctrl + C,停止 Fruit API。
审阅
在本练习中,你了解了如何:
- 在应用程序中执行 Razor 关键字
- 将 C# 代码与 Razor Pages 语法相结合