この演習では、ASP.NET Core Blazor Web アプリにコードを追加して、HTTP クライアントを作成し、GET、POST、PUT、DELETE の操作を実行する方法について学習します。 このコードは、.razor.cs 分離コード ファイルに追加されます。 .razor ファイル内のデータをレンダリングするコードが完了しました。
目標
この演習を終了すると、次のことができるようになります。
- HTTP クライアントとして
IHttpClientFactoryを実装する - ASP.NET Blazor Web アプリに HTTP 操作を実装する
前提条件
演習を完了するには、次の項目がシステムにインストールされている必要があります。
- Visual Studio Code
- 最新の .NET 8.0 SDK
- Visual Studio Code 用の C# 拡張機能
この演習の推定所要時間: 30 分
演習のシナリオ
この演習には、次の 2 つのコンポーネントがあります。
- API に HTTP 要求を送信するアプリ。 Web アプリは
http://localhost:5010で実行します。 - HTTP 要求に応答する API。 API は
http://localhost:5050で実行します。

コードのダウンロード
このセクションでは、Fruit Web アプリと Fruit API のコードをダウンロードします。 また、Fruit API をローカルで実行して、Web アプリで使用できるようにします。
タスク 1: API コードをダウンロードして実行する
-
次のリンクを右クリックし、[名前を付けてリンク先を保存] オプションを選択します。
-
エクスプローラーを起動し、ファイルが保存された場所に移動します。
-
ファイルを独自のフォルダーに解凍します。
-
Windows ターミナルまたはコマンド プロンプトを開き、API のコードを抽出した場所に移動します。
-
Windows ターミナル ペインで次の
dotnetコマンドを実行します。dotnet run -
生成された出力の例を次に示します。 出力内の
Now listening on: http://localhost:5050行をメモします。 API のホストとポートを識別します。info: Microsoft.EntityFrameworkCore.Update[30100] Saved 3 entities to in-memory store. info: Microsoft.Hosting.Lifetime[14] Now listening on: http://localhost:5050 info: Microsoft.Hosting.Lifetime[0] Application started. Press Ctrl+C to shut down. info: Microsoft.Hosting.Lifetime[0] Hosting environment: Development info: Microsoft.Hosting.Lifetime[0] Content root path: <project location>
注: Fruit API は、以降の演習が終わるまで実行したままにします。
タスク 2: Web アプリ プロジェクトをダウンロードして開く
-
次のリンクを右クリックし、[名前を付けてリンク先を保存] オプションを選択します。
-
エクスプローラーを起動し、ファイルが保存された場所に移動します。
-
ファイルを独自のフォルダーに解凍します。
-
Visual Studio Code で、[ファイル] を選択し、[フォルダーを開く…] を選びます。
-
プロジェクト ファイルを解凍した場所に移動し、FruitWebApp-codebehind フォルダーを選択します。
-
エクスプローラー ペインのプロジェクト構造は、次のスクリーンショットのようになります。 メニュ バーにエクスプローラー パネルが表示されない場合は、[表示] を選んで、[サーバー エクスプローラー]] を選びます。
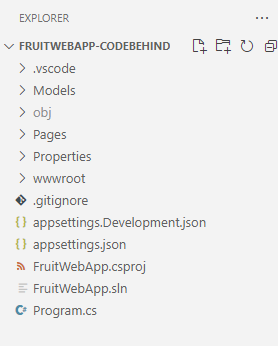
注: この演習全体を通して編集されている各ファイルのコードについて、時間をかけて確認してください。 このコードには多数のコメントが付いているため、コード ベースを理解するのに役立ちます。
HTTP クライアントと HTTP 操作のコードを実装する
Fruit Web アプリは、ホーム ページに API サンプル データを表示し、追加、編集、削除の機能を備えています。 HTTP クライアント操作を実装するコードを追加する必要があります。
タスク 1: HTTP クライアントを実装する
-
[エクスプローラー] ペインで Program.cs ファイルを選択し、編集用に開きます。
-
// Begin HTTP client codeと// End of HTTP client codeのコメント間に次のコードを追加します。// Add IHttpClientFactory to the container and set the name of the factory // to "FruitAPI". The base address for API requests is also set. builder.Services.AddHttpClient("FruitAPI", httpClient => { httpClient.BaseAddress = new Uri("http://localhost:5050/"); }); -
Program.cs に対する変更を保存します。
タスク 2: GET 操作を実装する
-
[エクスプローラー] ペインで home.razor.cs ファイルを選択し、編集用に開きます。 これは、
Components/Pagesフォルダーにあります。 -
// Begin GET operation codeと// End GET operation codeのコメント間に次のコードを追加します。protected override async Task OnInitializedAsync() { // Create the HTTP client using the FruitAPI named factory var httpClient = HttpClientFactory.CreateClient("FruitAPI"); // Perform the GET request and store the response. The parameter // in GetAsync specifies the endpoint in the API using HttpResponseMessage response = await httpClient.GetAsync("/fruits"); // If the request is successful deserialize the results into the data model if (response.IsSuccessStatusCode) { using var contentStream = await response.Content.ReadAsStreamAsync(); _fruitList = await JsonSerializer.DeserializeAsync<IEnumerable<FruitModel>>(contentStream); } else { // If the request is unsuccessful, log the error message Console.WriteLine($"Failed to load fruit list. Status code: {response.StatusCode}"); } } -
変更を Home.razor.cs に保存します。
-
Home.razor.cs ファイルでコードを確認します。 依存関係挿入を使用して
IHttpClientFactoryをページに追加する場所に注意してください。
タスク 3: POST 操作を実装する
-
[エクスプローラー] ペインで Add.razor.cs ファイルを選択し、編集用に開きます。
-
// Begin POST operation codeと// End POST operation codeのコメント間に次のコードを追加します。private async Task Submit() { // Serialize the information to be added to the database var jsonContent = new StringContent(JsonSerializer.Serialize(_fruitList), Encoding.UTF8, "application/json"); // Create the HTTP client using the FruitAPI named factory var httpClient = HttpClientFactory.CreateClient("FruitAPI"); // Execute the POST request and store the response. The response will contain the new record's ID using HttpResponseMessage response = await httpClient.PostAsync("/fruits", jsonContent); // Check if the operation was successful, and navigate to the home page if it was if (response.IsSuccessStatusCode) { NavigationManager?.NavigateTo("/"); } else { Console.WriteLine("Failed to add fruit. Status code: {response.StatusCode}"); } } -
変更を Add.razor.cs に保存し、コード内のコメントを確認します。
タスク 4: PUT 操作を実装する
-
[エクスプローラー] ペインで Edit.razor.cs ファイルを選択し、編集用に開きます。
-
// Begin PUT operation codeと// End PUT operation codeのコメント間に次のコードを追加します。private async Task Submit() { // Create the HTTP client using the FruitAPI named factory var httpClient = HttpClientFactory.CreateClient("FruitAPI"); // Store the updated data in a JSON object var jsonContent = new StringContent(JsonSerializer.Serialize(_fruitList), Encoding.UTF8, "application/json"); // Execute the PUT request using HttpResponseMessage response = await httpClient.PutAsync($"/fruits/{Id}", jsonContent); // If the response is successful, navigate back to the home page if (response.IsSuccessStatusCode) { NavigationManager?.NavigateTo("/"); } else { Console.WriteLine("Failed to update fruit with edits. Status code: {response.StatusCode}"); } } -
変更を Edit.razor.cs に保存し、コード内のコメントを確認します。
タスク 5: DELETE 操作を実装する
-
[エクスプローラー] ペインで Delete.razor.cs ファイルを選択し、編集用に開きます。
-
// Begin DELETE operation codeと// End DELETE operation codeのコメント間に次のコードを追加します。private async Task Submit() { // Create the HTTP client using the FruitAPI named factory var httpClient = HttpClientFactory.CreateClient("FruitAPI"); // Execute the DELETE request and store the response using HttpResponseMessage response = await httpClient.DeleteAsync("/fruits/" + Id.ToString()); // Return to the home page if (response.IsSuccessStatusCode) { NavigationManager?.NavigateTo("/"); } else { Console.WriteLine("Failed to delete fruit. Status code: {response.StatusCode}"); } } -
変更を Delete.razor.cs に保存し、コード内のコメントを確認します。
Web アプリを実行してテストする
タスク 1: Web アプリを実行する
-
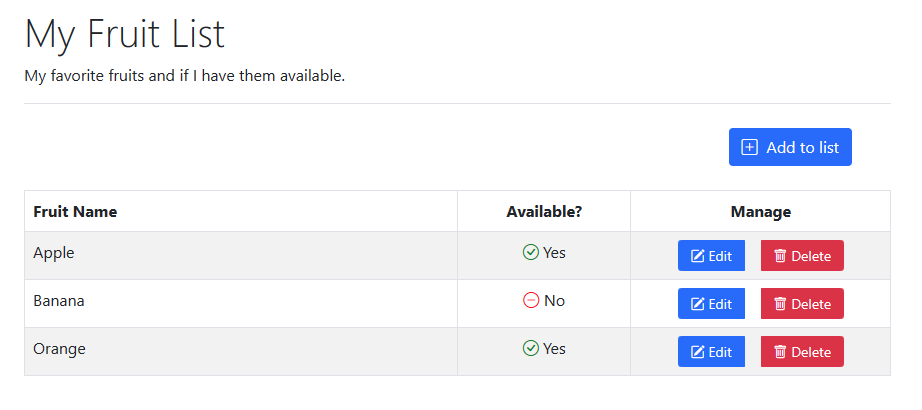
Visual Studio Code の上部メニューで、[実行]| から [デバッグの開始] を選択するか、F5 を選択します。 プロジェクトのビルドが完了すると、Web アプリが実行された状態でブラウザー ウィンドウが起動し、次のスクリーンショットに示す API サンプル データが表示されます。
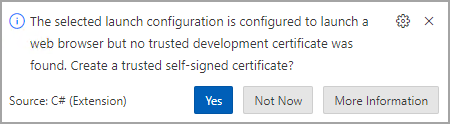
注: アプリの実行時に以下のプロンプトが表示される場合は、無視しても問題ありません。
タスク 1: Web アプリをテストする
-
[リストに追加] ボタンを選択し、生成されたフォームに入力します。 次に、[作成] ボタンを選択します。
-
追加した項目がリストの下部に表示されていることを確認します。
- 編集するリスト内の項目を選択し、[編集] ボタンを選択します。
-
[フルーツ名] フィールドと [使用できる項目] フィールドを編集し、[更新] を選択します。
-
変更がリストに表示されることを確認します。
-
削除する項目をリストから選択し、[削除] ボタンを選択します。
-
[削除] ページ上で、選択した項目が表示されていることを確認し、[削除] ボタンをクリックします。
- この項目が最初のリストに表示されていないことを確認します。
演習を終了する準備ができたら、次を実行します。
-
ブラウザーまたはブラウザー タブを閉じ、Visual Studio Code で [実行] | [デバッグの停止] を選択するか、Shift + F5 キーを押します。
-
実行中のターミナルで Ctrl + C キーを押して Fruit API を停止します。
確認
この演習では、以下の方法を学習しました。
- HTTP クライアントとして
IHttpClientFactoryを実装する - ASP.NET Core Blazor 分離コード ファイルで HTTP 操作を実装する