Create a Bot with Bot Framework Composer
Bot Framework Composer is a graphical designer that lets you quickly and easily build sophisticated conversational bots without writing code. The composer is an open-source tool that presents a visual canvas for building bots.
Prepare to develop a bot
Let’s start by preparing the services and tools you need to develop a bot.
Get an OpenWeather API key
In this exercise, you will create a bot that uses the OpenWeather service to retrieve weather conditions for the city entered by the user. You will require an API key for the service to work.
- In a web browser, go to the OpenWeather site at
https://openweathermap.org/price. - Request a free API key, and create an OpenWeather account (if you do not already have one).
- After signing up, view the API keys page to see your API key.
Update Bot Framework Composer
You’re going to use the Bot Framework Composer to create your bot. This tools is updated regularly, so let’s make sure you have the latest version installed.
Note: Updates may include changes to the user interface that affect the instructions in this exercise.
- Start the Bot Framework Composer, and if you are not automatically prompted to install an update, use the Check for updates option on the Help menu to check for updates.
- If an update is available, choose the option to install it when the application is closed. Then close the Bot Framework Composer and install the update for the currently logged in user, restarting the Bot Framework Composer after the installation is complete. Installation may take a few minutes.
- Ensure that the version of Bot Framework Composer is 2.0.0 or later.
Create a bot
Now you’re ready to use the Bot Framework Composer to create a bot.
Create a bot and customize the “welcome” dialog flow
- Start the Bot Framework Composer if it’s not already open.
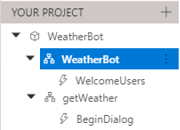
- On the Home screen, select New. Then create a new empty bot; naming it WeatherBot and saving it in a local folder.
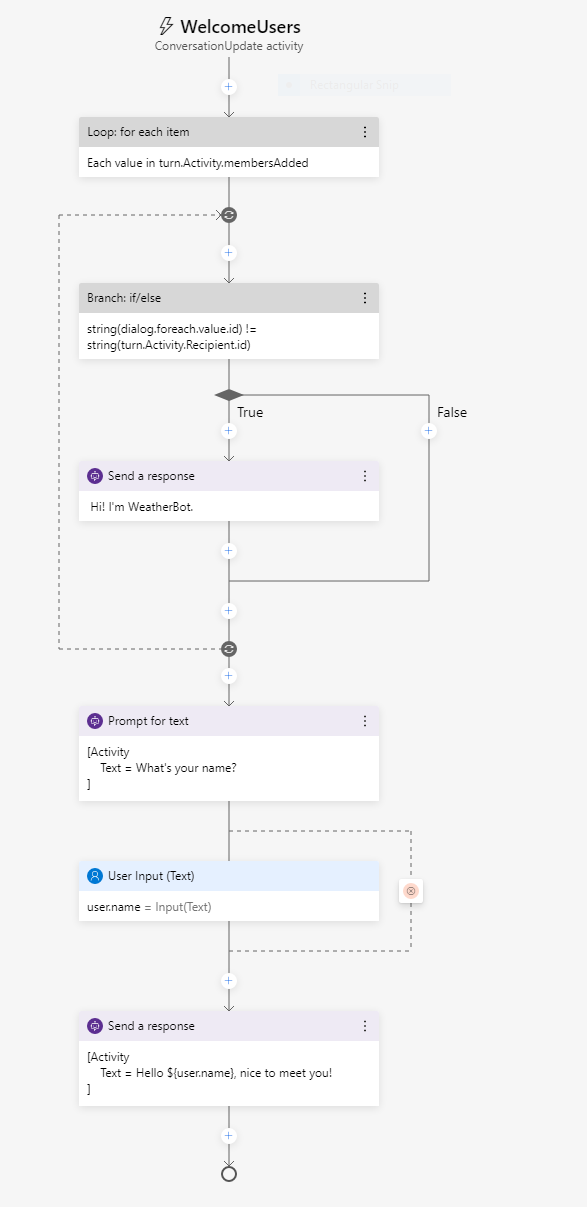
- Close the Get Started pane if it opens, and then in the navigation pane on the left, select Greeting to open the authoring canvas and show the ConversationUpdate activity that is called when a user initially joins a conversation with the bot. The activity consists of a flow of actions.
- In the properties pane on the right, edit the title of Greeting by selecting the word Greeting at the top of the properties pane on the right and changing it to WelcomeUsers.
- In the authoring canvas, select the Send a response action. Then, in the properties pane, change the default text from Hi to your bot to
Hi! I'm WeatherBot. -
In the authoring canvas, select the final + symbol (just above the circle that marks the end of the dialog flow), and add a new Ask a question action for a Text response.
The new action creates two nodes in the dialog flow. The first node defines a prompt for the bot to ask the user a question, and the second node represents the response that will be received from the user. In the properties pane, these nodes have corresponding Bot response and User input tabs.
- In the properties pane, on the Bot response tab, add a response with the text
What's your name?. Then, on the User input tab, set the Property value touser.nameto define a variable that you can access later in the bot conversation. - Back in the authoring canvas, select the + symbol under the User input(Text) action you just added, and add a Send a response action.
-
Select the newly added Send a response action and in the properties pane, set the text value to
Hello ${user.name}, nice to meet you!.The completed activity flow should look like this:
Test the bot
Your basic bot is complete so now let’s test it.
-
Select Start Bot in the upper right-hand corner of Composer, and wait while your bot is compiled and started. This may take several minutes.
- If a Windows Firewall message is displayed, enable access for all networks.
- In the Local bot runtime manager pane, select Open Web Chat.
- In the WeatherBot web chat pane, after a short pause, you will see the welcome message and the prompt to enter your first name. Enter you first name and press Enter.
- The bot should respond with the Hello your_name, nice to meet you!.
- Close the web chat panel.
- At the top right of Composer, next to ↻ Restart bot, click = to open the Local bot runtime manager pane, and use the ⏹ icon to stop the bot.
Add a dialog to get the weather
Now that you have a working bot, you can expand its capabilities by adding dialogs for specific interactions. In this case, you’ll add a dialog that is triggered when the user mentions “weather”.
Add a dialog
First, you need to define a dialog flow that will be used to handle questions about the weather.
-
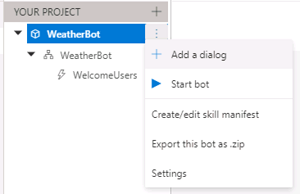
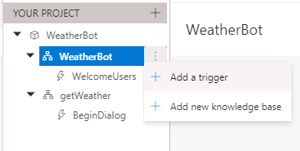
In Composer, in the navigation pane, hold the mouse over the top level node (WeatherBot) and in the … menu, select + Add a dialog, as shown here:
Then create a new dialog named GetWeather with the description Get the current weather condition for the provided zip code.
- In the navigation pane, select the BeginDialog node for the new GetWeather dialog. Then on the authoring canvas, use the + symbol to add a Ask a question action for a Text response.
- In the properties pane, on the Bot response tab, add the response
Enter your city. -
On the User input tab, set the Property field to
dialog.city, and set the Output format field to the expression=trim(this.value)to remove any superfluous spaces around the user-provided value.The activity flow so far should look like this:
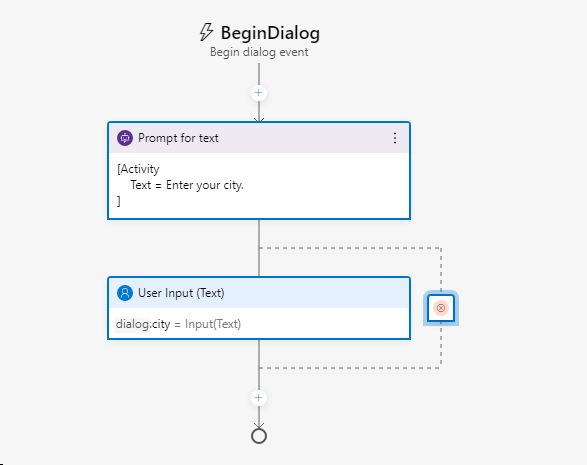
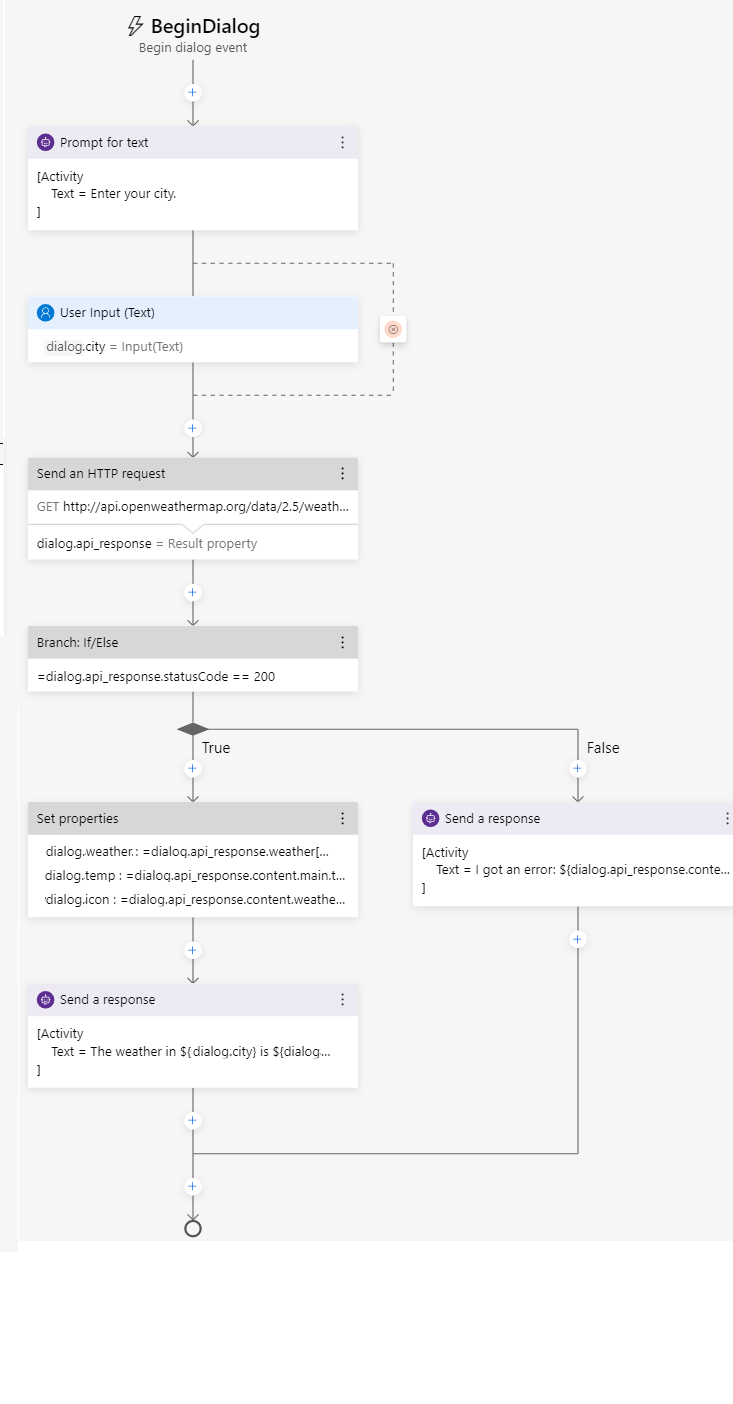
So far, the dialog asks the user to enter a city. Now you must implement the logic to retrieve the weather information for the city that was entered.
- On the authoring canvas, directly under the user Input action for the city entry, select the + symbol to add a new action.
- From the list of actions, select Access external resources and then Send an HTTP request.
- Set the properties for the HTTP request as follows, replacing YOUR_API_KEY with your OpenWeather API key:
- HTTP method: GET
- Url:
http://api.openweathermap.org/data/2.5/weather?units=metric&q=${dialog.city}&appid=YOUR_API_KEY - Result property:
dialog.api_response
The result can include any of the following four properties from the HTTP response:
- statusCode. Accessed via dialog.api_response.statusCode.
- reasonPhrase. Accessed via dialog.api_response.reasonPhrase.
- content. Accessed via dialog.api_response.content.
- headers. Accessed via dialog.api_response.headers.
Additionally, if the response type is JSON, it will be a deserialized object available via dialog.api_response.content property. For detailed information about the OpenWeather API and the response it returns, see the OpenWeather API documentation.
Now you need to add logic to the dialog flow that handles the response, which might indicate success or failure of the HTTP request.
- On the authoring canvas, under the Send HTTP Request action you created, add a Create a condition > Branch: if/else action. This action defines a branch in the dialog flow with True and False paths.
-
In the Properties of the branch action, set the Condition field to write the following expression:
=dialog.api_response.statusCode == 200 -
If the call was successful, you need to store the response in a variable. On the authoring canvas, in the True branch, add a Manage properties > Set properties action. Then in the properties pane, add the following property assignments:
Property Value dialog.weather=dialog.api_response.content.weather[0].descriptiondialog.temp=round(dialog.api_response.content.main.temp)dialog.icon=dialog.api_response.content.weather[0].icon -
Still in the True branch, add a Send a response action under the Set a property action and set its text to:
The weather in ${dialog.city} is ${dialog.weather} and the temperature is ${dialog.temp}°.Note: This message uses the dialog.city, dialog.weather, and dialog.temp properties you set in the previous actions. Later, you’ll also use the dialog.icon property.
-
You also need to account for a response from the weather service that is not 200, so in the False branch, add a Send a response action and set its text to
I got an error: ${dialog.api_response.content.message}.The dialog flow should now look like this:
Add a trigger for the dialog
Now you need some way for the new dialog to be initiated from the existing welcome dialog.
-
In the navigation pane, select the WeatherBot dialog that contains WelcomeUsers (this is under the top-level bot node of the same name).
-
In the properties pane for the selected WeatherBot dialog, in the Language Understanding section, set the Recognizer type to Regular expression recognizer.
The default recognizer type uses the Language Understanding service to product the user’s intent using a natural language understanding model. We’re using a regular expression recognizer to simplify this exercise. In a real, application, you should consider using Language Understanding to allow for more sophisticated intent recognition.
-
In the … menu for the WeatherBot dialog, select Add new Trigger.
Then create a trigger with the following settings:
- What is the type of this trigger?: Intent recognized
- What is the name of this trigger (RegEx):
WeatherRequested - Please input regex pattern:
weather
The text entered in the regex pattern text box is a simple regular expression pattern that will cause the bot to look for the word weather in any incoming message. If “weather” is present, the message becomes a recognized intent and the trigger is initiated.
- Now that the trigger is created, you need to configure an action for it. In the authoring canvas for the trigger, select the + symbol under your new WeatherRequested trigger node. Then in the list of actions, select Dialog Management and select Begin a new dialog.
-
With the Begin a new dialog action selected, in the properties pane, select the GetWeather dialog from the Dialog name drop-down list to start the GetWeather dialog you defined earlier when the WeatherRequested trigger is recognized.
The WeatherRequested activity flow should look like this:

- Restart the bot and open the web chat pane.Then restart the conversation, and after entering your name, enter
What is the weather like?. Then, when prompted, enter a city, such asSeattle. The bot will contact the service and should respond with a small weather report statement. - When you have finished testing, close the web chat pane and stop the bot.
Handle interruptions
A well designed bot should allow users to change the flow of the conversation, for example by canceling a request.
-
In the Bot Composer, in the navigation pane, use the … menu for the WeatherBot dialog to add a new trigger (in addition to the existing WelcomeUsers and WeatherRequested triggers). The new trigger should have the following settings:
- What is the type of this trigger?: Intent recognized
- What is the name of this trigger (RegEx):
CancelRequest - Please input regex pattern:
cancel
The text entered in the regex pattern text box is a simple regular expression pattern that will cause the bot to look for the word cancel in any incoming message.
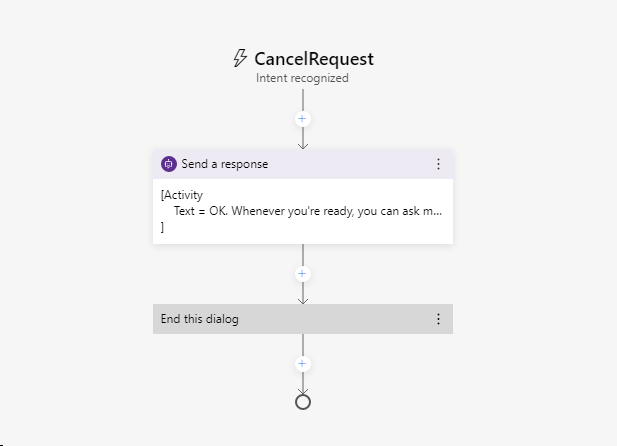
- In the authoring canvas for the trigger, add a Send a response action, and set its text response to
OK. Whenever you're ready, you can ask me about the weather. -
Under the Send a response action, add a new action to end the dialog by selecting Dialog management and End this dialog.
The CancelRequest dialog flow should look like this:
Now that you have a trigger to respond to a user’s request to cancel, you must allow interruptions to dialog flows where the user might want to make such a request - such as when prompted for a zip code after asking for weather information.
- In the navigation pane, select BeginDialog under the GetWeather dialog.
- Select the Prompt for text action that asks the user to enter their city.
- In the properties for the action, on the Other tab, expand Prompt Configurations and set the Allow Interruptions property to true.
- Restart the bot and open the web chat pane. Restart the conversation, and and after entering your name, enter
What is the weather like?. Then, when prompted, entercancel, and confirm that the request is canceled. - After canceling the request, enter
What's the weather like?and note that the appropriate trigger starts a new instance of the GetWeather dialog, prompting you once again to enter a city. - When you have finished testing, close the web chat pane and stop the bot.
Enhance the user experience
The interactions with the weather bot so far has been through text. Users enter text for their intentions and the bot responds with text. While text is often a suitable way to communicate, you can enhance the experience through other forms of user interface element. For example, you can use buttons to initiate recommended actions, or display a card to present information visually.
Add a button
- In the Bot Framework Composer, in the navigation pane, under the GetWeather action, select BeginDialog.
- In the authoring canvas, select the Prompt for text action that contains the prompt for the city.
- In the properties pane, select Show code, and replace the existing code with the following code.
[Activity
    Text = Enter your city.
    SuggestedActions = Cancel
]
This activity will prompt the user for their city as before, but also display a Cancel button.
Add a card
- In the GetWeather dialog, in the True path after checking the response from the HTTP weather service, select the Send a response action that displays the weather report.
- In the properties pane, select Show code and replace the existing code with the following code.
[ThumbnailCard
    title = Weather for ${dialog.city}
    text = ${dialog.weather} (${dialog.temp}°)
    image = http://openweathermap.org/img/w/${dialog.icon}.png
]
This template will use the same variables as before for the weather condition but also adds a title to the card that will be displayed, along with an image for the weather condition.
Test the new user interface
- Restart the bot and open the web chat pane. Restart the conversation, and after entering your name, enter
What is the weather like?. Then, when prompted, click the Cancel button to cancel the request. - After canceling, enter
Tell me about the weatherand when prompted, enter a city, such asLondon. The bot will contact the service and should respond with a card indicating the weather conditions. - When you have finished testing, close the emulator and stop the bot.
More information
To learn more about Bot Framework Composer, view the Bot Framework Composer documentation.